

 Note: This post is from 2016…. our car design has gone through lots of iterations since that time. You can find our newest design here.
The first year of our class, when we studied Cars, our lead teacher found wooden cars with turning wheels that kids could paint. This was a fun and easy art project, but at $2 per car, it was pricier than most of what we do. And, it was just an art project, not a STEM project. We also decorated big cardboard box cars we could use for a “drive-in movie.” It’s a very fun art project…
I decided that I wanted to do an Engineering project, where the kids BUILD a car that rolls.
I’m going to share my design process in the top half of the post for those who enjoy seeing the steps in the process. If you just want my conclusions on how to build a car project, check out these tutorials / directions for the simplest option, or for clothespin racers, or cars powered with a retractable badge holder, or my 2021 edition that’s evolved from what I write about here.
Criteria: Our students range in age from 3 – 7. I was looking for a project that our 5 – 7 year olds could do independently, with assistance with perhaps just a couple quick tasks. I expected our 3 and 4 year olds would need a fair amount of help from their parents or a teacher. The materials need to be affordable. As a non-profit that tries to keep our tuition low, it’s something I keep in mind. We do like to use items from the recycle bin when possible, but we also have to consider whether we can get enough of them for 36 kids to do a project. (So, when we’re talking wheels for cars, that means 144 items!) It couldn’t involve a crazy amount of prep work for my co-teacher and I. (So, not cutting out 144 circles…) And it had to produce a fun and usable product that was not too delicate to be played with.
Gathering Ideas
I turned to the internet for initial ideas. Here’s what I found. (Note: some of these cars are “motorized” and given mechanisms that help them move independently. I’ll write about that in a separate post – this is just about building the body and wheels of a car that can roll down a ramp.)
 Almost Unschoolers – Body: clothespin; axle and wheel: Straw casing, bread tie and button wheels. Assemble: run bread tie through straw, loop bread tie through holes in buttons or the loop on the back of the buttons; Clip clothespin over one straw, slide the other straw in the back, add tape so it can’t slip out. My thoughts: minimal prep, looks doable for little ones… would buttons roll well? Could I sub pipe cleaner for bread tie? Price of buttons?? Price of clothespins?
Mr. Inquiry – very similar design – clothespin body. Straw casing, toothpick axles and button wheels.
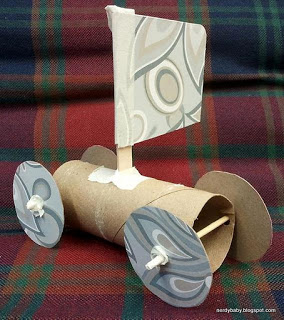 Nerdy Science – Body: TP tube. Axle and wheel: BBQ skewer and circles cut from cardboard (kleenex box). Assembly: holepunch the TP tube and wheels. Run skewer through, tape wheels in place on the skewer. (Optional: add sail). My thoughts: easy to assemble, cheap materials. Lots of prep time cutting circles. Not very durable for playing with, and how well do wheels roll? Guessing it won’t roll down a ramp on its own.

Make it @ the Library – Body: paper towel tube. Axles: pencils. Wheels: cardboard circles in the front, CD’s with taped wheel hubs in the back. Assembly: Punch holes in tube for axles. Put pencil through front holes, add cardboard wheels. Put pencil through the back, wrap tape around enough times to fill the holes on the CD, mount the CD wheels. My thoughts: get pencils from the dollar store to make them affordable. Source for CDs? (I know I can get 100 brand new blank CD’s for $16. But that seems environmentally questionable… I’d rather get some from somewhere that was disposing of old used CD’s.) Cutting out front wheels = lots of prep work! Pretty doable, though wrapping the tape might be a challenge. [Can be motorized with rubber bands.]
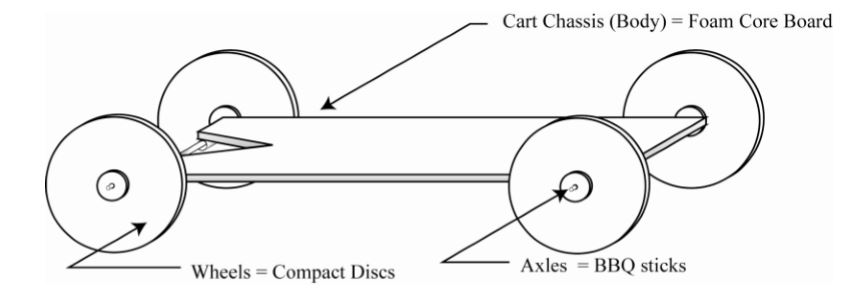 RAFT (Resource Area for Teaching) – Rolling Explorations. Body: foam core board (or cardboard or corrugated plastic). Wheels / axles: straw casing, BBQ skewer axle, CD wheels. Wheel hubs made of cardboard – glue to the CD so there are smaller holes in the CD to run the skewers through. Assemble: tape straws to body. Run skewers through straw and wheels. Thoughts: easy to assemble. Lots of prep time cutting bodies and wheel hubs. Would need to have lots of CDs! (Could be motorized with a mouse trap.)
 RAFT – Car on a Roll. Body: corrugated plastic or cardboard. W&A: Straw casing, coffee stirrer, foam wheels. Assemble: tape straws on, run coffee stirrer through straw, mount foam wheels. Thoughts: Easy! Where do I get foam wheels??
(Note: you can buy kits, $12.99 for 10 cars: www.raftstore.net/index.php?route=product/search&search=car)
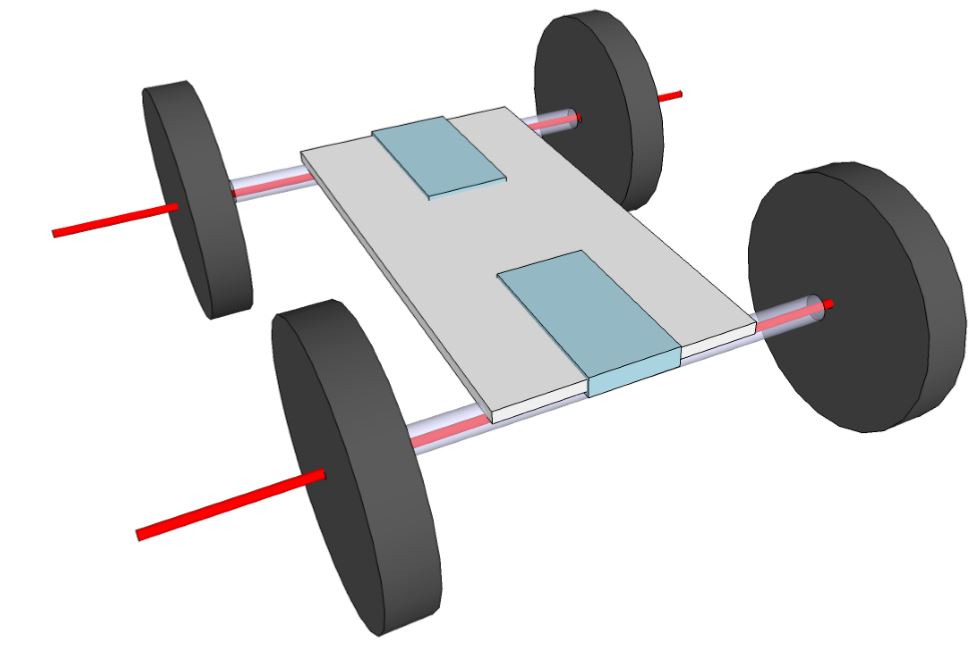
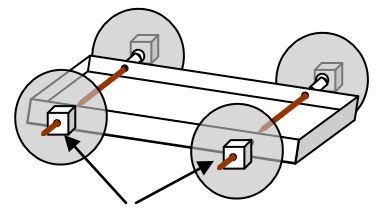 RAFT – Cart the Box. Body: cardboard box or lid (width needs to be less than skewer length). Axles: bamboo skewers, wheels: CDs; Assembly – glue foam blocks over holes in CD. Put skewers through box, then through straw spacers, then into the foam blocks in the CD. Thoughts: need to collect boxes / lid; prep foam blocks (or other wheel hub), buy lots of CD’s; side benefit – box can carry a load.
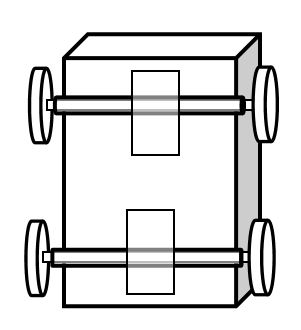
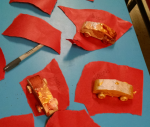
RAFT – Fender Bender Boxcars. Body – use a rectangle of stiff paper, make four cuts, bend flaps up and tape to make a box. Wheel and axles: tape straws on bottom, thread smaller straws through them, attach to plastic wheels. Thoughts: Easy. flimsy?? What to use for wheels….
 RAFT – File Folder Retractor Car. Body – fold and assemble a hanging file folder in complicated ways. (I confess, I skimmed the directions, and it just seemed complicated.) Axles – bamboo skewers. Wheels: CDs, with hubs made of tightly wrapped paper – again too complicated for little kids to make.) (Can be motorized with retractable badge.]
 RAFT – Retractor Car. Body – Corrugated cardboard. Axles – bamboo skewers run through the channels in the corrugated cardboard, with wire nuts / plastic cones. Wheels – plastic or paper cup lids with foam circle hubs. Assembly: Run skewers through cardboard channels. Cap off each skewer with a wire nut. Poke holes in foam circles, stick to lids, mount on skewers. Thoughts: source for lids? for foam circles? Cost of wire nuts? (Can be motorized with retractable badge.) RAFT sells kits for these – $30 for supplies for 10 cars: http://www.raftstore.net/educational-kits/retractor-car.
A couple other ideas – the sources didn’t have pictures….
- put coffee stirrer straws inside a regular straw; get bottle caps, drill holes in center, and thread coffee stirrer through hole… thoughts – would need to collect bottle caps
- Could order wooden wheels
and 1/4 dowels from Amazon. Easy! But not materials parents would have easy access to at home, plus cost ~ $1.60 per car.
- I also tested plastic bobbins (no traction!) and wooden spools
(lacked traction and each bag of spools only had a few the right size to mount on a wooden dowel.)
- I also found these plastic pulley wheels
on Amazon that I want to test. Good news: 30 pieces for $2.52! Bad news: they were itty bitty!! (much smaller than a dime)
Summary of options found:
Options for Car Body = clothespin, TP roll, paper towel roll, flat piece of cardboard / foam core / corrugated plastic; box, or paper folded into box. I knew I wanted to build a car that was capable of using a retractable badge clip for a motor, so I needed a sturdy body to withstand that.
Options for Wheels = buttons, paper circles (lots of prep!), CD’s (where to get, plus challenge of making hole smaller to mount on a skewer or dowel), wooden wheels, foam circles (where to get other than with RAFT kits?), cup lids, bottle lids, spools, bobbins. Again, if I wanted to motorize the car, I’d need wheels with traction. And, I needed minimal prep time. I recently found these plastic wheels and axles that I plan to test.
Axles = bread tie inside straw, toothpicks inside straw, pipe cleaner inside straw, BBQ skewer through holes in toilet paper tube or box, skewer through straw, dowel, coffee stirrer in straw, run skewer or dowel through the channels in corrugated plastic or cardboard. Note: I tested pipe cleaner axles, and I found that every time I tried to bend them to attach to a wheel, it would bend the center section and they wouldn’t roll smoothly.
“Motors” – mousetrap, retractable badge, mechanism from pull-back car, rubber bands.
Simplest Option
If you’re looking for a simple art project that preschool age kids can do, then I would either:
- Start with the Nerdy Science idea: kids decorate TP tubes, you punch four holes in each, run skewers through, then you mount on cardboard circles. (If you’re lucky, you have a die cut machine to prep these!) Not terribly durable, but easy and cheap.
- Use small boxes for the bodies (or fold your own like Fender Bender boxcars), tape straws to the bottom to serve as “bearings” for the axles. Use smaller straws or skewers for the axles. Attach to buttons or cardboard circles.
I wanted to be able to motorize our cars, so neither of these options was sturdy enough for me. I did lots of testing, revising, re-building… tinkering… I ended up with two options I’m considering for this weekend’s class.
Our Final Projects
- Using a clothespin body like Almost Unschoolers. Dismembering a pullback car to use for the wheels, axles, and motor. Tutorial here.
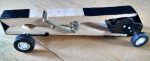
- A design inspired by several of the RAFT ideas: I’m using corrugated plastic for the body (cardboard would also work), straws for bearings, dowels for axles, and wooden wheels. We’ll motorize it with a retractable badge holder. Tutorial here.
Tinkering Method You could also do this as a pure tinkering activity – on a table, put one bin full of options for car bodies, a bin full of options for wheels, another container with possible axles, and let the all be creative, building cars from scratch.
Testing Your Cars
Once the kids have build their cars, set up a test track… a nice long ramp and measuring tape so they can measure how far their car travels.
After testing, you may need to “tinker” – adjust variables to help the cars roll better.
Really lightweight cars often don’t roll well. Adding a little weight can help. Depending on your design, you could place weights in your car (like pennies, glass blobs, washers…), tape or glue them on, or clip on big binder clips or paper clips.
Traction can be a big problem. If there’s too much friction, your car won’t roll (so rough-edged cardboard wheels might have problems. Can you smooth them?) If there’s not enough friction, the car might skid down the hill, but it won’t roll. (If your wheels are too slick, can you add traction to your wheels? Or add friction to the surface… cars might roll better on fabric or sandpaper than they do on smooth wood, metal, or cardboard.)
What’s your favorite car design for kids?

[…] Designing a Car – Preschool Engineering […]
LikeLike
[…] Designing a Car – Preschool Engineering […]
LikeLike
[…] a car that rolled. I explored lots of different ideas – learn about them all in this post: Designing a Car Project. They range from very simple cars built of toilet paper skewers and cardboard wheels to much more […]
LikeLike
[…] few weeks ago, I wrote about the process I went through designing a car that kids age 3 to 7 could build in my Family Inventors’ class. Now, for our upcoming session […]
LikeLike
[…] Challenge: Build a car that can move. […]
LikeLike
[…] car: We made cars, then we “motorized” them with a retractable badge holder. With one inch wheels, it […]
LikeLike
[…] few years ago, I went to a lot of work to design a car project for my class. (You can read about the design process and/or just read the tutorial for our final design.) It is a fine project – pretty doable […]
LikeLike
[…] Challenge: Build a car that can move. […]
LikeLike
[…] OK. You could also use wooden wheels and dowels as we did in our other car design, or use these other ideas for wheels like bamboo skewers and plastic […]
LikeLike