
 This post is a comparison of two modular electronics kits aimed at young children. We used both in the session of our Inventors’ Lab class where we talked about Electricity. (Note: I’ve also added some thoughts on Cubelets at the bottom of this post.)
Snap Circuits
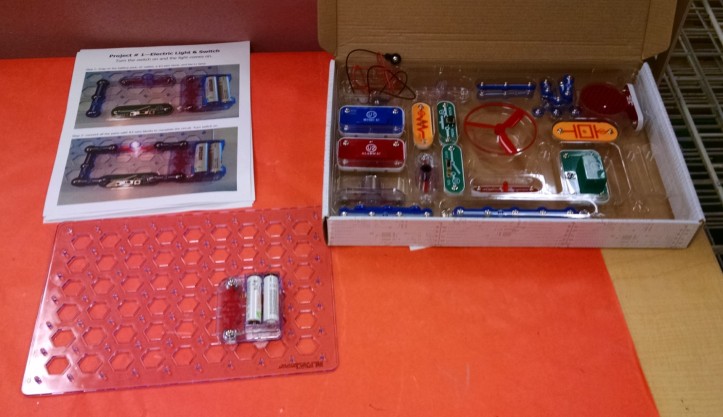
What are Snap Circuits? Modular electronic components that snap together. You first lay out the configuration you want by snapping components onto a base plate – this helps keep things evenly spaced. Then you connect them by snapping on wire modules to close the circuit. Here is a photo of a basic configuration with a switch and a light.

What are the components in the system?
They are plastic “building blocks” with metal snaps that click together. Blocks include:
- Power source block for the batteries
- Switch blocks – slide switch and press switch
- Resistors
- Lamp blocks, motors, music blocks, speakers
- Wire blocks of different lengths, ranging from one snap to six. These are just used to connect other components to transport electricity. There are also jumper wires which allow more flexibility.
Circuits need to always include: a battery block and at least one component that limits the current through a circuit, such as the speaker, lamp, motor, or resistor. (If a child uses wire blocks to connect the two terminals of the battery, either directly with one wire block, or with a circuitous path of wire blocks, it will cause a short circuit. Short circuits can damage components or drain your batteries.)
Instructions:
Elenco, the company which makes Snap Circuits, has been making kids’ electronics sets for many years – they were founded in 1972. They do many things very well. But, in attempting to be very scientifically accurate in their descriptions, their documentation is too high level for the intended user (kids age 7 and up). As an example, instead of describing something as a light sensor, and describing in simple terms “if you shine a light on it, it will allow electricity to flow through it”, it says: “the photoresistor is a light-sensitive resistor, its value changes from nearly infinite in total darkness to about 1000 ohms when a bright light shines on it.” Here’s a sample page. (Click on picture for a closer look.)

Many of their details will be great someday when your kid is a 13 year old electronics geek who wants all the details. But, they’re mostly useless to a 7 year old who just wants to assemble circuits.
The assembly instructions for the projects are done as diagrams primarily, with some text next to them. The text might offer information about the assembly, or it might talk about the science of what you’re doing, but it’s never step-by-step instructions.
You rely on the diagrams to learn how to assemble the projects. But unlike LEGO instructions, which break things down into several steps, these show the fully assembled circuit. The components are labeled with a 1 or 2 to show whether they’re in the first layer you lay down or the second (or third…)
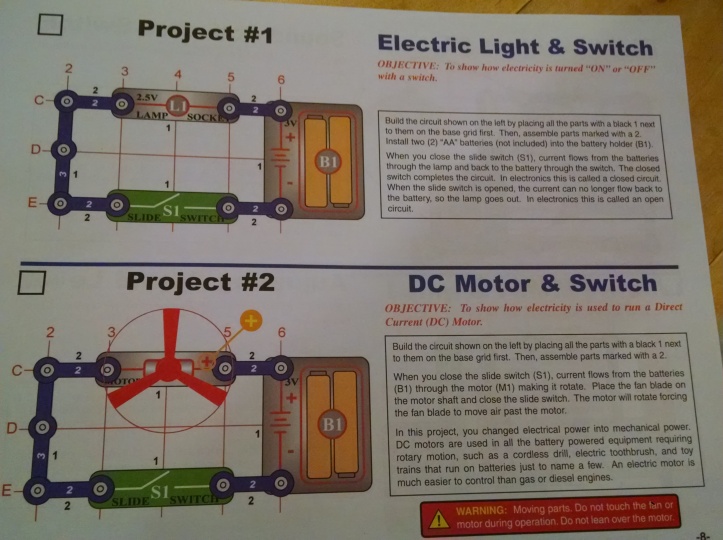
For my almost 5 year old son, and for the 3 – 7 year olds in my class, these instructions are simply not comprehensible.
I wrote my own set of simplified instructions for the first several projects, which
1) change the description of the project from a technical objective to something which is easier to grasp and more appealing to a child (e.g. “to show how electricity is used to run a direct current (DC) motor” becomes “Turn the switch on and the motor runs the fan.”)
2) Add simple step-by-step instructions
3) instead of the multi-layer diagram, break it down into pictures which show the first layer, then the first with the second added on, and so on.
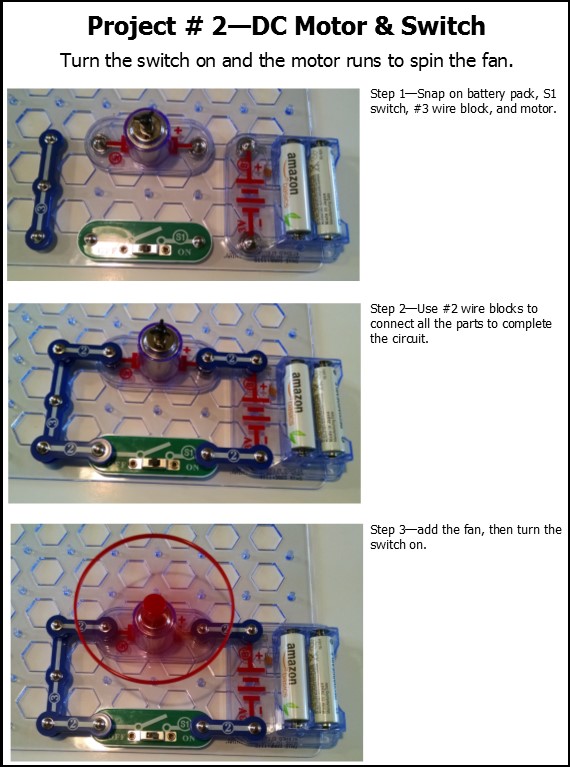
Here are cards that you can print and use with simplified instructions for 6 simple circuits.
When we used Snap Circuits in class, we set the kit out with the cards describing 6 different projects and encouraged them to try building them. Some also experimented with their own designs. From time to time, one of the teachers would go over and disassemble and tidy up projects so that the next child who wanted to play could find the items they needed.
Age: Manufacturer rates as age 7 and up. In our class, we saw that our 3 – 4 year olds liked watching their parents assemble circuits, but they weren’t following the science of how the circuit works, and their fine motor skills and finger strength just weren’t up to the task of assembling circuits. Our 5 – 7 year olds fared better, but it was definitely a fine motor challenge. These older kids could follow the directions that I wrote (see above) but can’t follow the single-illustration instructions that appear in the book. Older children would be better able to work directly from the book.
Where to Start: We’ve got the Snap Circuits Jr. Discovery Kit which has 30 parts, and instructions for 100 projects. It’s plenty to get you started.
Cost: The Jr. Discovery kit is only $17.50, so it’s easy to jump into this system. Their most expensive non-classroom-pack kit is the Snap Circuits Extreme SC-750 which is $71.
Expandability: There are many kits of Snap Circuits, with many components. There’s a lot you can do with them. The Snap Circuit Jr. kit has over 100 projects, including Lights & Police Sirens; Bomb Sounds, Alarm Circuit, Musical Doorbell, Spin Draw. Plenty of things to learn and discover. But, in the end, your constructions are limited to a 2 dimensional circuit attached to a baseboard, and can’t offer the range of opportunities that littleBits offer.
Summary: If you’re looking for an affordable electronics kit for a geeky kid, age 7 – 12 who loves just sitting and building electronic circuits, this is a great product!
littleBits
What are they? littleBits is kind of the Lego of electrical circuits. It’s a modular system.
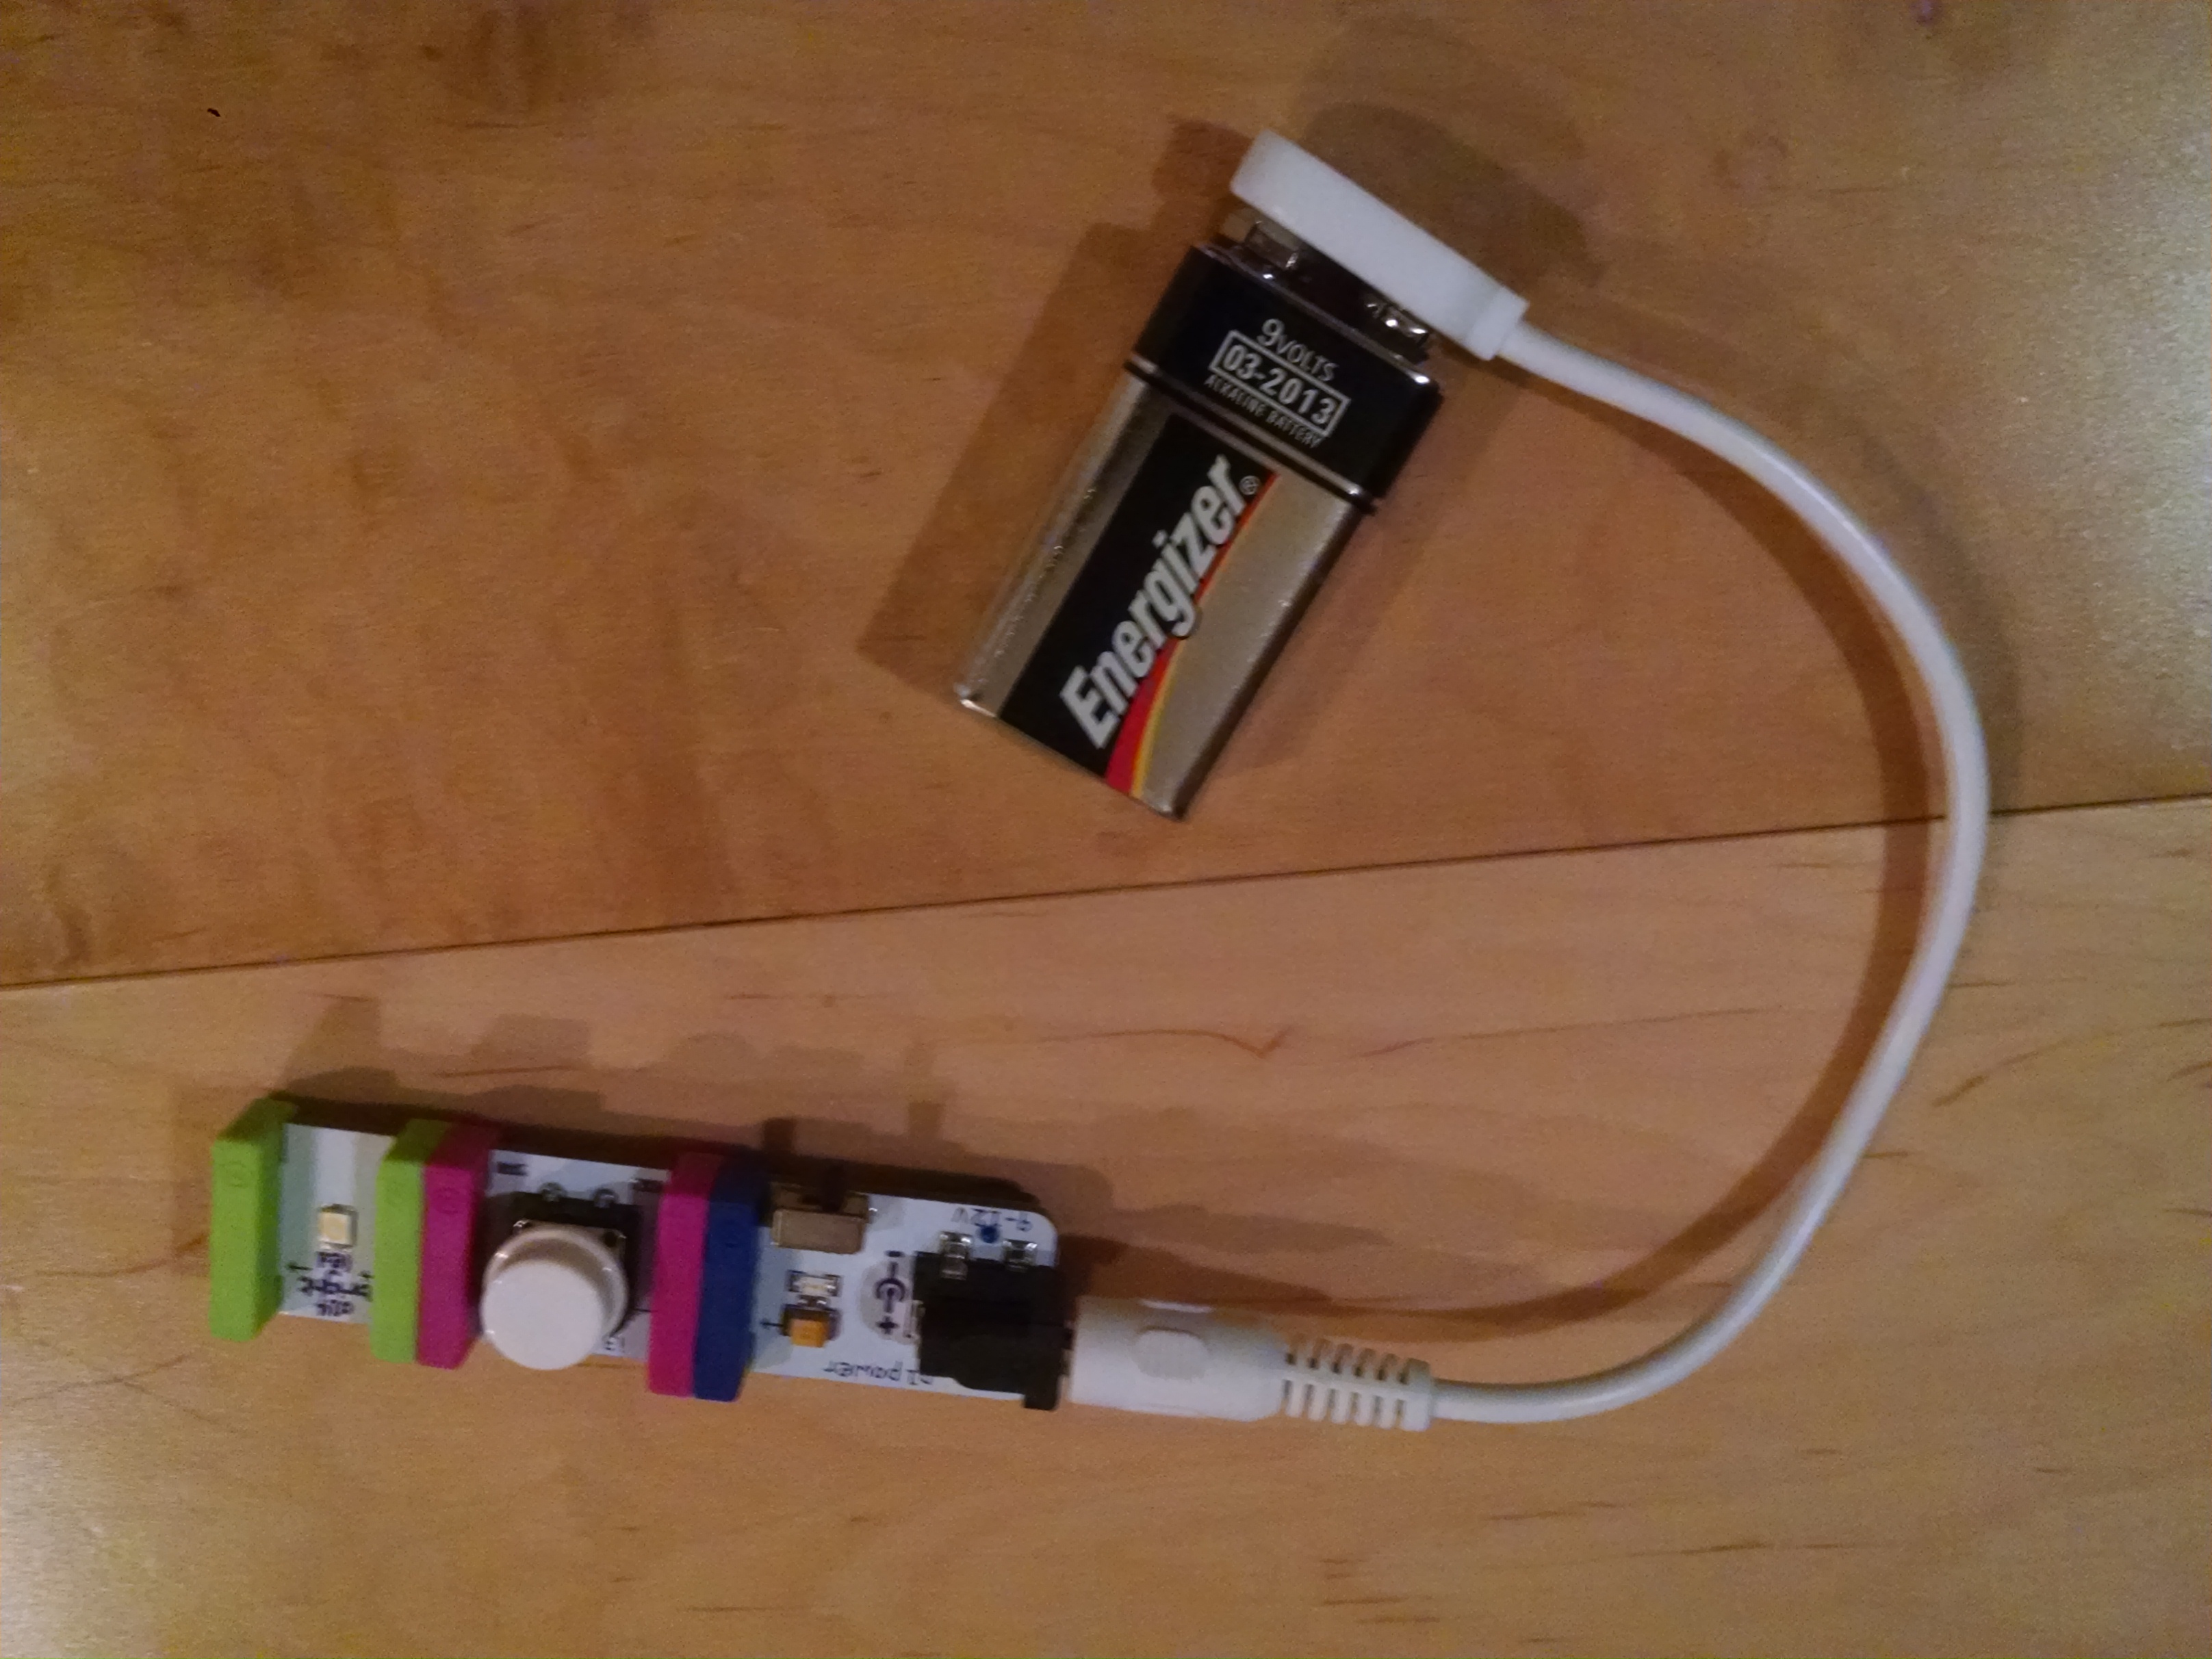
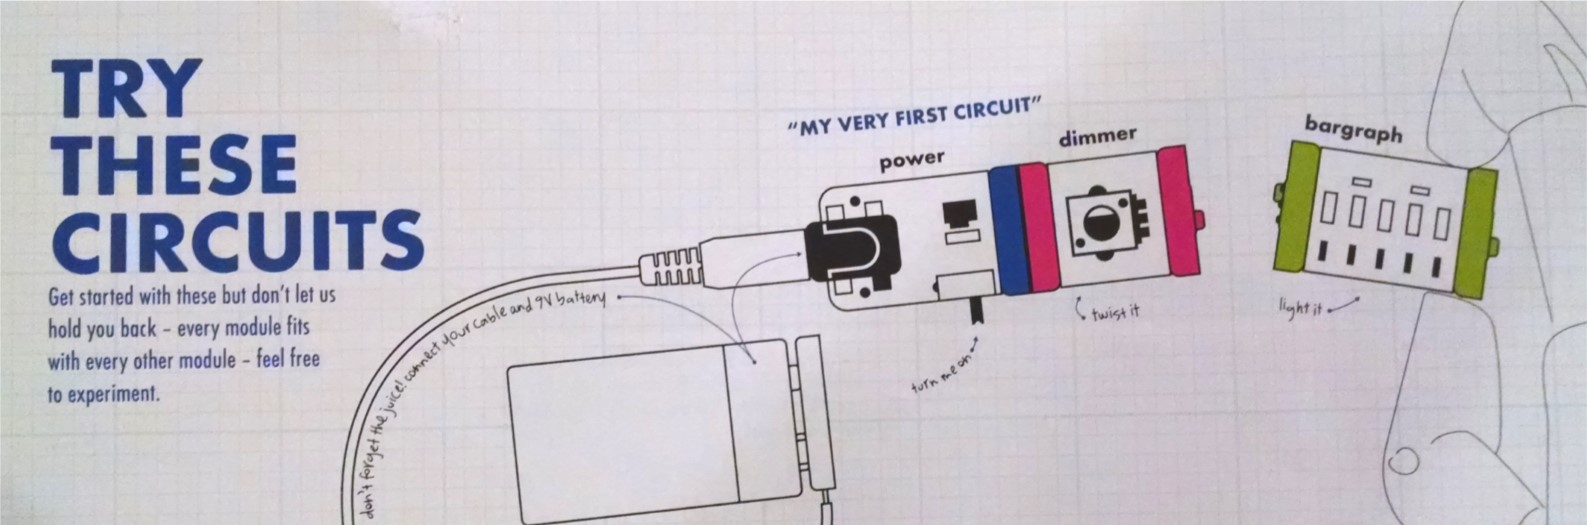
Here is a basic configuration: power cell, input switch (a push button) and an output (a bright LED light.)
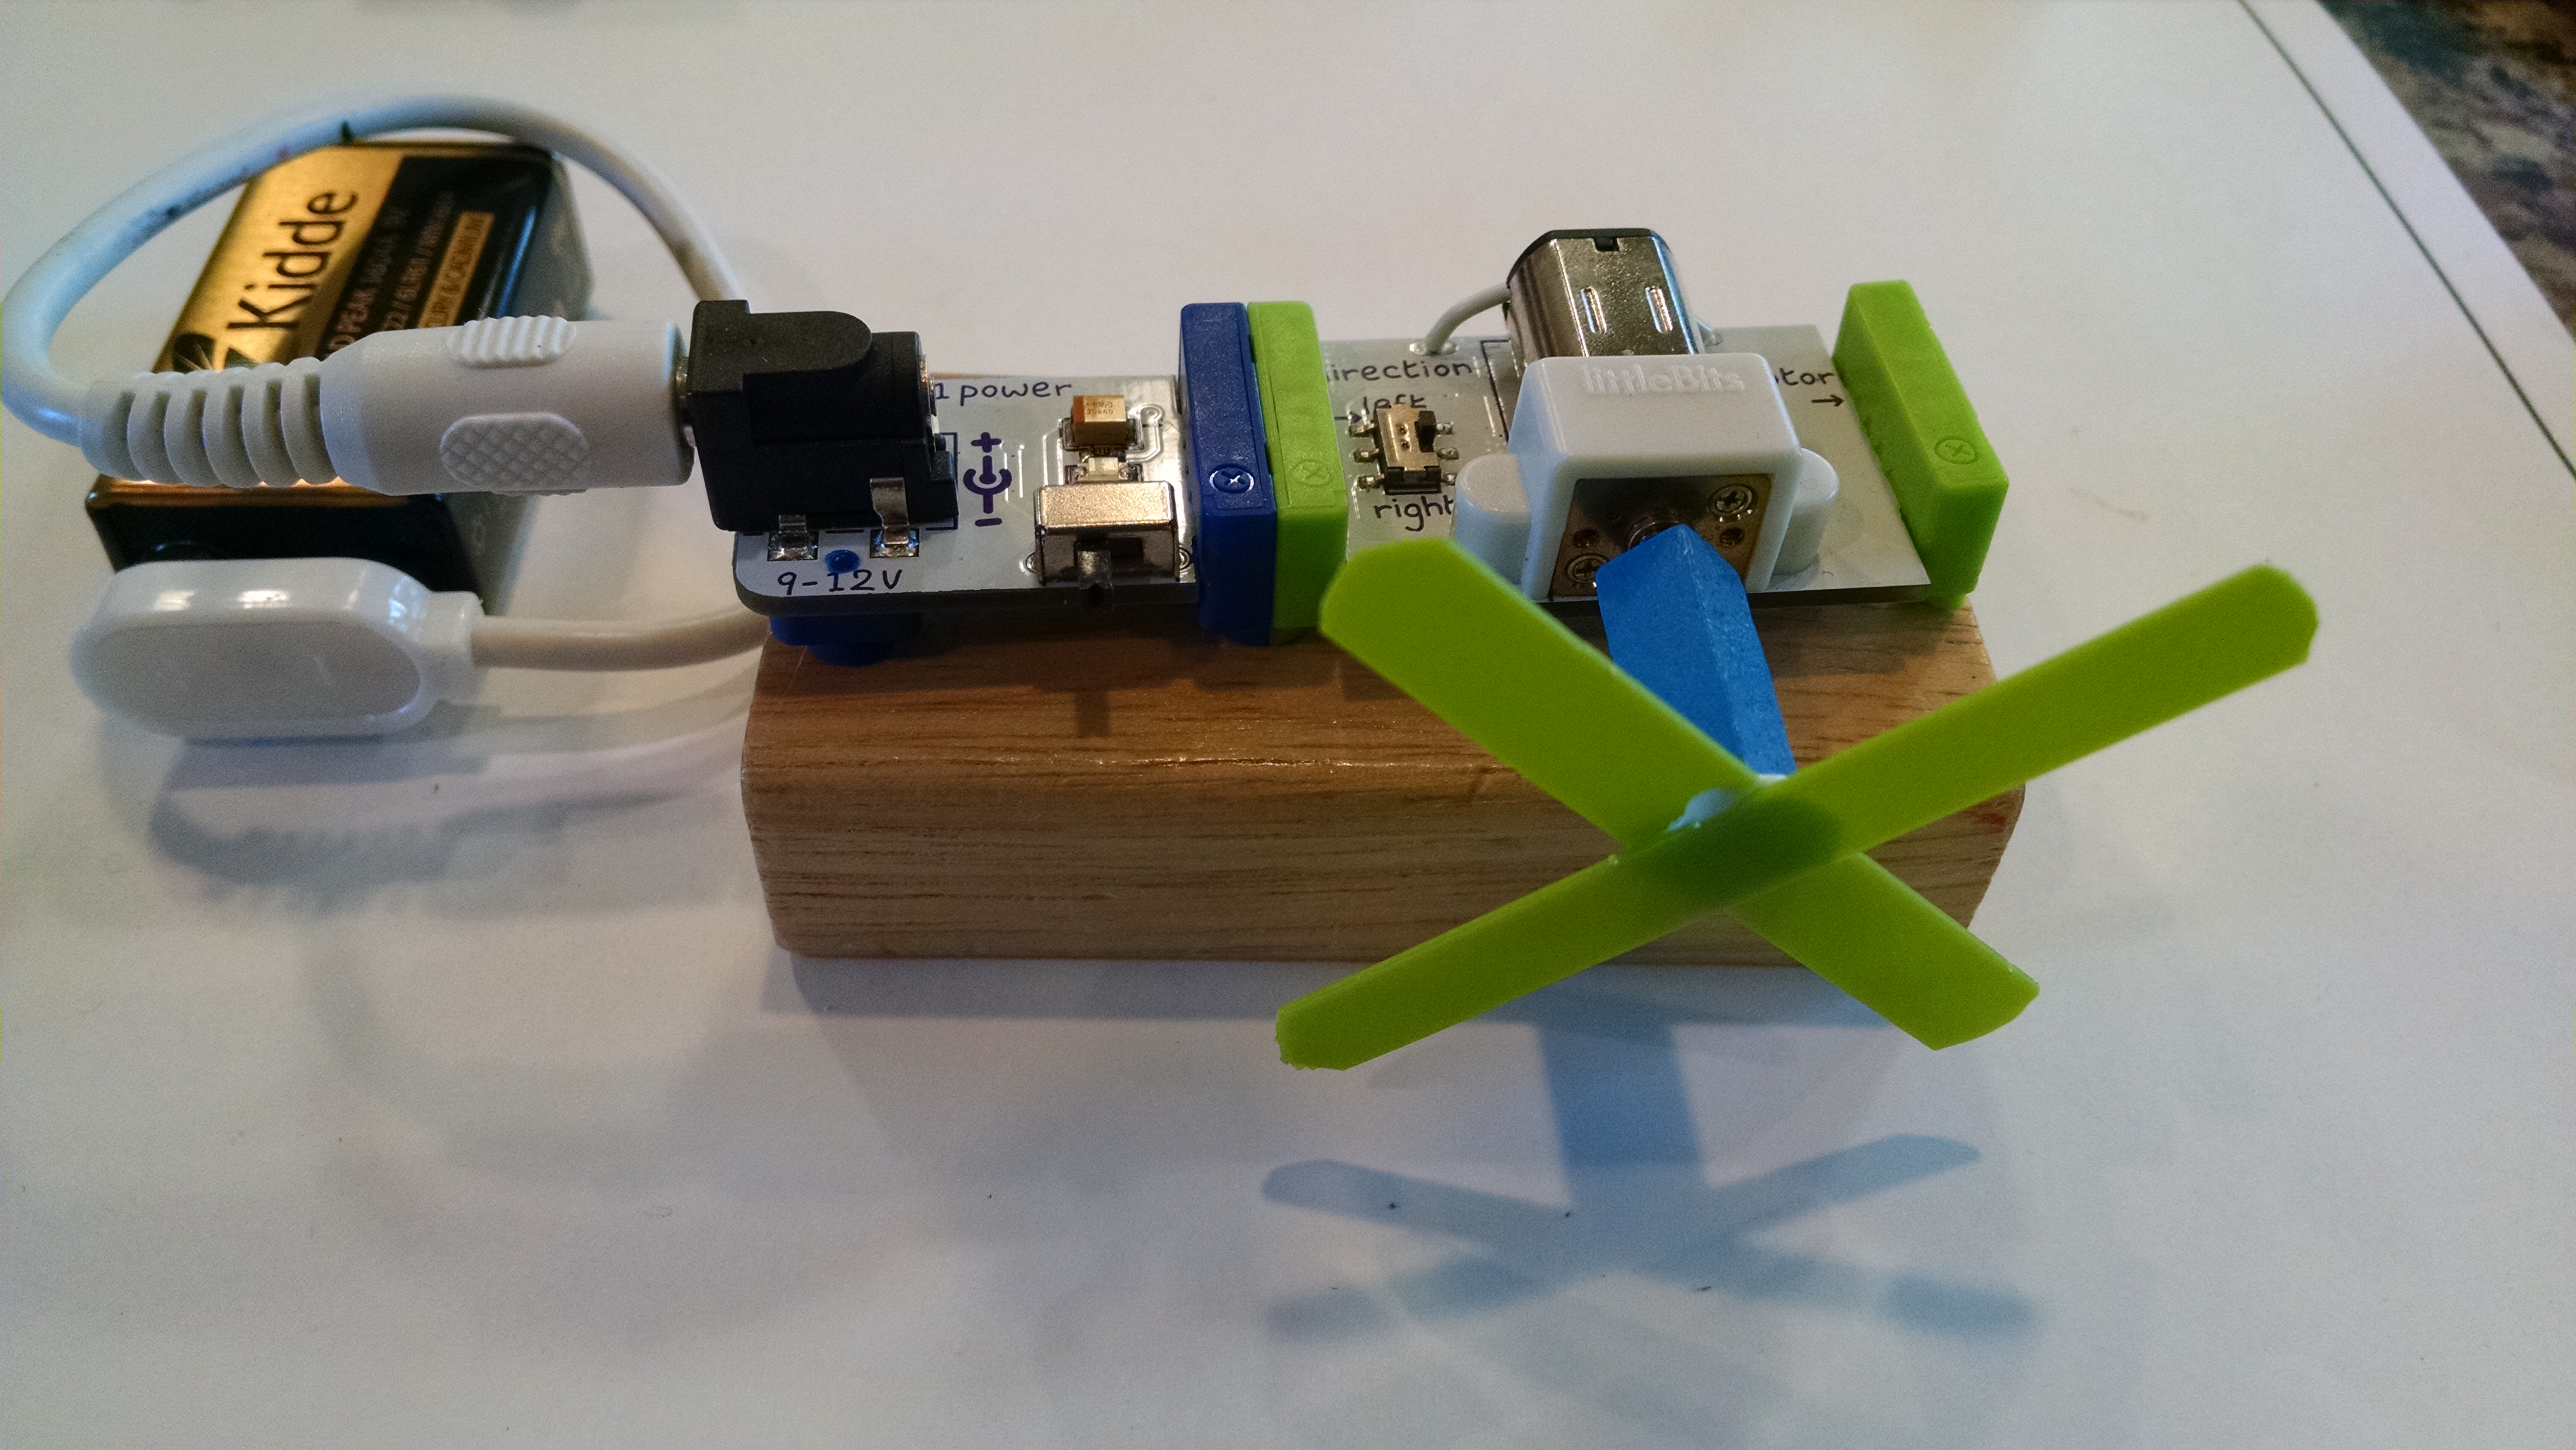
This is a simple “project” hooking together the power cell and a motor. I built a propeller using a blue bead and green plastic to mount on the shaft of the motor. I set the motor on a wood block to give the propeller room to turn.
What are the components in the little Bits system?
The pieces are color coded by type:
- Blue for power – the power switch you attach to the battery or to a USB cable.
- Pink for controls – These pieces respond to inputs such as sound, light, or pressure to affect the flow of current. Button, dimmer switch/ volume control, sound activated switch, light sensor switch, remote controllable switch, oscillator, etc.
- Green for outputs / actions – These modules do something. Lights, buzzers, motors, fans, speakers, etc.
- Orange for wires – Include a simple wire that just lets you separate your bits by a few inches, and a splitter, where two inputs can connect to one output. Then all sorts of components from inverters to USB I/O to MIDI.
A slogan in the instruction book is “you always need a blue and green. Pink and orange are optional in between.”
The color coded blocks snap together with magnets. They only go together the “right” way. If you try any other direction, the magnets repel each other. This ensures that the circuit will work, and you can’t short circuit.
The order you assemble components in matters: the pink inputs only affect components that come after them in the circuit.
Instructions: The base kit comes with an instruction book to explain the basics, and some simple configurations of bits.

For our class of 3 – 7 year olds, I thought having many ideas all on one page might be confusing to them, so I made up a set of 8 cards with photo instructions for 8 simple configurations of bits. (Feel free to print and use: littlebits PDF.) We set out the cards with a couple trays that let us sort bits by type so the kids could collect what they needed to assemble each project. For the 3 – 4 year olds, I would sit with them and explain the basic ideas to them and explore with them. The 5 – 7 year olds could do this self-guided.


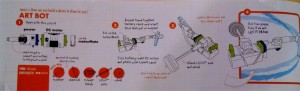
The instruction book also contains “ideas to get you started” on projects – other things you can invent by combining your littleBits with a wide variety of materials. The goal is to encourage tinkering. One of the sample projects they offer is the Art Bot. (Click on the thumbnail below for a larger image.)
My son’s favorite project was a joy buzzer called the Prank Handshake, which involves fastening the battery pack to your arm with rubber bands, running a wire down to a button input in your hand, and then another wire up to the buzzer. Everything is held in place with rubber bands, and you slide your sleeve down to cover the power and buzzer.
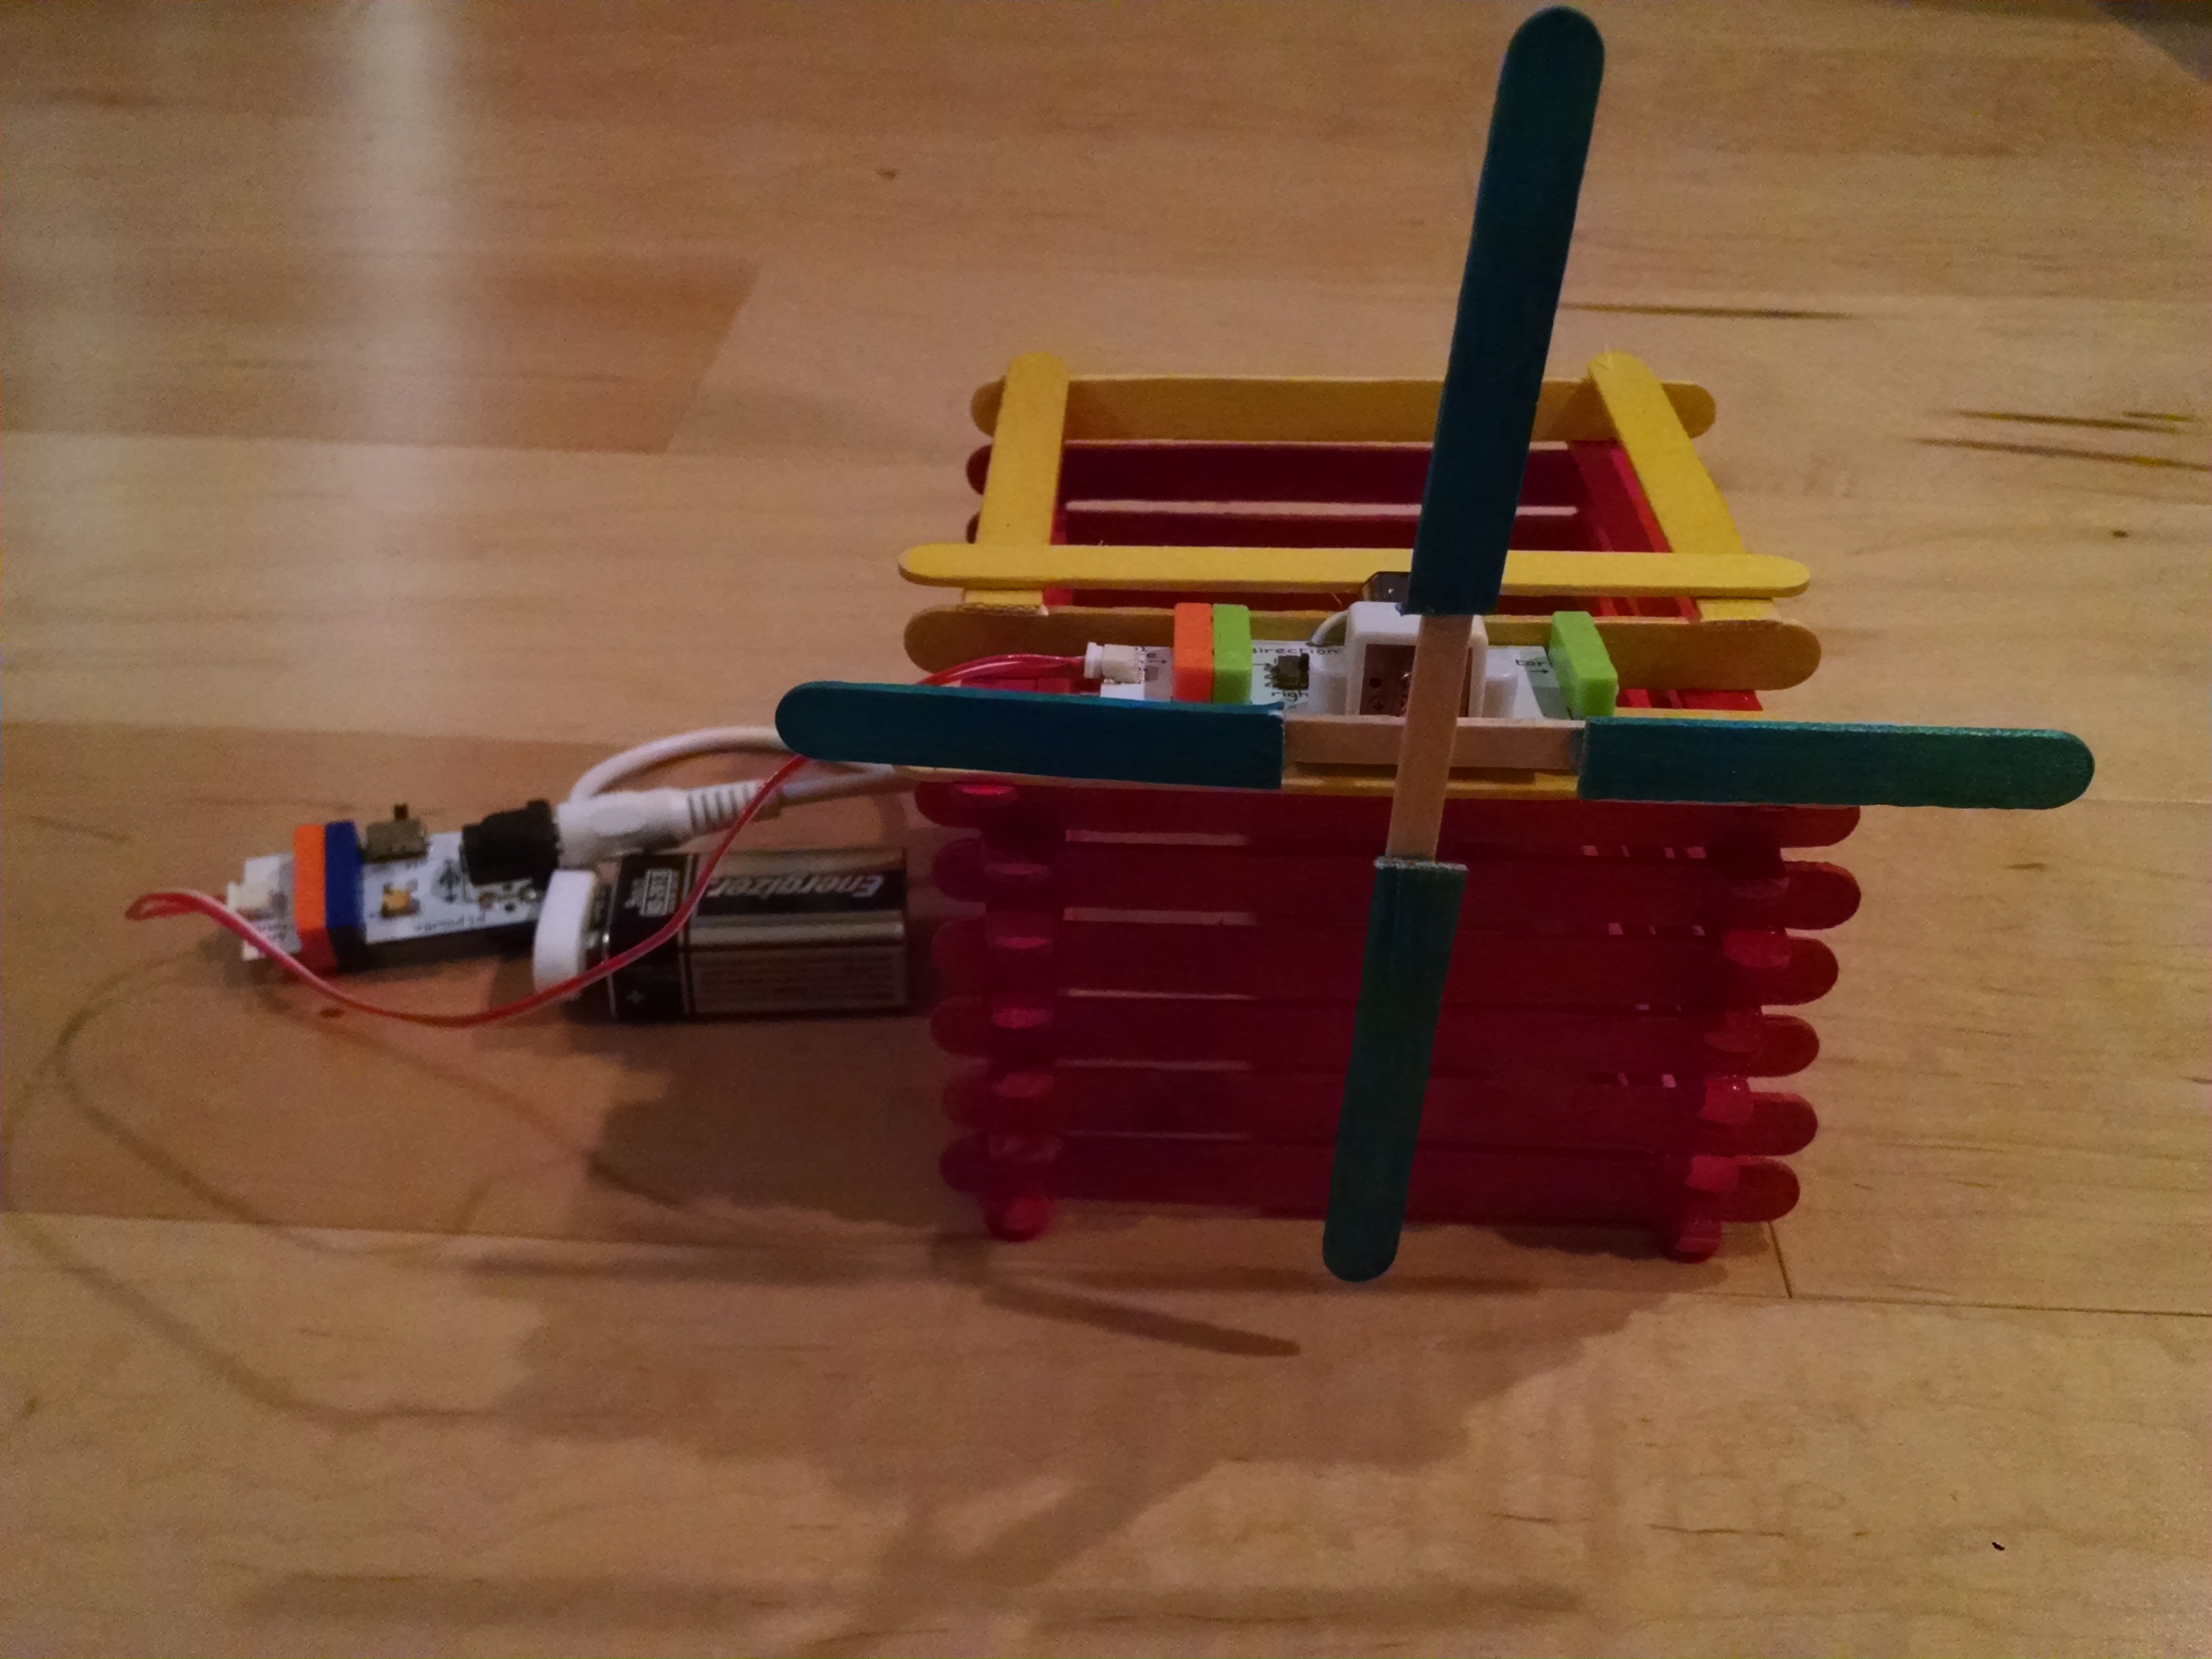
We’ve played with this expandability a little. For example, we built a windmill with popsicle sticks, then created a simple set-up of a power module, wire, and motor and mounted the propeller on the shaft of the motor. When you turn on the power, the propeller rotates.
Age: The manufacturer says they’re for ages 8 and up, but my five year old can do every project that was in the instruction book, and come up with some of his own ideas. Even the 3 year olds in my class could handle the basic concepts. I don’t think there is a maximum age. When I look at all the possible components and project ideas, I think this system could continue to intrigue and challenge people of all ages.
Where to start: We have the littleBits Electronics Base Kit.
Cost: Here’s the downside to littleBits. They’re really pricey! When I bought the base kit in 2015, it was $100. It’s now $229. They do have a few basic starter kits in the $35 range, like a Bubble Bot and some in the $80 range, like the Base Inventor Kit
. You can also buy individual components at the littleBits store, for anywhere from $5 to $50 depending on what you buy. When I put them out in class, I’m really crossing my fingers that none get lost or stepped on.
I can’t attest much to durability – they seem pretty sturdy, but since my boy wore his joy buzzer around a lot, the button component has been flaky, and I think one of the wires was damaged. The light sensor has a small screw to adjust the sensitivity – the kit comes with a little plastic screwdriver, but it got dinged up in one or two uses, so we use a metal one, but I worry about stripping the head of the screw.
You could also build your own DIY littleBits if you’re confident with a soldering and working with wiring. Tutorials at: http://www.instructables.com/id/DIY-littleBits-Introduction/
Infinite Expandability: The cool thing about littleBits is how you can use them with a huge range of other materials to create all sorts of fun projects. Because you’re not soldering anything together, it’s easy to take apart, re-assemble, test, take it apart and assemble it differently until you get the result you want. I’ve barely begun to play with this expandability, so will just share here some other people’s ideas:
At http://littlebits.cc/projects, littleBits users share their ideas. Today’s page there includes:
- Harry Potter inspired projects: an animatronic Hedwig (when a motion sensor is triggered, a servo moves the head and lights flash in the eyes), a Voldemort disarmer, a Parselbot (a wheeled cart that moves an egg-carton snake), and a motorized Lego Hogwarts Express you control with a smart phone
- Halloween challenge winners: a remote control ghost, a haunted house diorama with spinning furniture and flashing lights, and a scary Zombie that can be activated from inside the house to scare off trick or treaters with flashing lights and a scream
- LOTS more!
Boston Tech Mom collects links to 30 top rated littleBits projects for kids, such as an electric toothbrush, box monster, and bubble flute.
A post on lifehacker on how to get started DIY’ing anything with littleBits covers:
- getting started with the cloudBit, which connects your littleBits project to the internet and to other devices, such as a smart phone
- getting started with the Arduino module
- sample projects: get an SMS notification from a doorbell, build a weather dashboard that pulls real-time data from Weather Underground, and make your own MIDI synth
This page on Instructables collects projects like: LEGO house with garage door openers and windmills, a motorized mobile, and a spinning, blinking paper Tardis.
I made a nervous system model with littleBits and Snap Circuits.
Science Education Note: These are not ideal for teaching the idea of a circuit to kids.
In our class, when we take a lantern battery, hook a wire from it to a lightbulb, then another wire from the lightbulb to the other terminal on the battery, kids can easily see and understand the idea of a circuit, and trace around the circle with their finger. In the littleBits, the wiring is hidden from sight, so when a kid hooks a light to the power module, they can’t see how the electrical current is traveling from the battery through the light and back to the battery. It actually could confuse, as when you make a long chain of components, it could be easy to think the electricity just travels out to the end of the line, and not realize that it ever loops back.
They also do not offer any technical details in the instruction book. An Amazon reviewer, Joel Avrunin, noted “I really do wish they would use the technical term instead of the popular one … The dimmer module is a potentiometer/variable resistor. The toy is so easy to use, why not let kids learn the right terms while they play? The light sensor is a nice little device (though they could have called it a photodetector or photodiode).” I agree and disagree… I like the instructions as they are, for making the system seem easy and accessible to kids by not using those technical terms. But it would be nice if there was a supplementary manual for older kids with the “now that you’ve played with them, you want to know more about how they work” approach and all that vocabulary.
Summary: I have to say: I LOVE the littleBits. They’re a great toy that my five year old really enjoys and learns from, plus we can keep them around and re-introduce off and on as he gets older, continuing to take his inventing skills to a new level. And they’re cooler than the nerdy Snap Circuits. But… they’re stupidly expensive! I am hoping that over time, with economies of scale, (and likely competitors) the price comes down. But for now they’re quite pricey.
Cubelets by Modular Robotics
I learned about these when shopping for robots. I think they’re mis-marketing these by calling them robots, as they’re not what most people would think of in that category. But, they are reasonable as competitors for Snap Circuits and LitttleBits in the snap-together electronic components field. You can read more on my thoughts on them in my post about Robot Toys.

What are they? Two-inch cubes that click together with magnets. One is a battery pack, and like littleBits, the current and the “programming” travels through to the others when they’re clicked together.
There’s a good introduction to this system on their website: www.modrobotics.com/cubelets/cubelets-getting-started/
Components: Sense blocks which include a light sensor, distance sensor, a temperature sensor, and a knob. Action blocks include a flashlight, drive – a set of wheels, a bar graph of lights, and a speaker. Think blocks include one that blocks signals going through, a Bluetooth for remote control, inverse, minimum, and maximum cubelets. There are also plates for connecting the blocks with Lego – one’s like the bottom of a Lego that you can mount on top of other Legos, and one is like a top, that other Legos can be built on top of.
Where to Start / Expandability: The Cubelets SIX robot blocks comes with a battery cube, Drive, Flashlight, Distance, Brightness, and Passive Cubelets. It’s $160. Other cubes can be bought in kits, or individually on their website, for around $27 a cube.
Age: They say 4 and up, and the reviews on Amazon confirm it works for kids as young as 3 and that 12 and 13 year olds also have fun with it. (Although they tire over time with the limitations of the system.)
My summary: Looks really cool. I would buy them and play with them. If they didn’t cost $160 for a base set. Just too pricey for me. But, if I’d seen these before buying littleBits, I would have definitely compared the two systems before starting to invest in one.
Pantheon Electronic Blocks
I wanted to like these… they’re really cheap – $40 for a big set, and I think they’re compatible with Duplos. I had some good experiences with them, but recently when I tried building something, I couldn’t get it to light up unless I pressed the bricks hard with my fingers… indicates that the wires weren’t making a good connection without that firm pressure, which made them useless for the project I was working on.
Other Fun Products
If you came to this page because you’re searching for a good STEM-themed gift for a child, you might also enjoy these posts: STEAM Gift Guide for ages 3 – 6, Robot Toys, Specialty Toys for STEM Education, and Best Books about Inventors.
If you’d rather find fun, cheap, easy hands-on STEAM projects you can do with materials you already have at home, just click on any of the categories in the sidebar on the right (or at the bottom of a mobile page) to find 100’s of fun experiments.

[…] littleBits vs. Snap Circuits […]
LikeLike
[…] littleBits vs. Snap Circuits […]
LikeLike
[…] cards: Many commercial products (like Laser Maze, Tumble Trax, and Snap Circuits) come with a series of instruction cards that teach skills sequentially – the child first […]
LikeLike
[…] circuits, the best balance of affordable price and quality toy is Snap Circuits. Read my review here, which compares them with littleBits. I reviewed several robots last year, on my own quest for a […]
LikeLike
[…] We’ve used everything from potato mashers to screwdrivers, egg beaters to magnets, wiring circuits to button […]
LikeLike
[…] I’d like to do is design an electrical model using either Snap Circuits or littleBits that shows a cycle of stimulus (a light sensor or sound sensor), traveling through a […]
LikeLike
[…] If you’re not familiar with these electronic kits: Here’s my review of littleBits vs. Snap Circuits. […]
LikeLike
[…] you happen to own Snap Circuits or littleBits, I think you could do some really fun things of having a sensor (light sensor, sound sensor or […]
LikeLike
[…] circuits, the best balance of affordable price and quality toy is Snap Circuits. Read my review here, which compares them with littleBits. For 2 – 3 year olds, check out Start-Up Circuits. (I […]
LikeLike
[…] you to connect any MP3 player to enjoy a music and a light show.) Read my review of Snap Circuits here, which compares them with littleBits. For 2 – 3 year olds, check out Start-Up Circuits. (I […]
LikeLike
[…] you to connect any MP3 player to enjoy a music and a light show.) Read my review of Snap Circuits here, which compares them with littleBits. For 2 – 3 year olds, check out Start-Up Circuits. (I […]
LikeLike
[…] to connect any MP3 player to enjoy a music and a light show.) Read my review of Snap Circuits here, which compares them with littleBits. For 2 – 3 year olds, check out Start-Up Circuits. (I […]
LikeLike
Have you tried out Snap Circuits Bric Structures (the kit that is compatible with Legos)? If so, what do you think of it?
By the way, thank you for this site. The resources are incredible, your observations are spot on, and I love the way you think. When I read it, I wish I lived in Seattle!
LikeLike
I hadn’t even heard of these – they look super cool! https://amzn.to/46YDAog (And thanks for the feedback!)
LikeLike