
This week’s class was about a fundamental concept from chemistry: when you mix two things together, sometimes they combine, sometimes they stay separate. (At this age, we don’t get into the details of electrons, molecular bonds, and so on! We just want them to experience it now, and someday when they do get all the details, it will make much more sense to them than kids with limited hands-on experience.)
Question of the Week: Will all things combine when mixed together?
In this blog post, I’ll just tell you what we did. To learn more about the science behind each activity, you can check out the posters I made to hang in class which explains the science behind how each of these experiments work. (Here’s the PDF.)
Activities with Oil and Water:
Free Exploration: Demo this in circle first (see below), then let them explore it on their own. Place out plastic containers (We used plastic Test Tubes, but they were a lot of work to scrub out later, so next year we’ll use clear plastic cups), pitcher of water, jar of oil (vegetable oil or baby oil), water-based food coloring and oil-based food coloring. They can try a variety of combinations. Here’s an article about this: http://www.metrofamilymagazine.com/May-2012/Simple-Science-Experiment-Oil-Water-and-Food-Coloring/
An option would be to also include detergent, which allows the oil and water to combine.
For the oil coloring, I have used Americolor Oil Food Coloring and Chefmaster Liquid Candy Color. I like the Americolor much better – it mixes better than the thick Chefmaster and is also much easier to clean up. For both, the blue color mixed with both the oil and the water, so I didn’t get quite the color separation I wanted. I was hoping for yellow water and blue oil where you could then shake them together to temporarily make green oily water that would then separate out again. Instead I had green water and blue oil.
 Another way to explore oil and water, from The Curious Kid’s Science Book, is to put a thin layer of oil in a dish. Give your child containers of colored water and a pipette. They drip in bits of water and watch them ball up – small pools of water bump against each other and merge into bigger blobs as you watch. Try this in a clear container on a light table, or put a clear container on white paper so the colors are obvious.
Fireworks in a Jar: Fill a jar most of the way with water, then in a separate container, whisk together oil and regular food coloring till the food coloring is broken up into lots of suspended droplets of color. Pour the oil on top of the water – the food coloring will gradually separate out, sink through the oil, and cascade into the water then mix with the water. Do a google search for “fireworks in a jar” to see lots of examples, including I Can Teach My Child.
Lava Lamps: After your child has created lots of containers of oil and colored water, try dropping part of an Alka-Seltzer tablet in one. It sinks to the bottom, reacts to the water, making bubbles that rise up through the oil, carrying up some colored water bubbles, that then sink back down. Do a search for “oil and water lava lamp” to see pictures. We didn’t do this as a class activity, but did demo it in our closing circle.
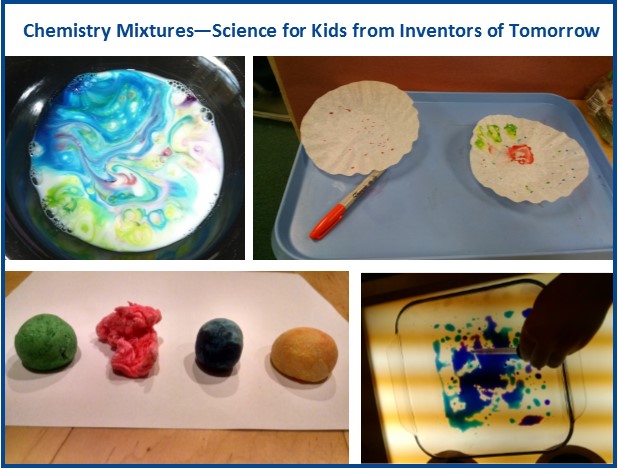
Discovery Bottles: We make discovery bottles by having children put water in a bottle, then add glue (it dissolves!), food coloring (it mixes in!), sequins and glitter (they can form a suspension!), and oil (it doesn’t mix in – it’s immiscible!). They can then take these home to use as a calm down tool – the mindfulness bottle.
Making Mixtures
Solutions: You could dissolve salt, or sugar, or honey into water.
What Dissolves in Water: You could put out a wide variety of substances and 6 – 8 clear glasses (or jars) or water. Kids sprinkle in a little of each substance, stir and see if it dissolves. Hands On as We Grow has a post on this.
Beverage at Snack Time: Make a solution you can drink: use Koolaid or other powdered drink mix you stir into water – talk about how the powder dissolves in the water, and then mixes in. Have them first dump the powder in but don’t stir. Then use a straw to taste the water at the top of the cup and then to taste the kool-aid saturated water at the bottom of the cup. Then stir and taste again. It’s no a homogeneous solution.
Suspension: Mix dirt or flour into a jar of water. Shake it up to make a suspension, then let it settle.
Cooking: Recipes and cooking are all about making mixtures. You could make almost anything! A great snack would be to make either a cake or pancakes to go with the cake recipe song or the pancakes book that we did in circle time.
Make a bouncing ball
Whereas most cooking recipes have some leeway for error (using slightly the wrong amount of an ingredient, or adding ingredients in a different order than written), some chemistry experiments must be done precisely right in order to work. We wanted to have the kids test one of those. (And yes, a few had “failures” when they didn’t follow the recipe, and we showed them how they could succeed by trying again and being precise.) There are more details on this recipe here.
Before starting: make Borax Solution. Mix 2 tablespoons hot water and 1/2 teaspoon borax powder. Stir till all the borax is dissolved.
- Pour 1 tablespoon of clear Elmer’s Glue
in a paper tray. Add 4 drops food color. Mix.
- Sprinkle 1/2 teaspoon of borax solution all over your glue. DON’T STIR!
- Sprinkle 1 tablespoon of cornstarch all over the glue / borax solution. DON’T STIR!!
- Count to 15 seconds. Then use a stick to stir it together till fully mixed.
- Once the mixture becomes impossible to stir, spread a little cornstarch on your palms, pick up the goo.
- Knead the ball by rolling it around in your palms like play-dough. It’s a sticky mess at first. Keep rolling till it starts to feel like a ball. (If it’s still really sticky, sprinkle on just a little cornstarch and keep rolling.)
- Once it’s solidified, play with it. Bounce it.
- Store in a baggie.

Make bubbles: You could make your own bubbles. There’s fun science in understanding that although water and soap make bubbles, to make long-lasting bubbles, you need some sort of sugar. Here’s one recipe: Measure 3 cups of water into one container. Add 1/2 cup dish soap, and stir GENTLY. Add 1/2 tablespoon glycerin OR 2 tablespoons light corn syrup. Stir gently. You can use it right away, but it works even better the next day.
Separating Mixtures
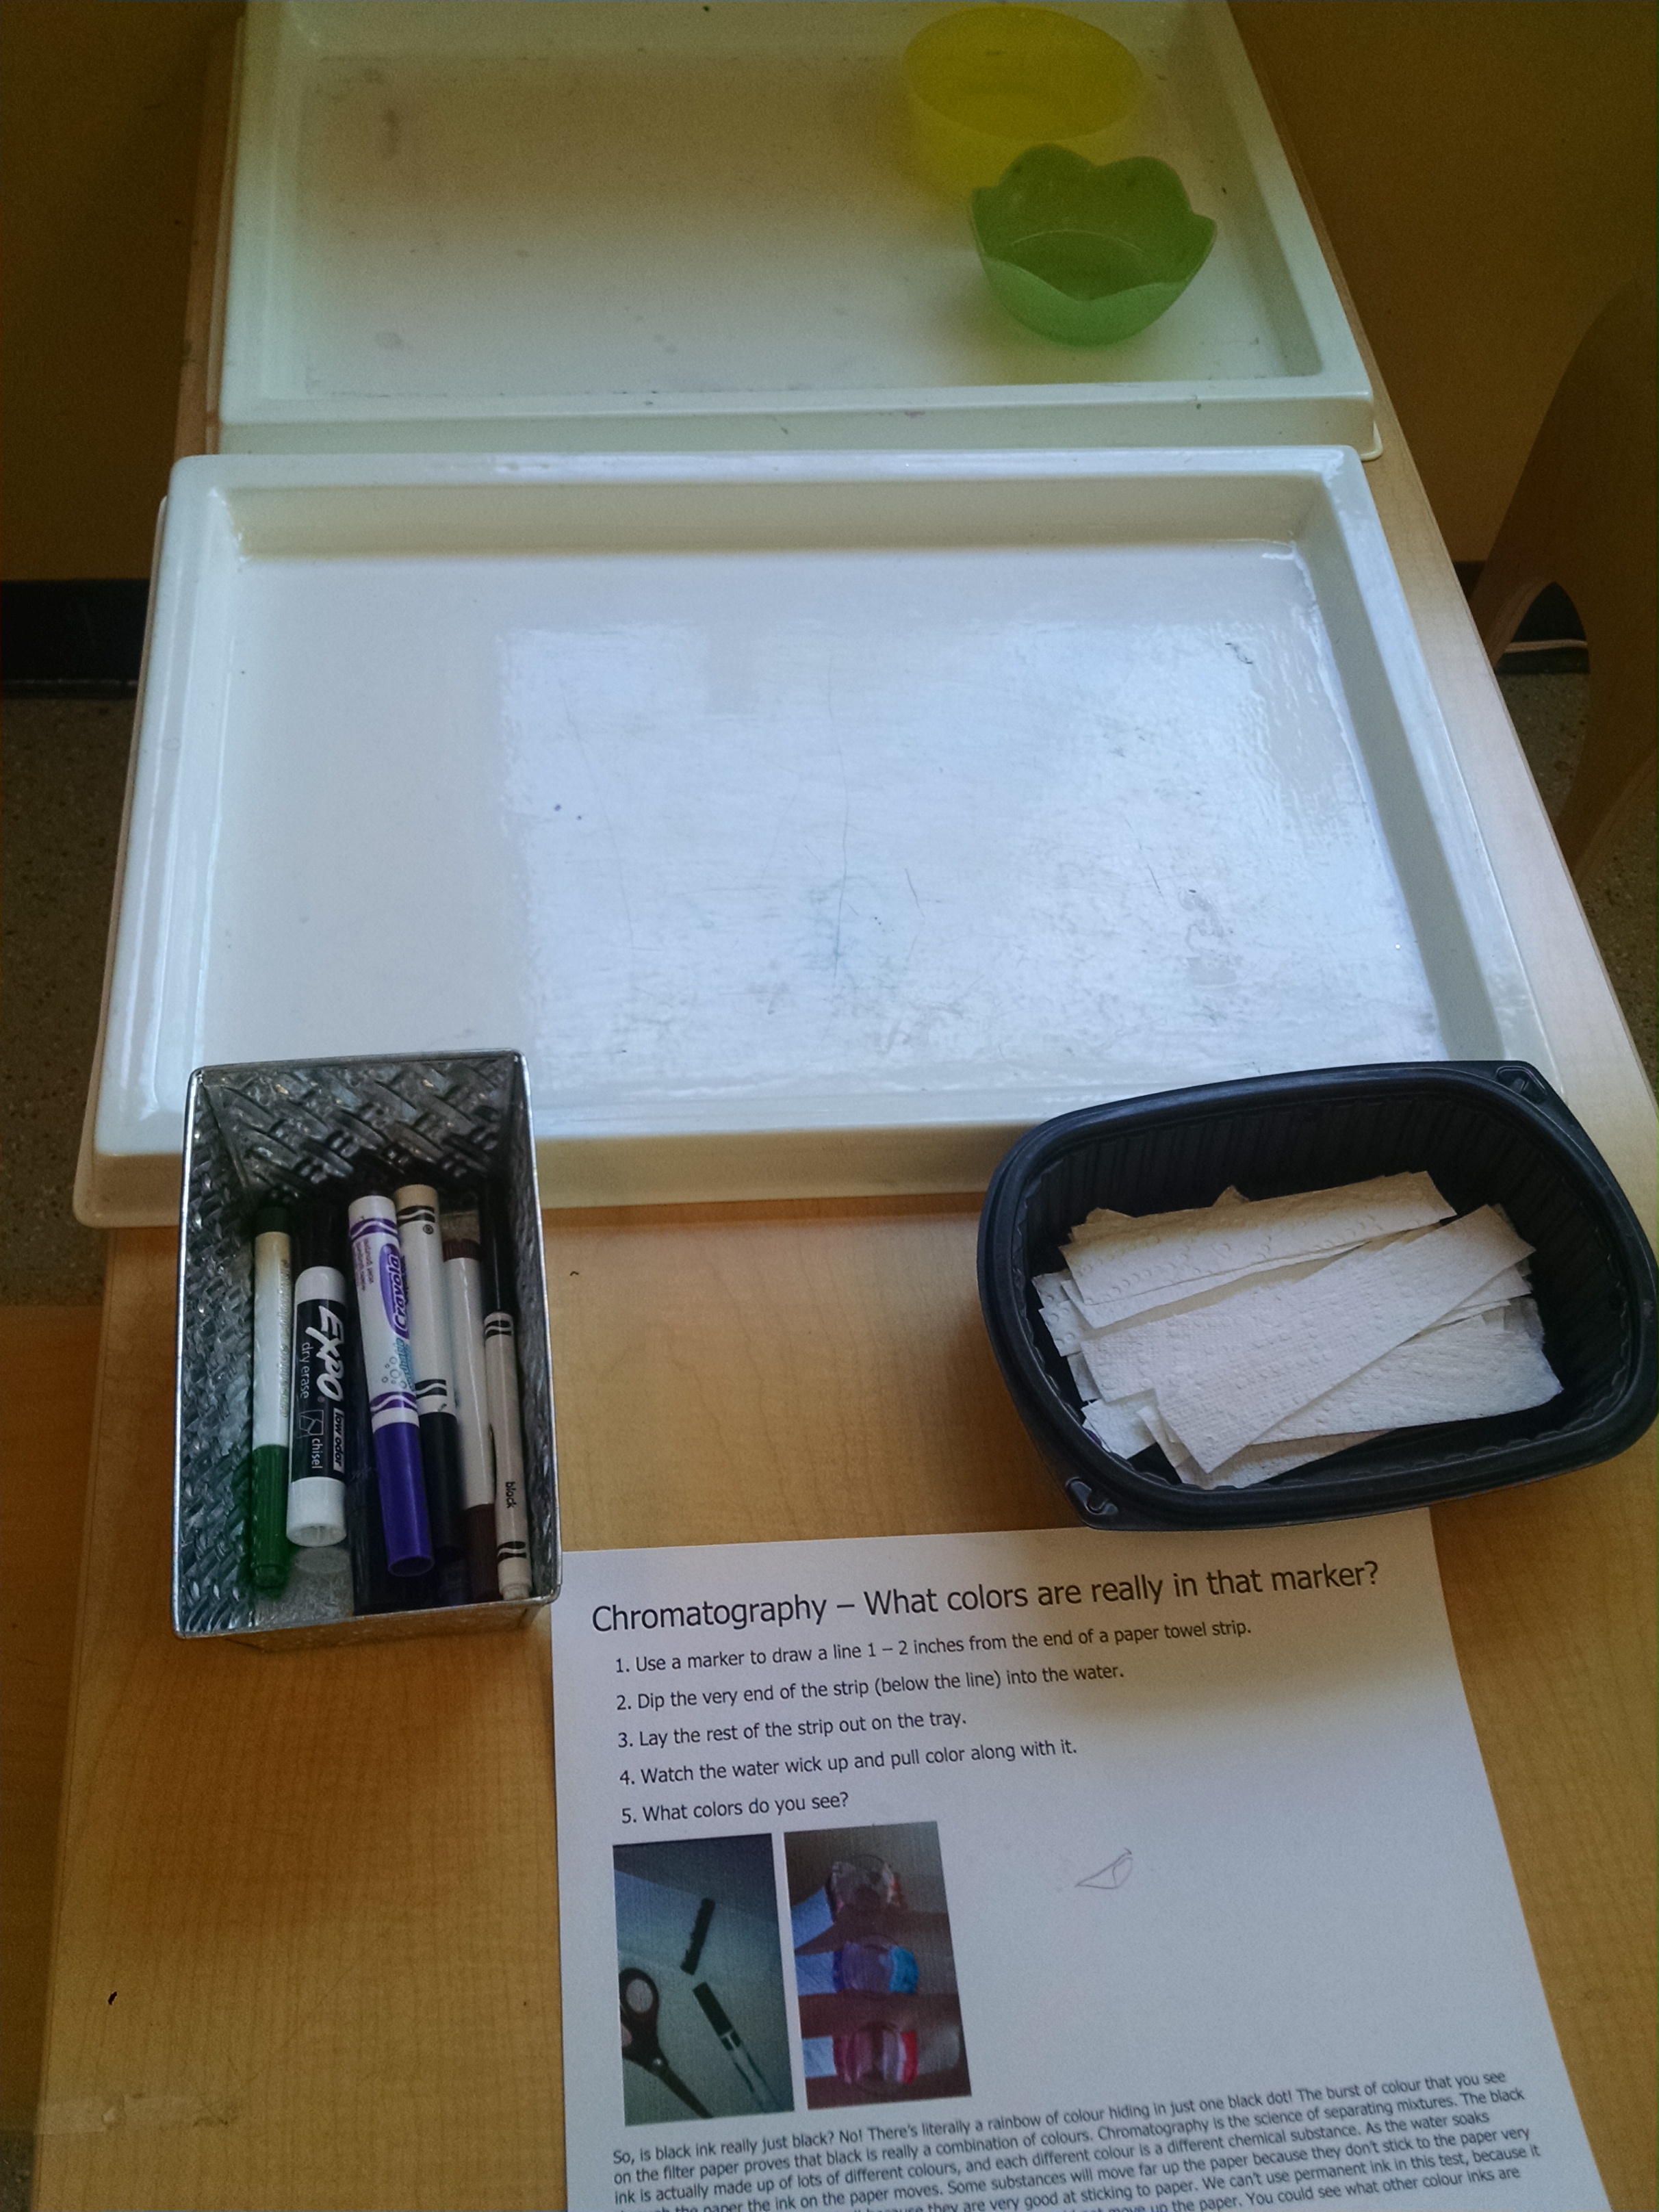
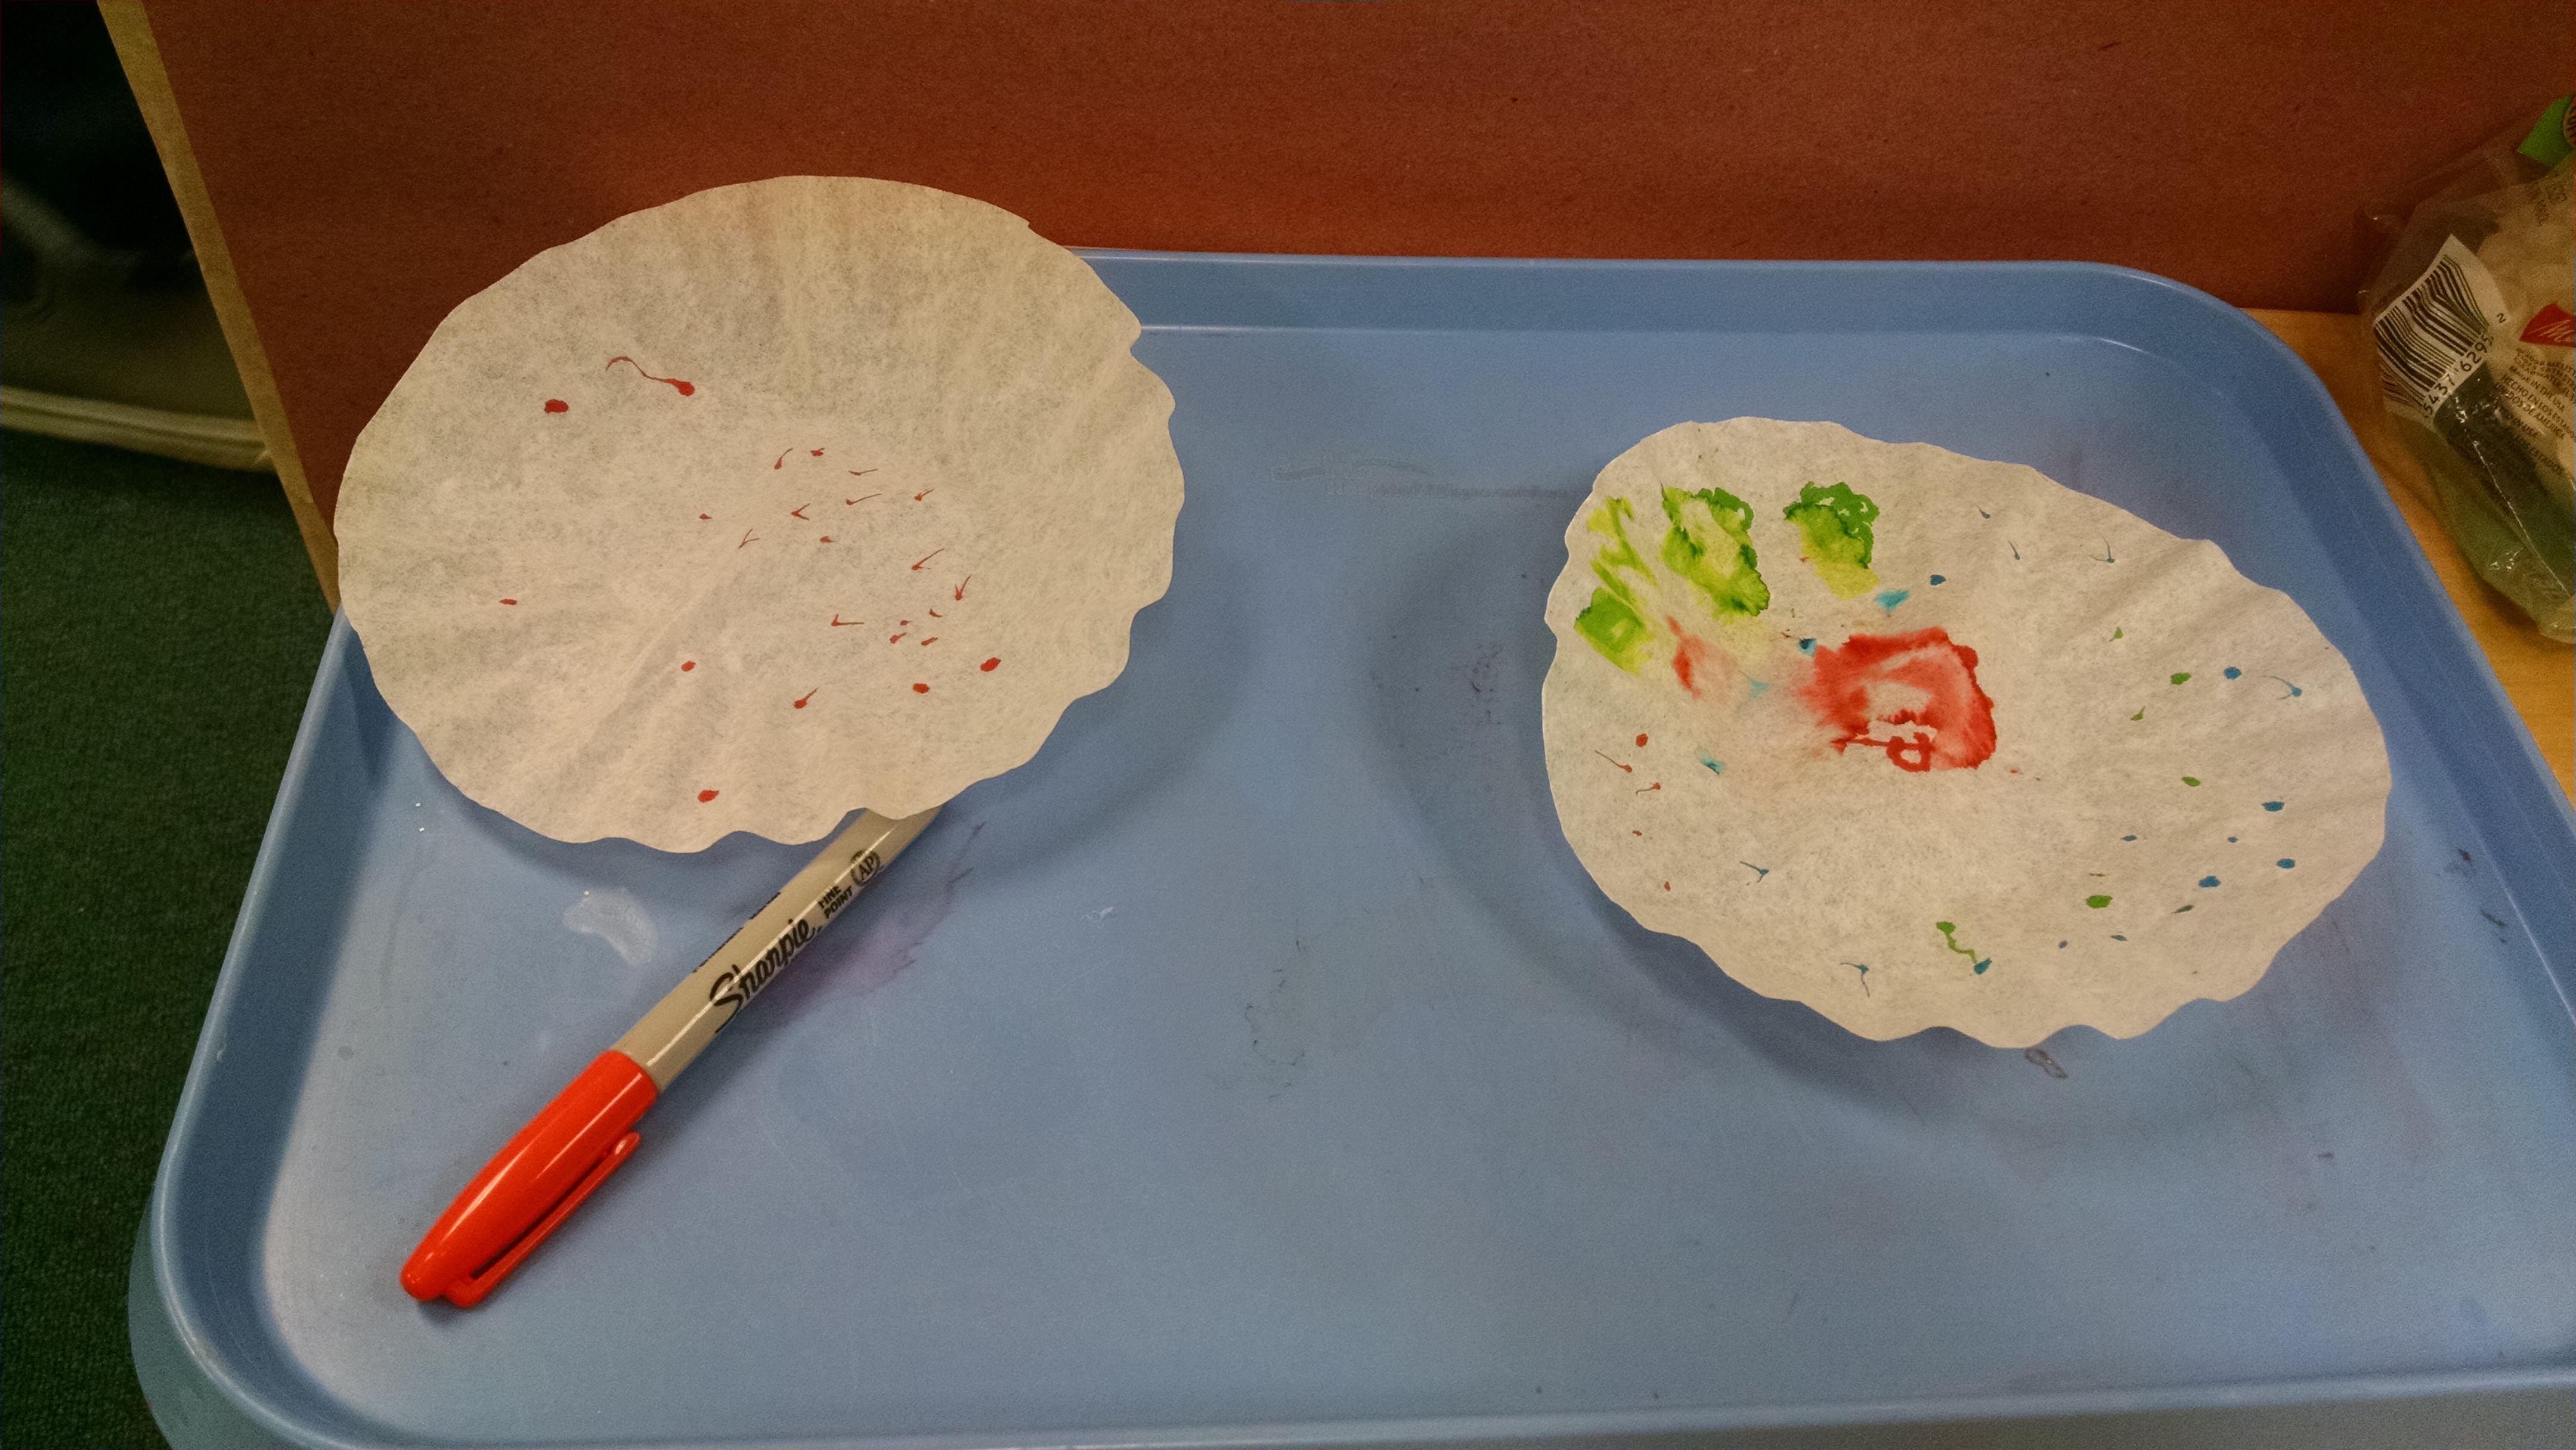
Chromatography – What color is that black marker? Supplies: strips of paper towel, various brands of watercolor black markers and small container of water. Choose a marker and draw a line 1 – 2 inches from the end of a paper strip. Dip the very end of the strip (below the line) into the water, and lay the rest of it out on the tray. It wicks up the water, bringing the color along with it. With SOME markers, unexpected colors separate out. Learn more: www.crayola.com/crafts/marker-chromatography-craft/ and http://b-inspiredmama.com/marker-chromatography-science-experiment/ www.exploratorium.edu/science_explorer/black_magic.html
Sharpie tie-dye: Supplies: coffee filters, permanent markers, rubbing alcohol (90%) and pipettes or eye droppers. Kids draw on the coffee filter, then drip on a little rubbing alcohol and watch the colors spread. You can tie-dye shirts or other fabric this way if desired.
www.youtube.com/watch?v=tg8g2mk2fsY

Sensory Table Sifting: Fill the sensory table with a mixture of items of varying sizes, and strainers that will sift some items out. We had a mixture of rice and beans, and then added glass stones. If they sifted it through the salad spinner bowl, all the rice and beans would fall out, leaving behind the glass stones. If they sifted through the white container, the rice would fall through, but the beans and the stones would remain. You could do lots of other combos – plastic gems in cornmeal, “gold coins” in sand, etc.

Crystals Painting: You could also do Epsom salt painting this week if you didn’t do it with States of Matter. You make a solution of salt and warm water and paint with it. As it dries, the crystals appear.
Water Table: I soaked water beads the night before (polymers) and put some in the water table with fishing nets (our Tool of the Week) and scoops. I had two brands of water beads – I can’t remember what brand the blue ones are – I’ve used them over and over. The multi-color beads were bio-gels. At the end of the day, the blue ones were whole and ready to be dried and re-used. The multi-coloreds had been squished into lots of little bits of loose jelly we had to fish our of the water. So, test your beads ahead of time!

Other Activities
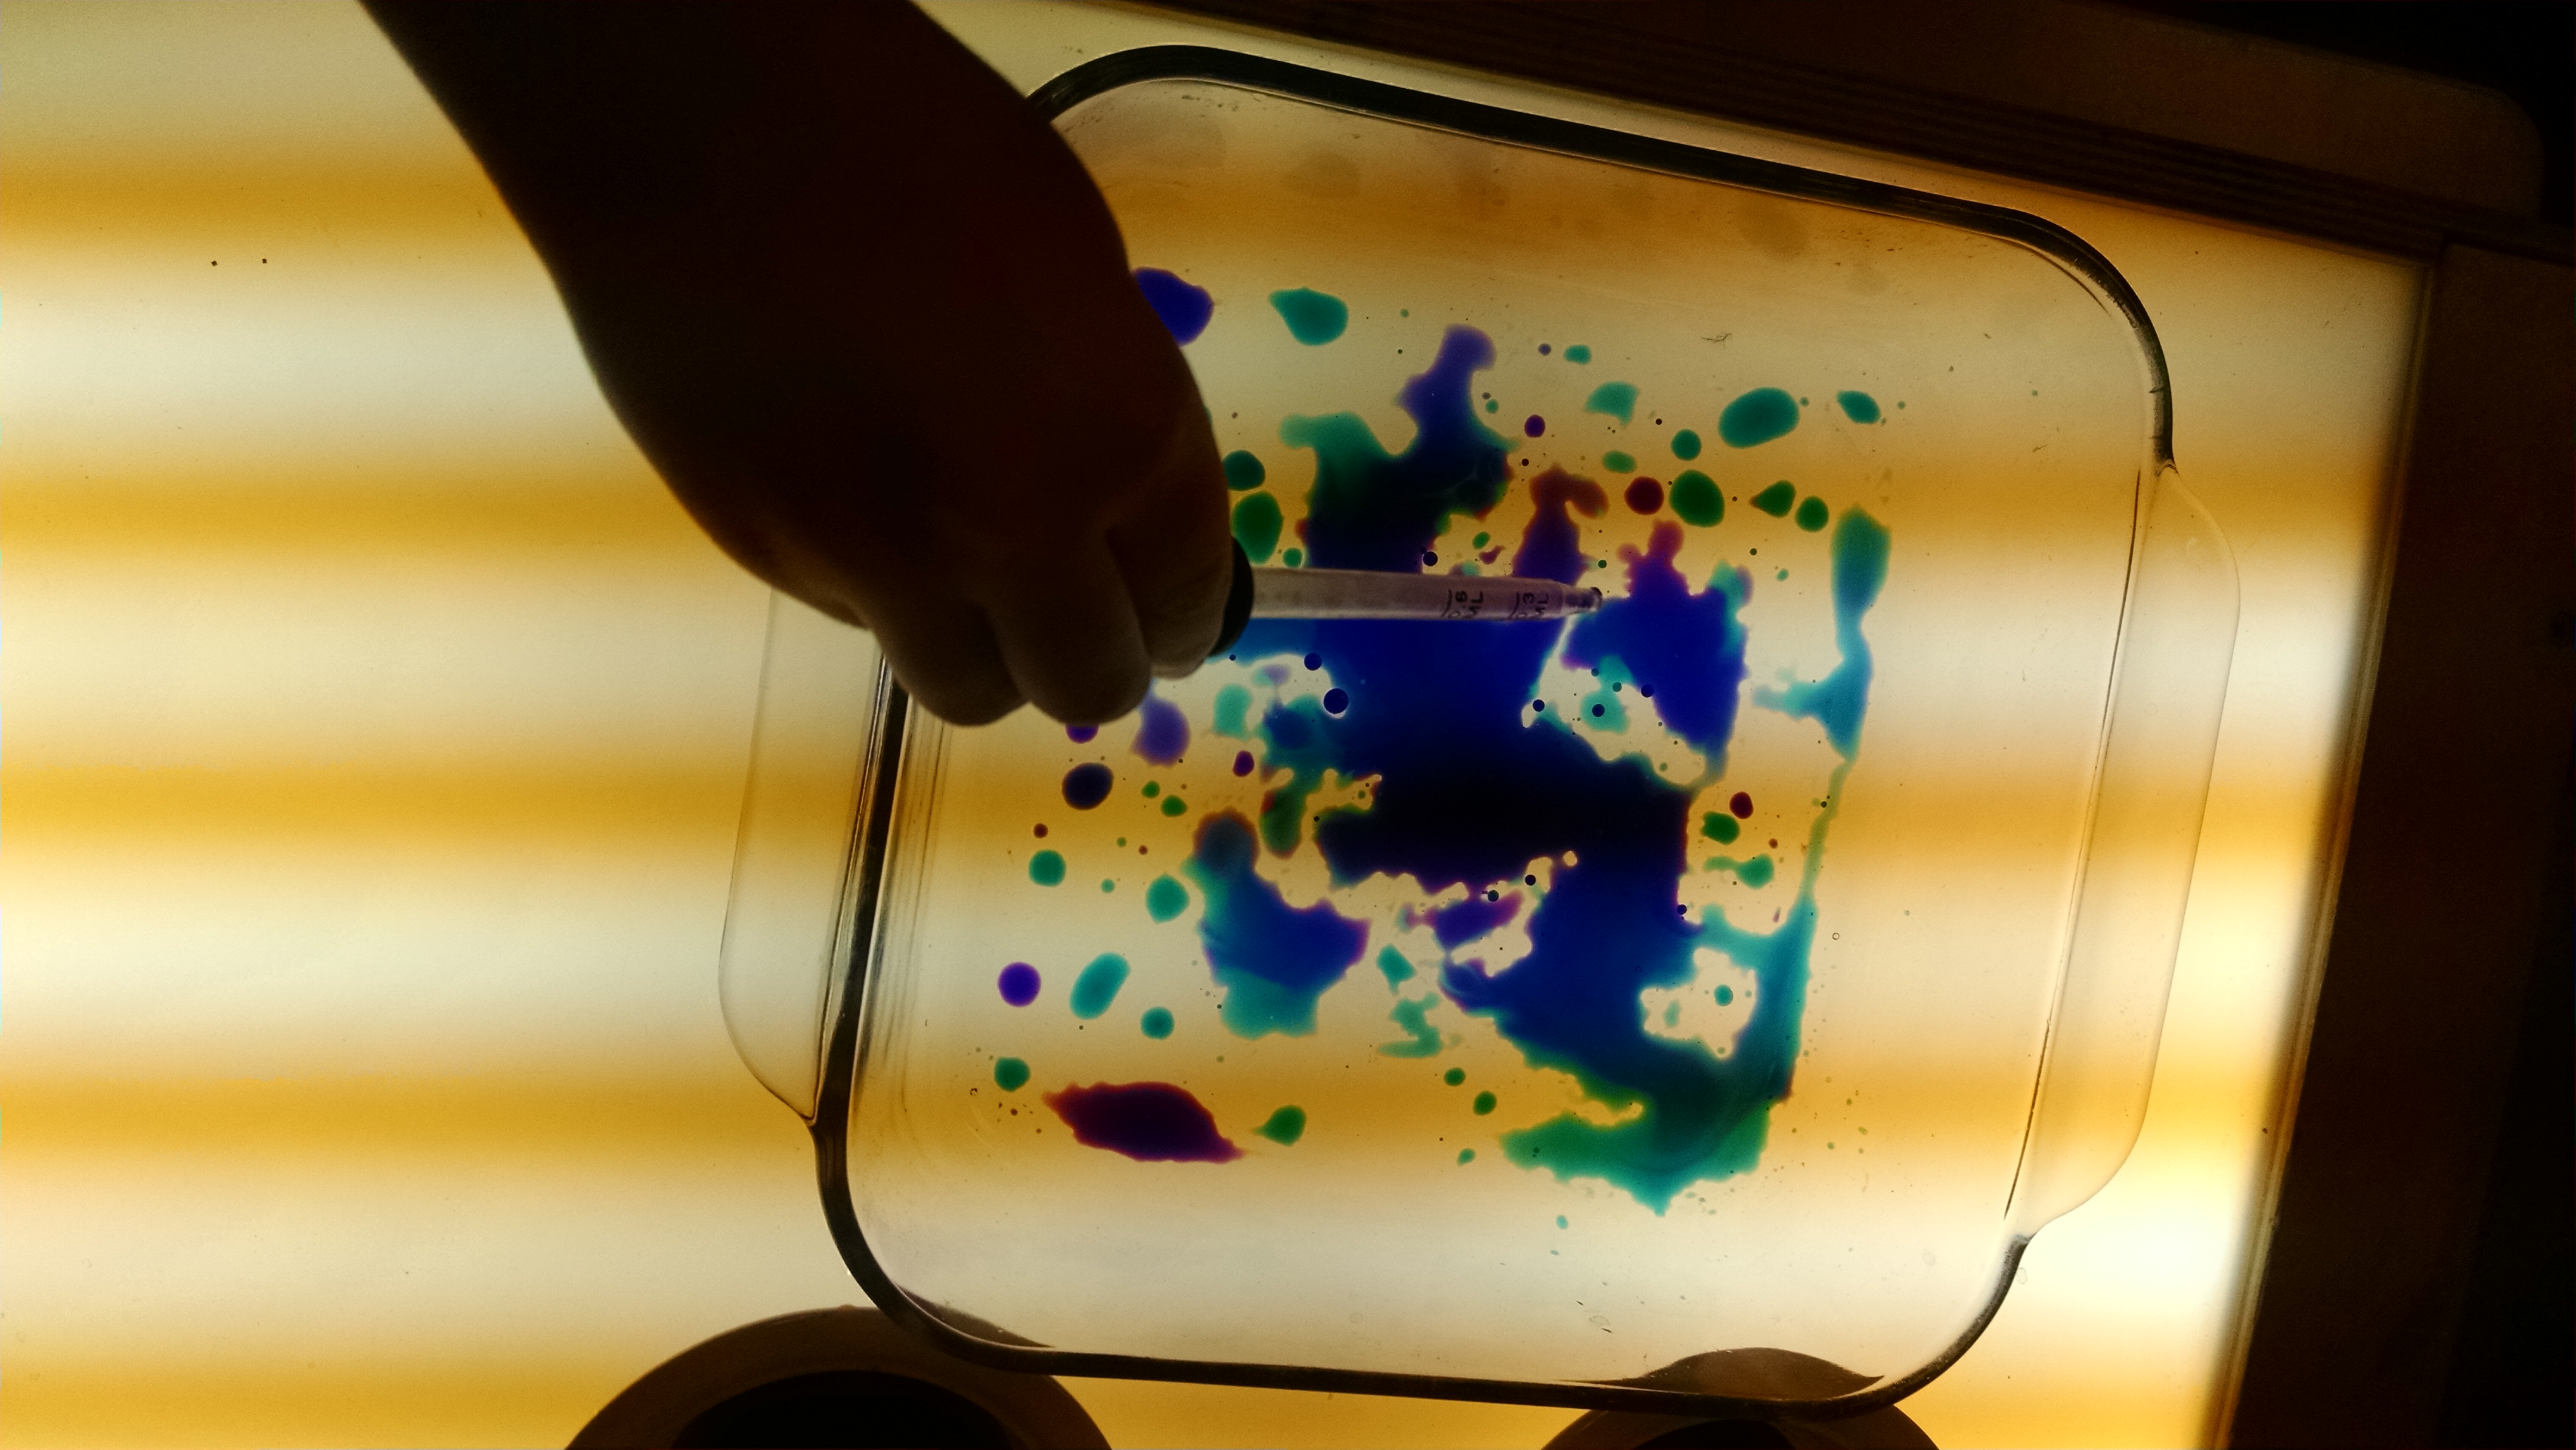
Concept exploration – Milk Fireworks: Take a flat shallow dish, pour in a thin layer of whole milk (not skim – you need the fat!). Drop on a few drops of different food colors, near to each other – they mostly float on the surface of the milk, since the water-based colors are less dense than the milk. Dip a q-tip into dishwashing detergent (Dawn and Joy work best), then dip it in the milk near the coloring and hold it there, but do not stir!! Wait a second for the response – the colors fly away from the q-tip. (This photo from Steve Spangler Science shows an effect you may see – you can also do an image search for “milk fireworks” to see lots more, or a video search to see the reaction in action!) Once the reaction slows down, lift the soapy Q-tip and dip it in somewhere else – a new reaction begins. Once the reactions have slowed down, you can gently stir the milk and the colors will swirl around, creating a marbled effect.

This is a great experiment! Pretty cheap, easy to clean up, entertaining for all ages. The challenge we found was convincing our three year olds and four year olds to put the q-tip in and hold it there waiting for the reaction. They just want to stir. The colors still move and intermingle, but it’s not as dramatic or pretty.
Art – paper marbling. You can also capture the results of the milk fireworks in beautiful marbled paper. Watercolor paper works best, but paper towels can also be an interesting effect. This does not work as well on a non-absorbent paper like printer paper. BEFORE you do your milk fireworks, cut out squares of paper that will fit well into the container you’ll put the milk in. AFTER you’ve done milk fireworks, take a piece of paper, lay it carefully flat on top of the milk. Press down lightly, just to make sure it’s in contact with the surface of the milk. (Note, children tend to press hard enough to sink it, so be clear in your instructions.) Then lift it off by peeling up from one corner, flipping it over as you do. Set it aside to dry. Some papers will curl up as they dry. If they do, later on you can press them flat under a heavy book. See pictures at Babble Dabble Do and Childcare Network.
Building Toy: ZOOB are a fun building toy which require learning a new small motor skill for many kids – knowing how to line it up just right and push hard to connect them. They only hook together in certain ways – can form matrices – kind of like molecule models.
Art Activity: Bubble wands. The kids used pipe cleaners and beads to make bubble wands for outside time. http://www.prekinders.com/bubble-chemistry/

Large motor: This day is a lot of high concentration, small motor, try not to make too much of a mess activities. The kids need to be able to blow off physical steam. So, we had tumbling mats in the big motor room and had a long outside time to play.
Opening Circle:
Song: We sang the Cake Recipe song. (I explained how when we cook food from a recipe, we’re basically doing chemistry. And that you had to follow the recipe right, because flour, eggs, milk, and sugar can make cake, but it can also make bread, all depending on how you mix it together.)
Before teaching the song, I had them clap the rhythms of the chorus: 1-2-3 1-2-3 mix-mix-mix mix-mix-mix and 1 2 3 4 mix mix mix mix. Rhythm is an important building block for the brain, helping with later math learning and more.
How to communicate the answer to the key “Question of the Week”? I asked “When you mix things together, do they always combine into one new thing or do they stay separate? Let me show you an experiment, and we’ll see.”
I started with a demo of oil and water. I poured water into a test tube, then showed them the regular Food Coloring, and explained it was color chemicals mixed with water. So, we know it will mix with water. I put a few drops in the water and mixed it.
Then I showed them the oil and explained that water and oil do not like to combine. I reminded them the regular food coloring was made of water, and added a few drops to the oil. It beaded up into little balls. I put the lid on the oil, and showed how I could pour the oil back and forth in the tube, and the ball of food coloring might break up a bit, but would not mix in. Then I poured some oil in with the water, and shook it gently to mix it, then showed how it separated out again, with the oil floating on top of the water. I also added the Oil Food Color to the oil to show how it could mix in because it was color mixed with a chemical that “likes” to connect to oil.
Matter and molecules. We reminded them of last week’s book, I Get Wet, which talked about how water molecules really like to stick together. Then I held up a magnet ball, said “Imagine this is a water molecule (remember, real molecules are so teeny tiny we can’t seem them.) It really likes to stick to other water molecules. So, as soon as it finds one, they stick together (stick two magnet balls together), then then find other water molecules to stick to.”
Set the magnets down and hold up a plastic ball or egg. “We’re pretending this is an oil molecule. It doesn’t like to stick to water.” (show how it doesn’t stick to the magnets.)
Put some magnet balls, then some eggs, then some balls and so on in a clear container so they’re nicely blended. Say “this is oil and water just after we shook them up so they look kind of mixed, just like the oil and water are kind of mixed after we shake them” (show this). “But what happens when we let the oil and water rest? It separates out again, with the oil floating on top.” Shake the balls and eggs – the magnets will grab each other and sink to the bottom, with the “oil” eggs floating on top.
Book: I didn’t find any little kids’ books about chemistry (I did find books for adults and older kids about chemistry experiments to do, but nothing with a story.)
So I wrote a book to meet our needs. It’s called Mixing It Up and talks about mixtures, solutions, suspensions, immiscible liquids, emulsion, and reactions. You can print your own from this PDF. (Note: it’s set up to print on an 11×17 double-sided printer, but will scale down OK to print on 8.5 x 11 paper, and if you have to print single sided, you should be able to assemble it OK.) In this first draft, I had to use some photos from the internet, not all of which were public domain, so sadly I’m violating copyright with some of the photos… I plan to re-do them all soon.
The way we did circle time, since we had this custom book, was to read the beginning section of the book. Then when we got to the page on immiscible liquids, we set the book down and did the oil and water demo. Then we read the page explaining the molecular idea while also showing the demo with the magnet balls and eggs. We saved the last few pages for closing circle.
Every page of the book shows photos which are experiments parents or teachers can re-create with their kids using simple everyday materials they have at home. We did many of those experiments in this class, but not all.
Closing Circle
Book: You could read Pancakes, Pancakes! by Eric Carle. Not only is this about the chemistry of cooking, but it also goes through how we get flour (harvesting, threshing, grinding – it showed a water wheel powered mill which allowed me to remind them about our Simple Machines unit on Wheels, and showed a water wheel like we use in the water table, but being used to create power before we understood electricity.
You could also read a book about cooking such as Whopper Cake, which would tie in nicely with the song we did… and is terribly silly, so the kids love it.
Book and demos: We read the next to last page of the book I wrote, which talks about emulsifying, and then added a little soap to our test tube of oil and water to show how it helps them to mix, and why this property helps us when we want to wash greasy dishes.
We read the last pages on reactions, then dropped an Alka-Seltzer tablet into another tube of oil and water to show the “lava lamp” effect described above.
Cool ideas we didn’t try:
- Density Column http://chemistry.about.com/od/chemistryactivities/a/densitycolumn.htm
- Nice article on solubility, tied into the chromatography and sharpie tie-dye: http://www.scientificamerican.com/article/soluble-science-making-tie-dye-t-shirts-with-permanent-markers/
- Cornstarch and water: In a shallow tray, put a thin layer of corn starch, and spray bottles of water. Kids spray the water on, making their own “non-Newtonian fluid. www.60secondscience.org/activities/cornstarchAndWater.html Learn more about this fluid in last week’s post.
- Sensory table: Just put in containers with flour and water measuring cups, sifters and spoons – let them mix bowls full of the stuff of whatever thickness they want. (Note: I know preschool teachers who claim this is a FABULOUS learning activity. I am mighty concerned about the mess and how we clean it up.)
Like all my posts, this posts includes Amazon Affiliate links. If you click through and purchase something, I get a small payment. However, I do this primarily so you can see what product I am referring to, and can read reviews of it and look for alternatives easily. Most things are available in your local grocery store or drug store.

[…] Chemistry for Kids: Mixtures […]
LikeLike
[…] Chemistry for Kids: Mixtures […]
LikeLike
[…] Chemistry for Kids: Mixtures […]
LikeLike
[…] Theme – Chemistry: Mixtures […]
LikeLike
[…] Theme – Chemistry: Mixtures […]
LikeLike
[…] of Matter, Mixtures and Solutions, Dramatic Reactions – Things that go […]
LikeLike
[…] Chemistry – Dr. Eureka […]
LikeLike
[…] Chemistry for Kids: Mixtures […]
LikeLike
[…] Mixtures, solutions. Pancakes or a birthday cake to go with the books recommended in the theme. Kool-Aid, or some powdered drink (solid) that they mix with water (liquid) and it dissolves/mixes. […]
LikeLike
[…] a tray of sand, and give kids a back massager to press against the pan to create an earthquake. For chemistry mixtures, we make corn starch quicksand and put in plastic animals to “run across” or sink into […]
LikeLike
[…] to mix oil and water. Make “fireworks in a jar” and “lava lamps” and learn about […]
LikeLike
[…] Play with chemistry: Put a little oil in a dish, make colored water – kids drip it in with pipettes or eye droppers – stir it around – it never mixes in. When you’re done playing with that, pour it in a bottle, and add either an alka seltzer or salt – it’s a fun lava lamp effect. Sprinkle baking soda on a plate. Give the child colored vinegar and pipettes or eye droppers – they drip vinegar on the baking soda – lots of miniature “volcanoes.” […]
LikeLike
[…] Milk Fireworks: Put a thin layer of milk in a dish (nonfat won’t work! whole milk or half and half is best). Drip a few drops of food coloring on top. Then drop in one drop of detergent. What happens? Swirl the colors around to make pretty designs. Then lay a piece of paper on top and peel off to make marbled paper. […]
LikeLike
[…] more hands-on chemistry learning in my posts on States of Matter, Chemistry Mixtures, and […]
LikeLike
[…] great hands-on ways to explore chemistry with kids. (I cover them in these posts: States of Matter, Mixtures, Reactions.) Here are two of our favorites. (And be sure to check out Oil and […]
LikeLike
[…] experiment is simple and kids love it, and it forms a nice bridge between our class about chemistry mixtures where we study how oil and water don’t mix, and our chemical reactions […]
LikeLike
[…] https://inventorsoftomorrow.com/2016/12/14/chemistry-for-kids-mixtures/ […]
LikeLike
[…] Chemistry – Dr. Eureka […]
LikeLike
[…] we study Chemistry, the children make discovery bottles, which can then be taken home to be used as mindfulness […]
LikeLike
[…] / Chemical Reaction: things can be solid or liquid, depending on temperature. Some things can be mixed and unmixed, some cannot. Heating or cooling a substance can cause changes – some are […]
LikeLike