
We have done this topic as a stand-alone unit near Halloween, and also combined it with Bugs (and Exoskeletons) and with a unit on the Human Body.
Key concepts: The skeleton creates a structure for our body.
1) Having long, strong bones helps us to stand up and to carry things.
2) Our skull and ribcage help to protect our fragile organs.
3) Our joints allow us flexibility.
We don’t present these concepts to the children at the start of class. We first present them with activities to explore hands-on so they can discover ideas and make connections on their own. (See my post on class structure.)
So, in this post, I’ll first share our activities with you, then at the end, I’ll talk about how we discuss these concepts during opening circle and closing circle.
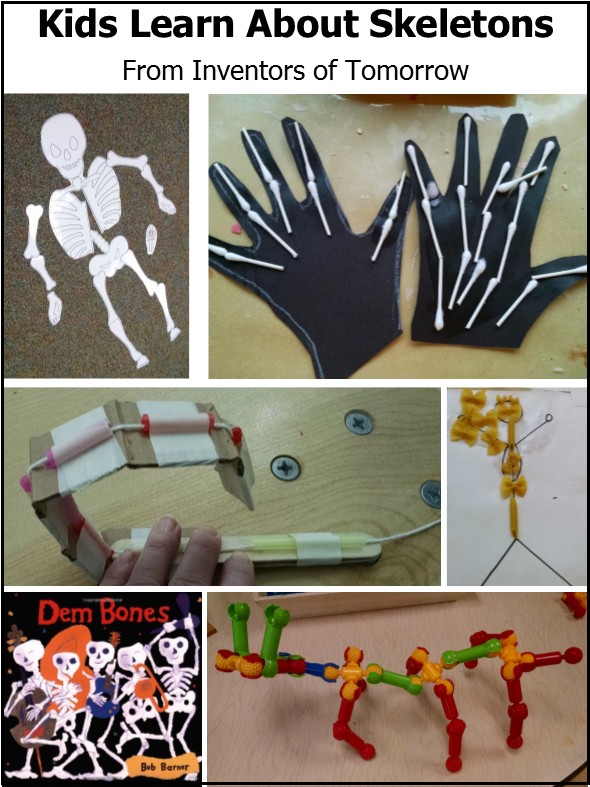
Engineering Projects
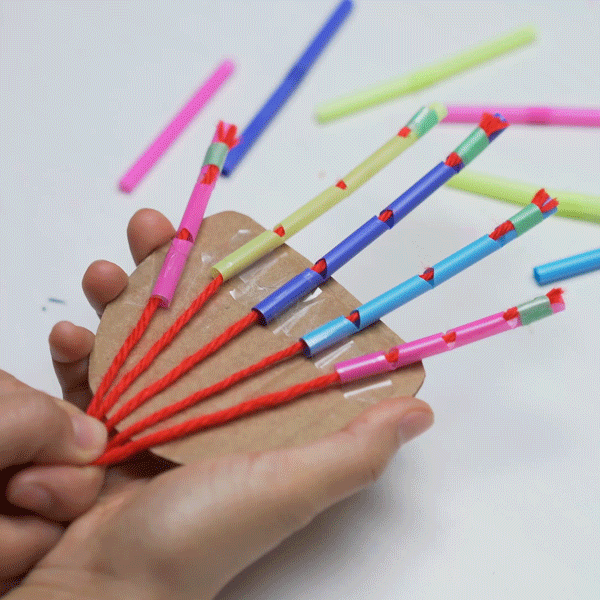
Build a Cardboard (Or Straws) Finger or Hand. Here’s a post describing this in a detailed tutorial.
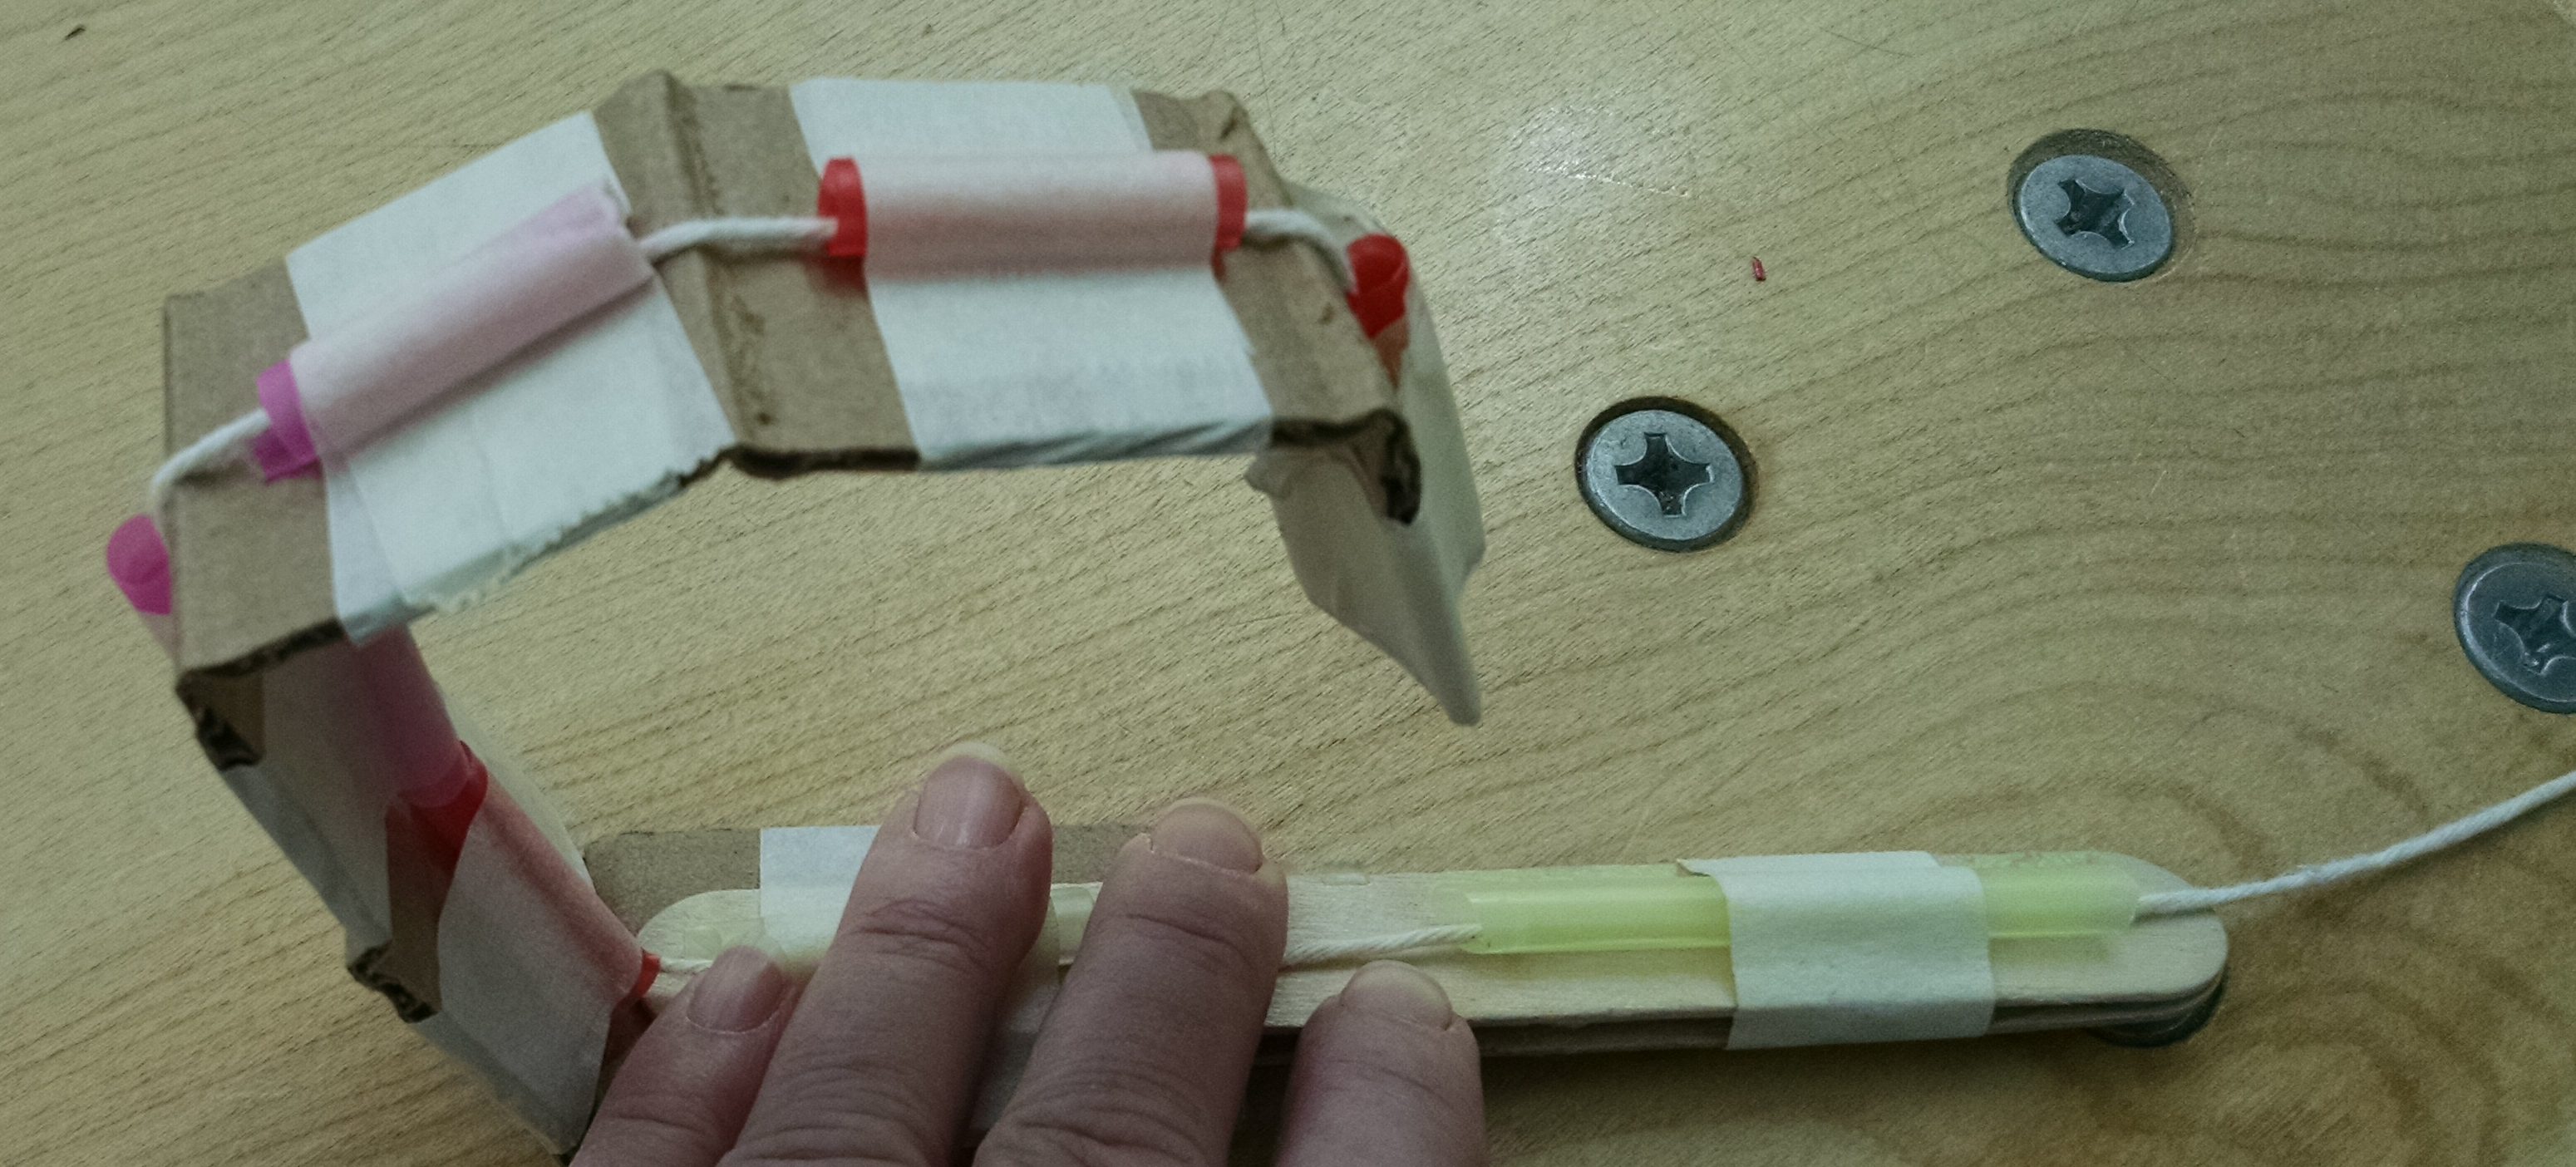
Build an elbow joint. You can also make a paper or cardboard arm to show the lever action of the elbow joint, as seen in our Levers class.
Art Projects:
Pasta skeletons: We had drawings of simple stick figures, glue, and pasta (penne, elbow macaroni and bow ties). You can see some of the results on the right. We discovered it would have been better to do these on cardboard, or at least cardstock, as the pasta is very heavy, and it’s hard to carry a piece of floppy paper with pasta glued all over it. Instead of doing the stick figures, another option would be to have pictures of various skeletons or x-rays (snakes, dogs, people) and let children design whichever skeleton they want. (We do a similar project in our Dinosaurs class.)


Hand x-rays: We had black paper hands, Q-tips we’d cut into halves (or straws cut short), and glue. Children glued on bones. Make a sample for kids to copy, but also have an x-ray of a hand so children really see what they are creating.

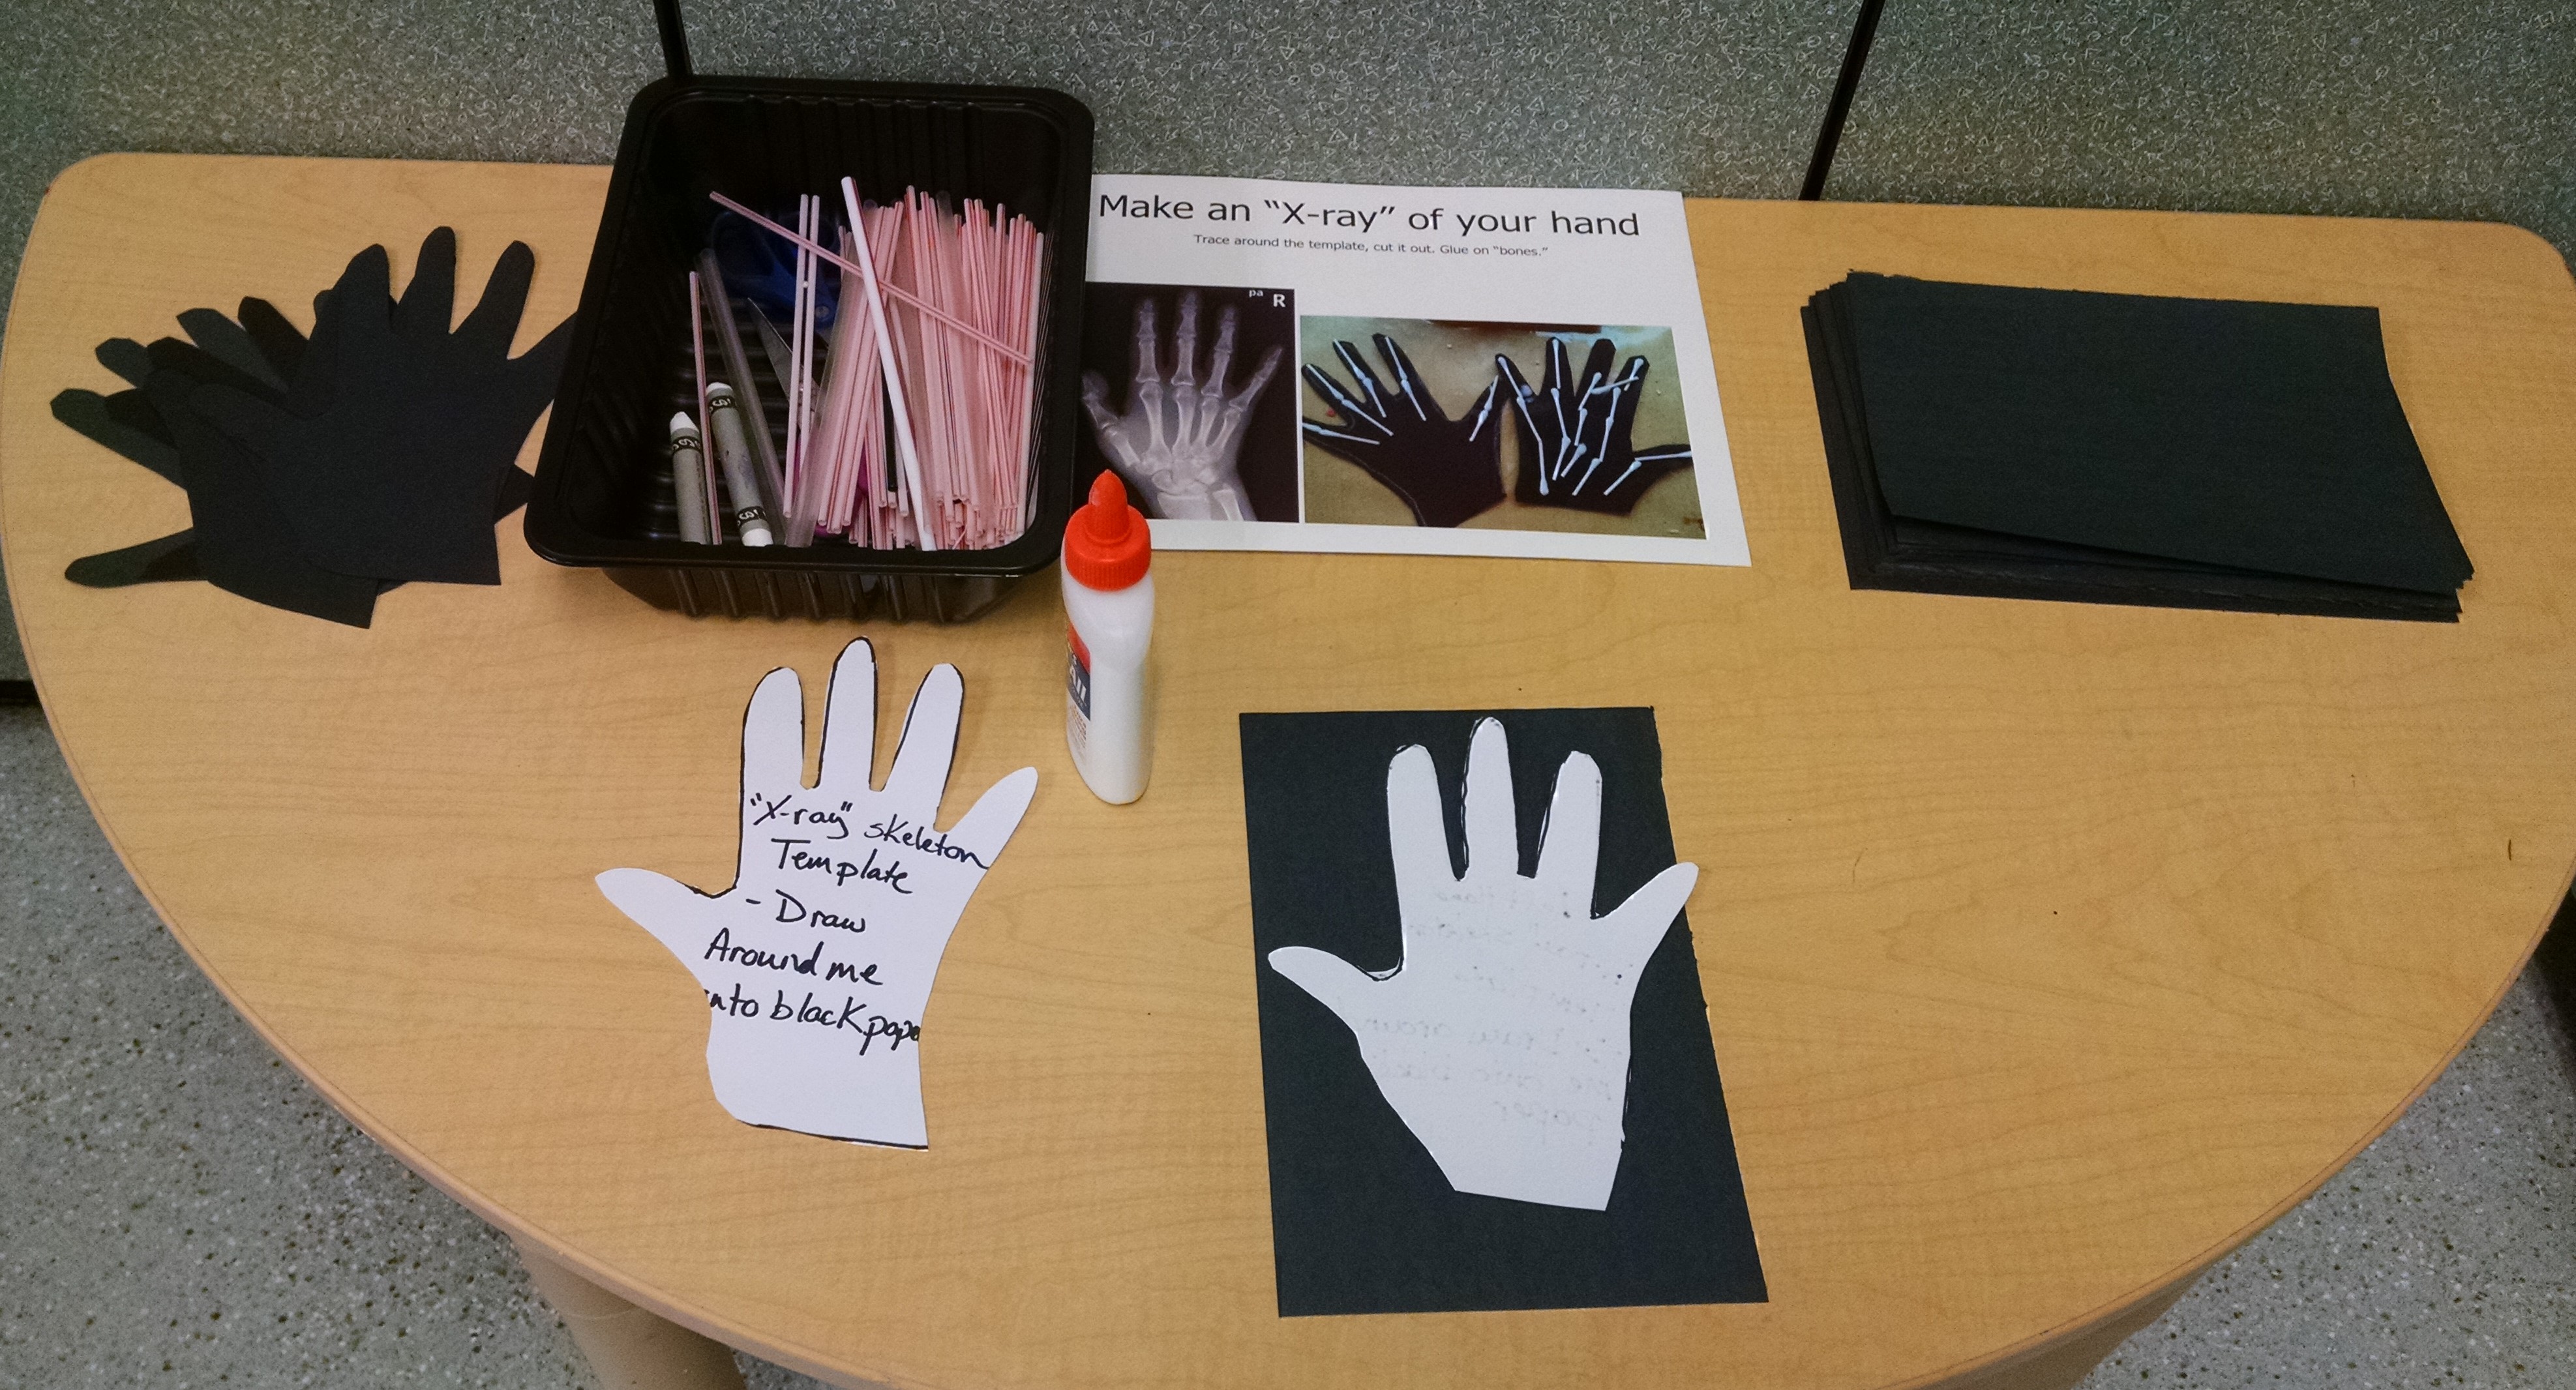
Almost Unschoolers has a fun idea of helping the children feel where the bones are on their hands, then painting their hands where they can feel the bones, then pressing their hand onto the black paper, making a handprint of their bones that looks a lot like an x-ray.
Build skeletons to support a salt dough body: The idea was: Using salt dough and toothpicks (you could also use wooden coffee stirrers cut short), build a skeleton, then build the body on top of it. Children used the materials in a wide variety of ways, none were quite what we’d expected / planned. Would be worth trying again with a sturdier building material for the skeletal structure and a lighter weight substance to coat it with.


Puzzles and Sorting Games:
Skeleton puzzle: We printed the skeleton found here: www.gamescraftscoloring.com/crafts/halloween_skeleton.htm then laminated it and cut it apart. Children could assemble it on the floor.

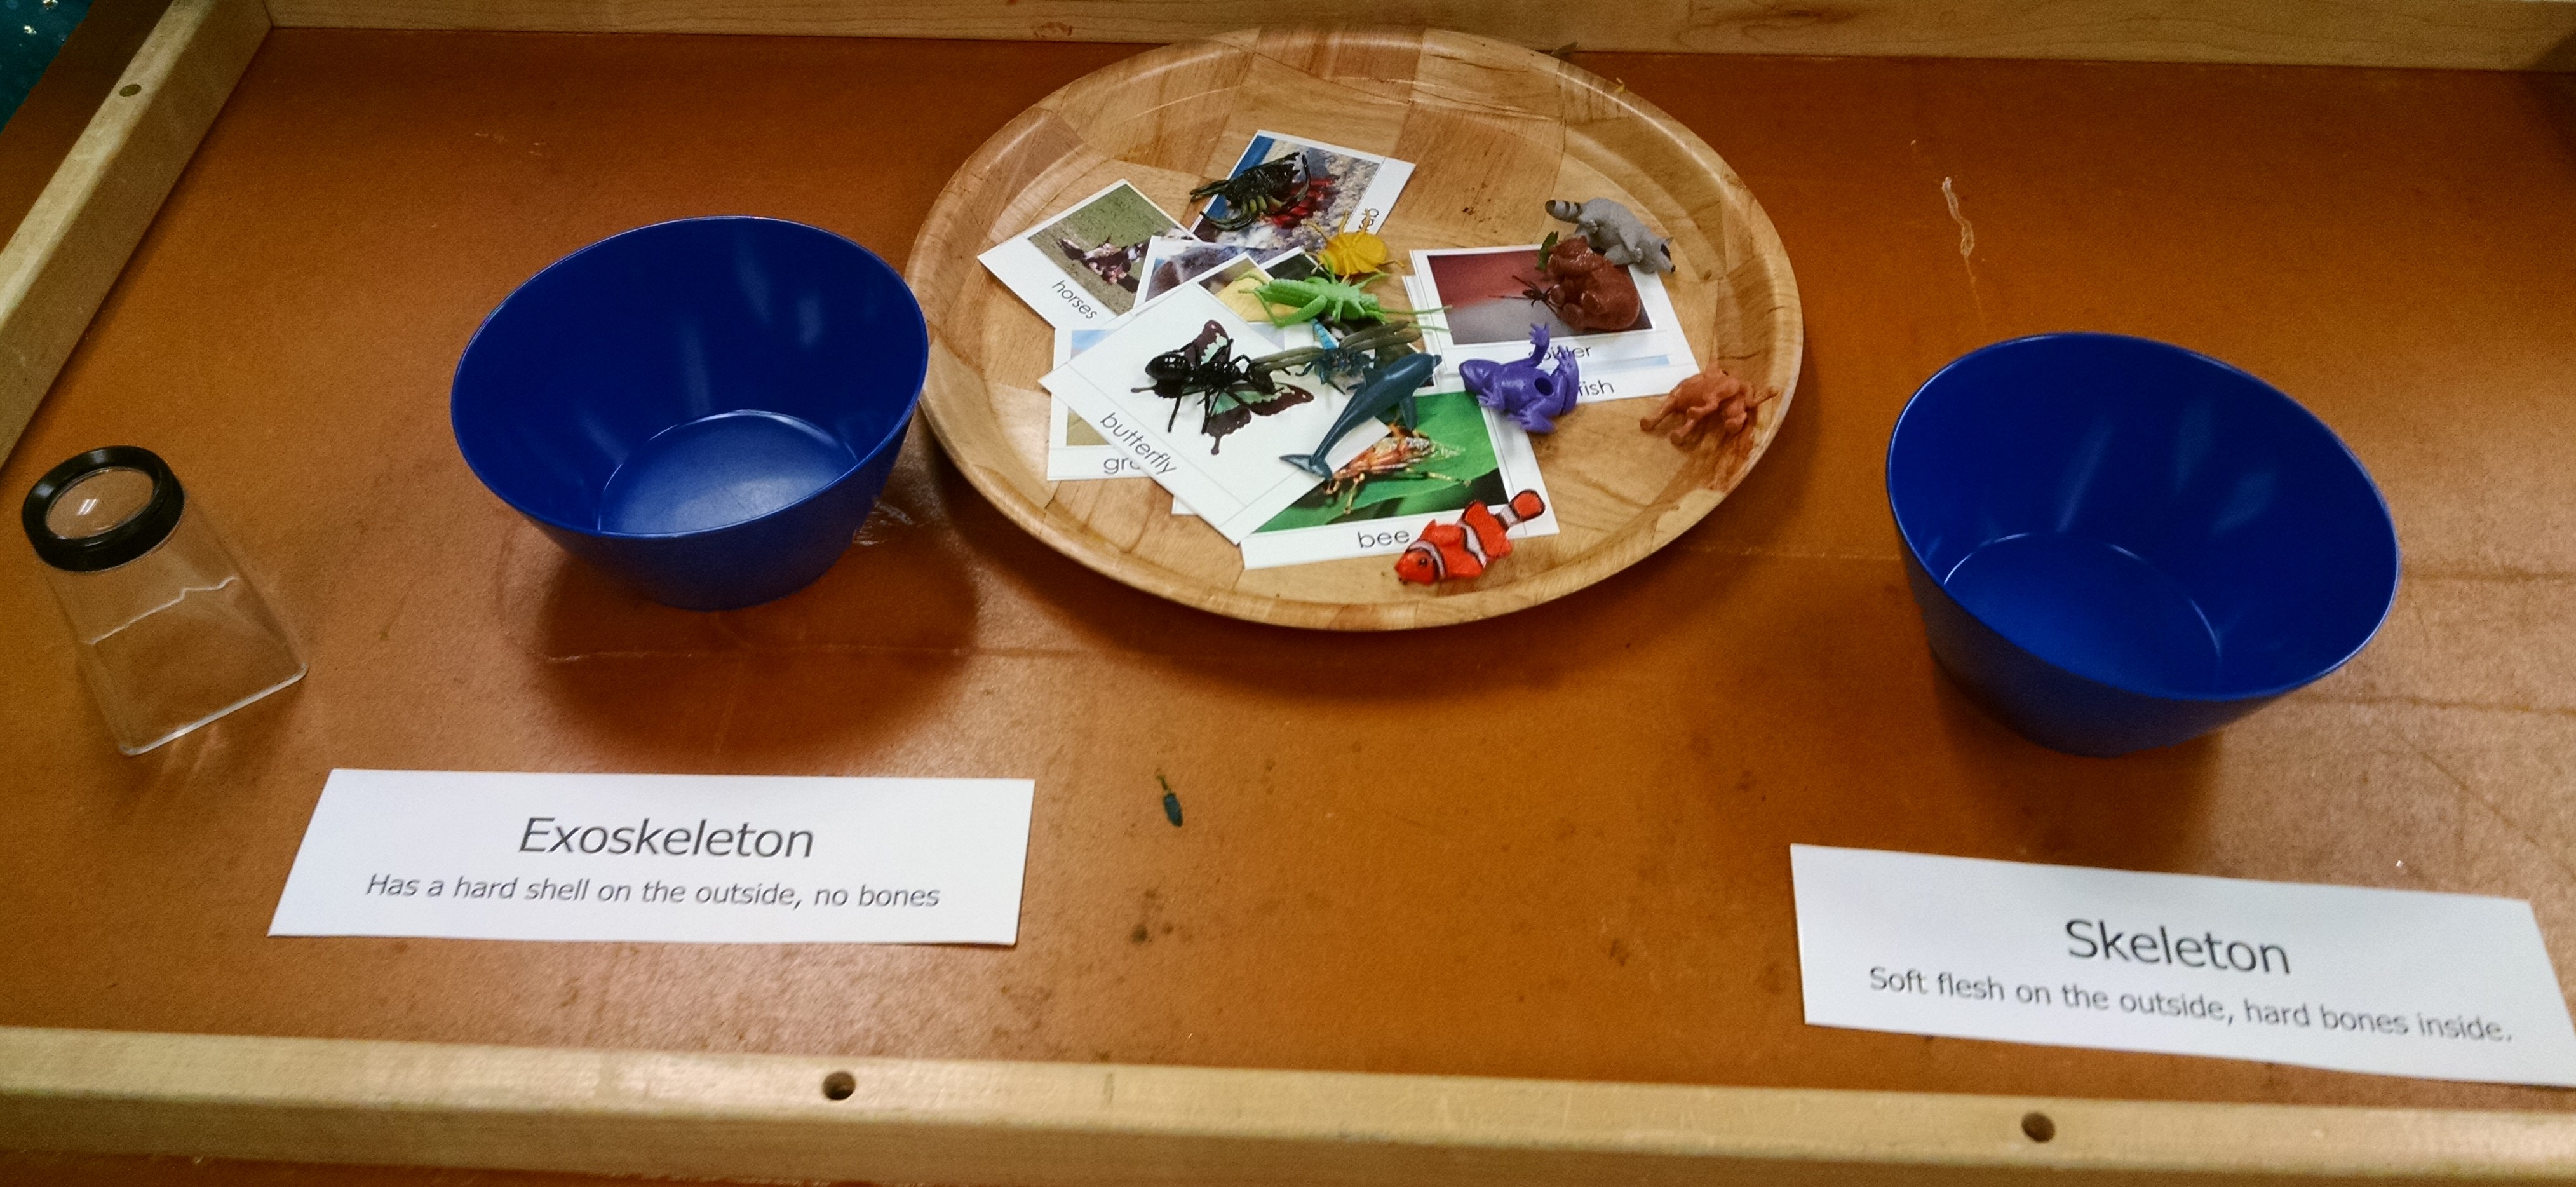
Sorting: We put out two dishes labeled skeleton and exoskeleton, and a collection of plastic animals and insects and had the children sort them.

Science experiment: We considered trying to dissolve chicken bones in Coca-Cola (search online for more discussion of this, or just look at one kids’ experiment: http://schools.dcsd.k12.nv.us/zces/kixmiller/class/dkixmiller/%602012/www/a/Gabriela/ScienceFair.htm. But, we were concerned about health issues of raw chicken bones.
There’s also the naked egg experiment we did for eggs week of dissolving an egg shell in vinegar (http://www.science-sparks.com/2012/12/24/how-to-get-an-egg-yolk-without-cracking-the-egg/). The idea behind both of these experiments is that acidic things (coke, vinegar) dissolve calcium. There’s a great description of how to do a week-long experiment with this with your kids at home: http://littlewondersdays.blogspot.com/2012/03/disappearing-egg.html
In class, we knew we wouldn’t see the full effects in a couple hours of class, but wanted to introduce the idea, so we had egg shells, vinegar, and pipettes and eye droppers. The kids placed eggshells in a cup and dripped vinegar on them. In the morning class, the vinegar fizzed all around the eggshells, so you could see a reaction happening. For some strange reason, in the afternoon class, we got no reaction at all… But the kids still enjoyed playing with pipettes and eye droppers.
Free Play:
ZOOB: We had a construction toy out, called ZOOB. The connections are basically balls that pop into sockets – somewhat like a ball joint – like our shoulders and hips. We put them on a table with Wood Artist Manikins which kids could use to explore how joints work, then build joints with the Zoob. (I’d love to have a Manikin Hand too)


A note about Zoob: I have to say that if I was buying construction toys for home and had limited space and budget, Zoob would not be my first choice construction toy, as I find they’ve got some big limitations on what you can do with them. But, if your child already has lots of experience with other building toys, these offer an intriguing new set of challenges.
Sensory tub: we buried plastic insects under lentils: “find the exoskeleton.”
Book Recommendations:
As always, we get several books from the library to put on the shelf, but only read a few of them in class. Here are some of this week’s books:

- Dem Bones
by Barner has great illustrations, and the words of the song (a spiritual from about 100 years ago that’s very fun to sing) , but it also has information about each of the bones, like it talks about how the ankle bone helps us bend, flex, and climb stairs. When we read it in class, while I sing out the verse (“the foot bone’s connected to the ankle bone”), I point to that bone or joint on me and encourage them to examine their own bone or joint (like flexing and swiveling the ankle joint) as I read the additional facts about that bone. After we read all the way through, we sing the song as I flip through the book. It’s a fun and memorable way to learn about skeletons. Note, the lyrics in the book end with the traditional “Hear the Word of the Lord”. If that’s not appropriate for your setting, you can adapt to “Doing the Skeleton Dance.”

- Bend and Stretch: Learning About Your Bones and Muscles
by Nettleton is a nice non-fiction book, that would be a great educational book about how the body works for kids age 5 – 7 or so. Sample text: “Inside of your body, you have a skeleton made of bones. Bones are strong and hard. Bones help hold your body upright.” “Muscles attach to bones on each side of a joint. The muscles stretch and shrink as the joint is straightened and bent.”
- Skelly the Skeleton Girl
by Jimmy Pickering. Fiction, age 4 – 6. If you like the art style / humor of Nightmare Before Christmas and Coraline, you would like this book. Some might find it a little creepy. Tells the story of a girl who finds a bone and asks all her monsters if it’s theirs, then discovers it belongs to a skeleton dog.
- My Spine
by Rena. Non-fiction. Helps kids age 5 – 7 clearly understand what the spine is and what it does for us. Example text: “Why can my spine move so easily? It’s like beads on a string… the whole string of beads can move around a lot….. My spine is made of five parts. Each has its own job… the part by my chest keeps my ribs in place. The ribs in your rib cage protect your heart.”
- The Skeletal System by Kay Manolis and Your Skeletal System Works!
by Flora Brett are both good non-fiction with good images – for ages 7 – 9 Skeletal System by Sarah Tieck would be better for 6 year olds.
- Skippyjon Jones and the Big Bones
by Judy Schachner. Here’s the Amazon review. “Holy guacamole! Skippyjon Jones is crazy-loco for dinosaurs! The kitty boy enters (via his closet) the land of dinosaurs in search of the fabled Skipposaurus. Instead he runs into his old amigos, the Chimichango gang. When a T-Mex threatens the pack, it’s El Skippito, the great sword fighter, to the rescue. With yips and yowls, he drives the big baddie away, so all the dino-dudes can rattle their bones another day.” Kids like it because it’s kind of wild and crazy. I don’t like it. My co-teacher feels like there are racial stereotypes some people may find offensive.

Opening Circle:
Reminder… our key concepts are:
1) Having long, strong bones helps us to stand up and to carry things.
2) Our skull and rib cage help to protect our fragile organs.
3) Our joints allow us flexibility.
What are bones? Especially for our little ones (age 2.5 – 4) we needed to ground them in what bones are and what a skeleton is. (I asked during little kids’ circle: “who here has a skeleton?” and one child raised her hand.) You can have them touch their cheek and feel how soft it is, then touch their jawbone or cheekbone and ask them to notice how hard it is. (If you have a skull model or picture of a skull, point out these bones.) Then have them feel their arms or hands and notice more bones.
Why are bones helpful – they help us stand and carry things. Talk about it, but also show it. One way to demo concept # 1 is to fill one glove with water or flour, and another glove with a “bony” hand made of popsicle sticks, and with water or flour. (As shown in this post on Pink and Green Mama.) I made our bony hand with a jar lid and five short colored pencils taped on, then tucked in a glove filled with kinetic sand. They can explore how floppy and useless the boneless hand is, then feel how sturdy the hand with “bones” is. Have them try holding a small book (or a wooden block) with the floppy fingers – the book falls to the ground. Then hold it with the firm fingers.

How do bones protect us? You can talk about how the rib cage protects the heart and lungs, and the skull protects the brain (concept #2). We didn’t cover this specifically, but I bet you could do something with inflated balloons as the lungs. Have them blow air into a balloon (like the balloon is taking a deep breath). Easy, right? But what if you were out working, and something heavy fell on your chest? (Now lay a hand on the empty balloon, squishing it flat, and ask them to blow it up again. (Have the balloon take a breath.) It can’t inflate. Then protect the balloon inside a box or something to represent the rib cage. Now put the hand on the box… the box stays firm, the balloon isn’t squished… you can blow it up.
Note: After I wrote that, I noticed that in the Pink and Green Mama post I linked to above, she gives this intriguing, but low in detail description of how she explained this concept: “We saw how our lungs fill up with air and are protected by a ribcage. We saw how helmets protect our brains and heads. And we smashed stuff. Lots of balloons and also a giant ice alien brain.”
Exoskeletons You could also cover exoskeletons, and how insects and crabs have their hard skeletons on the outside to protect their soft squishy insides. (It would be great to have a crab shell or lobster claw or something for this discussion.) Talk about how exoskeletons inspired some human inventions. we showed pictures of armor from a variety of historical cultures, and we also showed modern invented “exoskeletons” that help people do hard labor or help people with physical disabilities walk or lift things. Learn more: www.infoniac.com/hi-tech/top-10-robotic-exoskeletons.html
Conclusions Circle
We first talked about all the things we had discovered and explored about bones and skeletons during discovery time, opening circle, and tinkering time. Then we added a new concept: joints.
How do joints help us? Go back to your hand made of pencils and sand/flour. It can hold up a book or a block. But, can it pick up a small object (like a cheerio)? No, because it has no joints. To help them further understand why joints matter, take long poster tubes or wrapping paper tubes, and slide them over the child’s arm (as shown in this post on Growing Little Scientists, which also has LOTS of other great ideas about teaching bones and joints). This locks their elbow joint straight. Now have them try to scratch their head.
If you’ve already talked about simple machines, and did the activity showing how the arm is a lever, you might remind them of that.
We had several wooden artists’ manikins, so we passed them around for kids to explore. I encouraged them to notice: how does the manikin’s elbow bend? Is this like your elbow? How does its shoulder move? Is this like your shoulder? Is it like the Zoob toys we played with? Then I posed a manikin and asked them to do the same thing with their body that the manikin was doing (lift one arm up, put both hands forward). Then we did it the other way… I did a motion and asked them to copy it with the manikin.

We then sang Dry Bones as a fun wrap-up to the day.
photo credit: artist manikin Exuberance_6491 via photopin (license) Zoob: http://www.myfreeproductsamples.com/free-kids-samples/building-modeling-with-zoob-event-at-barnes-noble/

[…] Skeletons […]
LikeLike
[…] Theme – Skeletons […]
LikeLike
[…] Biology: Skeletons; Habitats, Adaptations, Eggs, Seeds and Plants […]
LikeLike
[…] Biology: Skeletons; Habitats, Adaptations, Eggs, Seeds and Plants […]
LikeLike
[…] but I haven’t had a chance to compare quality), Lincoln Logs on House week, and Zoob on Skeleton week, and probably others I’m […]
LikeLike
[…] could do an entire unit just on skeletons (and we have! Just click on that link in that last sentence to find the lesson plan) You could do […]
LikeLike
[…] you build a robot, do they need a skeleton (or some internal structure) that helps them stand up? Would they be soft on the outside, or have a […]
LikeLike
[…] a variety of noodle shapes and have your child glue together a pasta skeleton – human, or dinosaur or make hand “x-rays” with […]
LikeLike
[…] Learn about skeletons – Have the child feel for the bones in their hand, then paint where they can feel them. Then trace their hand on black paper, cut it out, and have them glue on q-tips on the paper in all the places they can feel bones on their hands. Make a collage of a skeleton where they use various shapes of noodles to represent the bones. (You can also make dinosaur skeletons this way.) […]
LikeLike
[…] you build a robot, do they need a skeleton (or some internal structure) that helps them stand up? Would they be soft on the outside, or have a […]
LikeLike
[…] but I haven’t had a chance to compare quality), Lincoln Logs on House week, and Zoob on Skeleton week, and probably others I’m […]
LikeLike
[…] I would choose Magna-Tiles if they’re in my budget), Lincoln Logs on House week, and Zoob on Skeleton week, and probably others I’m […]
LikeLike