

Sensory tables are a staple of most play-based toddler programs and preschools. Sensory play is basically a large tub full of some loose material, tools for scooping, pouring, and manipulating the loose material, and often other toys mixed in. It is a pure play-based activity, where children can settle in and explore to their heart’s content.
If you’re wondering what kids learn by “just scooping and pouring”, check out my list of benefits of sensory play at the bottom of this post.
How To Assemble a Sensory Activity
This can be as simple as mixing and matching from the ideas below: a material to fill it with, some tools to try, and optional add-in items.

If you are new to sensory play, start simple: just fill a cake pan with cheap white rice. Toss in a couple measuring cups and a bowl and let your child play! When they’re done, put the rice away. Next time, try adding some of of your child’s toys.
Note: once your child is familiar with sensory play, it’s a great independent activity. However, the first several times your child plays, you’ll want to be right alongside them, to teach them how to play without making a mess and without mouthing materials.
Sensory Table Fillers
Edible Items
Some parents/caregivers of young children only use items that are completely edible. For dry sensory, the most common is cereal: whole or crumbled up. For example, crumbled up Cheerios for “dirt” and cocoa pebbles for rocks, or Rice Krispies. I’ve seen crumbled Oreos for dirt. Mini marshmallows or candies for add ins. For wet sensory, they use pudding or whipped cream. Personally, I don’t do this. I worry that if the child tastes it and likes it, then we’re starting to blur the line between sensory play and food which could be complicated in the future.
For young children who mouth things, I supervise them closely to make sure they learn that things at the sensory bin don’t go in their mouths. I also choose only non-toxic items. (If one or two dry beans or popcorn kernels or a bit of uncooked rice goes in their mouth, or even gets swallowed, that’s unlikely to cause harm, but none of these things are intended to be eaten as is.)
Sensory materials from the grocery store
- Rice in all colors (how to dye rice).
- Pasta in all shapes (you can dye pasta, or find lots of amazing specialty pastas, like zebra striped bowties,
rainbow tagliatelle
or conch shells),
- Cornmeal, corn grits, or popcorn kernels,
- Grains: oatmeal or oat groats
, buckwheat, barley, wheat berries
- Legumes: split peas, lentils, dried beans (pinto, black, black-eyed peas, navy, mung beans and more), chickpeas, soybeans
- Seeds: flax seeds
, millet
- Baking soda – drip colored vinegar on it and watch it fizz
Non-food sensory fillers
- water beads (click on that link to learn ALL about this fabulous material)
- pompoms or cotton balls
- sand in all colors, Kinetic Sand
, aquarium gravel
- crumbled cork (I wish I could find a cheaper source for this… but it is fabulous), corks
- cedar shavings, birdseed (watch for tree nuts if allergens are a concern)
- rock salt, epsom salts
- easter grass, straw or hay, raffia, shredded paper, tissue paper, the crinkly paper you add to gift bags, bubble wrap, packing peanuts
- autumn leaves, flower petals
- silk leaves or flowers, cut up scraps of fabric or felt or ribbon, scarves, wool roving, polyfil
- wooden beads or plastic pony beads (add string or pipe cleaners for threading practice), mardi gras beads (add scissors for cutting practice)
- potting soil (note, some of our parents were concerned about chemicals that are often in soils, and don’t like the “natural” soil with manure or compost in it, so we’ve instead started to use coconut coir bricks – learn about them in our seeds and plants post)
- shaving cream – a little messy for my taste, but kids love it!
- mesh tubes – one of my co-workers found a “crazy hat” with these orange and green plastic mesh tubes she cut off – so fun to play with! (Like this, but they didn’t light up.)
- mesh hair rollers from the dollar store… these nest inside each other
- plastic jars, lids, and bottle caps
Sensory materials you can make
- cloud dough – flour and oil (we make ours with cocoa powder and it smells like brownies but looks like dirt)
- non-Newtonian fluid aka oobleck aka quicksand – corn starch and water
- Sand foam (shaving cream and sand) looks interesting, but I like to be able to re-use materials whenever possible so we haven’t tried it
- Slime – there’s 100’s of versions… just search on Pinterest
- Clean mud (made from toilet paper and soap – my students loved making it, but didn’t like playing in it that much)
- A big blob of clear gelatin with pipettes and liquid watercolor
- fake snow – baking soda and water
- Flour and water – one well-known preschool guru, Bev Bos, advocated for giving kids a 20 pound bag of flour and as much water as they wanted and letting them explore mixing without limits. (Personally, I’ve been un-willing to take on the clean-up this would involve. But it looks like great fun for the kids.)
- For some of the materials listed above, you can add in scents, like mixing cinnamon into the oatmeal, or soaking a few of the cotton balls in peppermint, or mixing some lavender seeds in with your flax seeds. Start really light with your scents. They can quickly become overwhelming. (Here is a great post on sensory activities related to scents.)
Water
There’s also the whole world of water play. Learn about this options in my Ultimate Guide to Water Tables post.
Tools for the Sensory Table
To set up an enriching play experience, think about what the child will do with the items provided. When you have something planned, think what actions they’ll be able to take – will they scoop, pour, stir, mix, dump, separate, sort, drop through a hole, hide, bury, excavate, or assemble? What tools will they need?
Common Tools
- scoops, measuring cups, spoons, slotted spoons, shovels, gardening rakes, spatulas, ladles
- tongs, tweezers, Handy Scoopers
, chopsticks
- funnels, PVC pipes, or TP tubes to pour through; test tubes
- containers of all sizes and shapes: bowls, buckets, metal pie pans, gift boxes, plastic eggs, etc. (Part of the fun of scooping material is to have a container to fill up, or to sort add-ins into.)
- multi-compartment containers (muffin tins, ice cube trays, silverware organizers, medication organizers)
- if you’re using funnels, be sure to have narrow necked bottles or other containers to pour materials into
- sifters, strainer, colanders, mesh trays
- magnifying glass, magnet
Specialty tools
- toy Conveyor Belt
, toy Grain Auger, a sand & water wheel
- balance scale
- Kodo’s Sift and Sort tower is a tower of three screens, which sift out large, medium, and small materials. (It’s pricey at $175. Some other alternatives are “classifiers” such as these Sifting Pans
($53 for a set of 5), or a DIY version: Explore Inspire EC cobbled together two pegboard platforms supported by dowels. I’m thinking you could use cookie cooling racks or a shelf insert or a drying rack)
- Sand castle molds
– these work best with wet sand or kinetic sand – not with most other materials
- Haba has a “spilling funnel”
that mixes water and sand – I’m curious to try it
Apparatus
The blog Sand and Water Tables by Tom Bedard is full of fabulous ideas and thoughtful reflections on sensory play. He assembles what he calls an “apparatus” out of cardboard and found materials to take sensory play up a level. I have tried several ideas. Here are two collages of photos to inspire you. The first collection are all images from Tom’s site. The second is compiled from lots of different sources. I will give links below to sources for all the images.
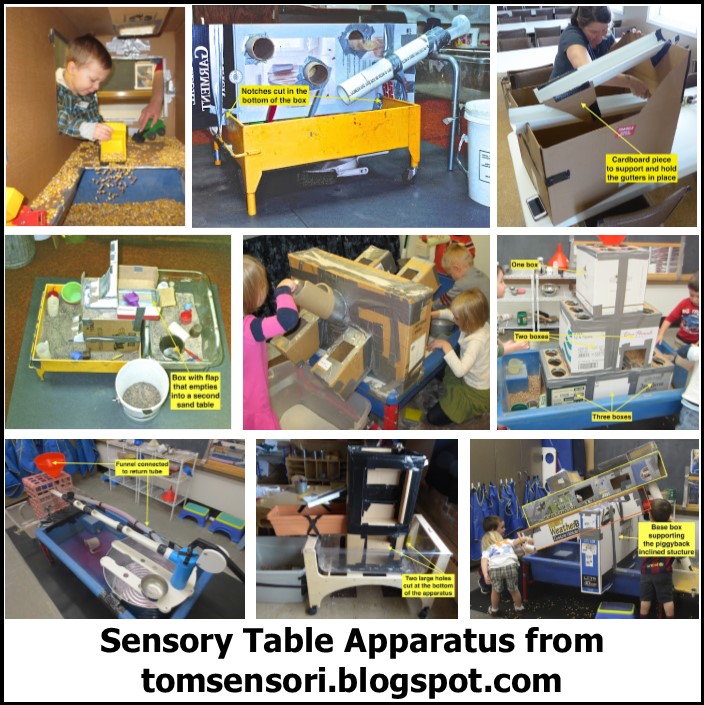
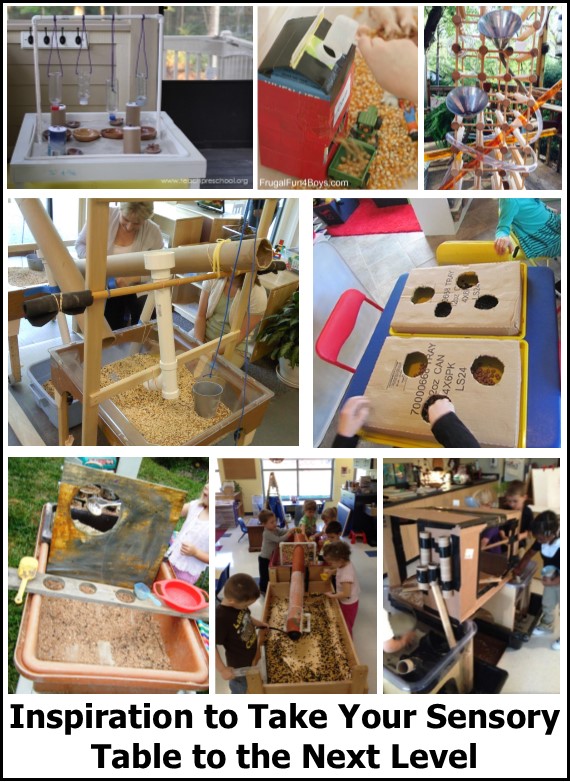
From top left: Hanging sand funnels from Teach Preschool; Grain silo from Frugal Fun. Wine rack and tubes from Nurturing Roots. Poster tubes and PVC pipes: source. Holes in a box from PreK and K sharing. Divider with a hole from Let the Children Play. Tube between tables from Day Nursery Indianapolis. Tubes and funnels from Fairy Dust. Don’t these all look fun?
Some common themes with these apparatus are ramps (inclined planes) or tubes to slide materials down, holes to reach through or drop things through, things that block your view of the materials or of your playmates (the increased mystery increases the fun) and chain reactions… pour through here, and it knocks this door open, etc.
Add-Ins:
A simple bin full of rice, scoops and a few containers to dump into can entertain toddlers for hours. But, a sensory bin can really come to life when we mix in other items to inspire imagination or provoke learning. For example: add in blocks or any building supply. Add in your child’s favorite toy of the moment – dolls? plastic horses? dumptrucks?
On this blog, I have examples of sensory bins we use to reinforce science learning, on plants week, a bin of potting soil with trowels and rakes is fun. But better when we add in a few plant pots, lima beans or other big seeds that are easy to sort out of the soil later and little signs to label what they’ve “planted”. Or we mix in silk flowers and pots. On cars week, we use kinetic sand and shovels to make mountains and trails with, then add in toy monster trucks with big tire treads to lay down tracks. On a hearing / sounds week, you could use dried beans or popcorn kernels with metal pans and cymbals where they could bounce the items off the metal for that metallic “tink” sound. When we study animal adaptations and habitats, we use sensory materials for a camouflage themed activity where we offer plastic animals to hide in various materials. In dinosaur week, you could put fossils in sand for them to dig up and identify, or hide pasta “bones” they could find and create a skeleton with, or plastic dinos to excavate and re-bury.
Sifting / Separating / Sorting
You can toss in a few handfuls of almost anything and children can use sifters or tweezers or their hands to separate all those items back out. For example, add plastic coins and gems into the bin, and a piggy bank or treasure chest to gather them into. Add glass stones, or buttons, or small toys. (If you search for “table scatters” or “vase fillers” you can find some possible options – but note that these things are not designed for sensory bin use, so you’ll have to assess them to see if they seem safe for little kids.) On Geology week, we use sand with pebbles, small rocks, and big rocks. We offer three different types of sifters which separate out the different sizes of rock and containers to sort them into. On Magnet week, we throw in metallic and non-metallic items, and give the children magnet wands to pull out all the magnetic items, and container for sorting out the magnetic and non-magnetic items. (Try jingle bells in December!) On Bugs week, we hide bugs in the coir, give them magnifying glasses, and dishes to sort out the bugs into categories – insect, arachnid, myriapod. (Learn more about sorting – a key skill for math and scientific thinking.)
In States of Matter, we freeze toys in a big chunk of ice, and the kids work to excavate the toys, using salt and water to melt the ice.
Scavenger Hunts
Gather a collection of items. Make a “key” listing them all – for younger children, you’ll want pictures of the items they can match an object with, for older children, this could be a list of words describing what they are hunting for. Then bury the items in the filler material. Kids hunt them out and match them to the key. We do this with the “human organs TOOB.” when we study anatomy. On dinosaur week, we bury plastic dinos and then they sort them by taxonomy. You could use magnetic letters, foam letters or scrabble tiles in an alphabet hunt. You could toss in puzzle pieces and they would search for all the pieces to complete the puzzle.
Book pairings
On Beach week, we fill our bin with sand, buckets, shovels, and seashells. We have a mural on the wall showing a beach scene, and we put nearby books about shells and beachcombing, so they can look up more information on the shells that they find.
Small Worlds
Small world play is when children use miniature items to act out ideas from real life or re-enact stories. Examples are playing in a dollhouse, or making a pet store with toy animals, or a fairy house with twigs and stones. Mixing in sensory play makes this an even richer learning environment. Learn more about in the Ultimate Small World Play Guide.
For our bridges and tunnels week, we use cloud dough, round wooden blocks to build tunnels around, and plastic animals to live in the tunnels. In Build a House week, all around the room, we are replicating parts of the home building process. Our sensory bin is the excavation stage with toy bulldozers, Playmobil dolls and cloud dough. For Earthquake week, we put plastic fences, trees, and animals in a tray of sand, and give kids a back massager to press against the pan to create an earthquake. For chemistry mixtures, we make corn starch quicksand and put in plastic animals to “run across” or sink into (you could also use this cornstarch and water mixture for “tar pits” in dinosaur week). When we study planets and space travel, we use Mars Rover toys in sand.
Where to find add-ins
Probably you already have plenty of toys, puzzles, building tools, manipulables, craft supplies decor items, and such that would make great add-ins. You may not need anything new.
One of my co-workers is a genius at finding new items. She goes to craft stores, dollar tree, Goodwill, hardware stores, and garage sales, and wanders around and waits for inspiration to strike! You don’t have to spend a lot of money to find fun add-ins. My preference is to only use used items from thrift shops or find things in nature so I’m not just buying more plastic that will end up landfilled.
Tables and other Containers
Are you wondering what to put this all in?? There’s lots of options.
Plastic tub
If you have one or two children who will be playing at a time, you can get by with a smaller container. A cake pan is not really big enough for most sensory play – but if it’s all you have, you can make it work with some. It’s better to use a big plastic tub. (Something like this Sterilite 32-Quart tub which is 24 x 16 inches or a Gift Wrap Storage Box
which is 33 x 12.) For multiple children to be able to play, you need more space, such as an Underbed Storage Bin
, which is around 40 x 20.
You can set these on the floor or kitchen table. If you’ll be using the same tub on the same table a lot, put velcro tabs on the tub and table to help hold it in place. Or some teachers just buy a few bins and stack them on top of each other… the one on the bottom provides a “table” for the open bin to get it up to a good height to play on.
DIY sensory tables
Search online, and you’ll find lots of examples of people who have built their own tables. For example: Teach Preschool, A Teaching Mommy’s PVC frame, Pink Oatmeal’s IKEA hack, or this collection of 12 ideas.
Commercially Made Tables
You can buy some inexpensive sand and water play tables for home use, but most aren’t very sturdy, and when you’re done with them, you can’t re-purpose them for anything else. You’re better off just using a storage tub. But, if you run a preschool or day care or toddler class, a really good sensory table is expensive but is worth the investment. Here’s a few to consider: Wood Designs or Jonti-Craft. Lakeshore Learning also has lots of great options. IKEA has the Flisat table that can combine with Trofast storage bins or trays to make a sensory bin.
Setting Boundaries / Containing the Mess
Many parents and teachers are resistant to sensory play, because to be honest, it’s pretty much a guaranteed mess. You will always need to do clean-up when they’re done! (If your sensory play is outside, you can be more lax about clean-up, but you still need to keep things safe and free of pests / infectious potential.)
During set-up, think about where it’s best to do sensory play (e.g. tile or hardwood floor is a whole lot easier to clean than carpet!). Consider laying down drop cloths (plastic tablecloth, shower curtain, or a flat sheet). You may need to tape it down to prevent tripping. Don’t tempt fate by putting the sensory table too near the water table or the painting easel. (Kids love to combine materials!) If something is so messy that you know you’d just spend the whole time fretting at the kids about the mess, then skip it. Part of the joy of sensory tables for children is the chance to be able to explore and play without you hovering nearby saying “don’t do that.”
That said, while children are playing, you do want to set expectations for behavior and be clear what the limits are. It’s best to phrase things in positive terms: instead of saying “don’t dump it all over the floor” tell them what they should do. Say “let’s keep it all in the bin” and “move the bucket here so when you pour all the material stays here” or “can you pour that over the bear”. Children often want to carry sensory materials away to other parts of the room – remind them that it all needs to stay there. They also like to bring other things in to try them out. Teach them – “ask a grown-up before adding anything.” In our class, we have the rule of “be creative, not destructive.” If something is fun and creative and will do no harm, we say yes, even if it means that things are being used in ways we never expected. However, if anything will get harmed or ruined, we say no.
If children are having a hard time following the rules, we will move them to another part of the room, or if it becomes a chronic problem in a class on a particular day, the sensory table goes on time out – we put the lid on and we’re done.
Encourage children to help with clean-up.
Read more about Reducing Sensory Bin Mess and about Setting Boundaries with Sensory Play.
Benefits of Sensory Play
In our academically driven world, parents may see sensory play as “just play” and wonder what their child is actually learning? First, it’s important to know there are all sorts of benefits of all play-based learning, but here are just a few things kid learn through sensory play:
- Life skills: Kids learn to use tools of all sorts!
- Kids learn to be OK with having messy hands. (Modern kids are doing a lot less outdoor play, like making mud pies, and less outdoor work, like mowing lawns, and that means many young adults struggle with messy chores and their ick factor.)
- Fine motor skills, strength, and flexibility. Eye-hand coordination.
- Spatial understanding – the meaning of empty, full, volume, weight – will the materials from this container fit inside that container?
- Social skills, language – As they play together around the table, children socialize, negotiate sharing tools, create stories together.
Sensory tables appeal to all ages and abilities. Every child can be successful. In my class, many kids are neurotypical, but some have sensory processing issues, autism, or ADHD. The materials seem to give them the sensory input they need in order to stay focused on other learning activities for longer times. I teach a multi-age class, with children ranging from 2.5 to 7 years old, and they (and the adults) all spend some time at the sensory table each day. There’s just something soothing and relaxing about sensory play.
More resources
Little Bins for Little Hands is the single best source of ideas: start on one of these pages for links to lots of specific ideas: 40 sensory bins collaborative series, Rice sensory bins for holiday and seasonal themes, and Complete Guide.
And, of course, you can search Pinterest for countless ideas for sensory play or scroll through several instagram accounts and Facebook groups on the topic.
Also, check out my Ultimate Guide to Water Tables post, my post on Sensory Table Set-Ups, which has lots of examples with comments on what makes them effective, and how to reduce the mess of sensory play.

/about/velcrohairroller.SvenOlofJonn-56aa189c5f9b58b7d000d449.jpg)
[…] Learn all about sensory play in: The Ultimate Guide to Sensory Play. […]
LikeLike
[…] want to have a lot of towels available, but it’s easier than sweeping or vacuuming around the sensory table! You may also consider offering smocks to keep clothes dry.) You can learn about the benefits of […]
LikeLike
Awesome post! I love how you listed down all the possible things that we can include in a sensory bin. It sure makes things easier for us newbies! I will definitely try this again with my nephew. He just loves scooping and pouring so much! Thanks for this article. I find it very helpful and informative.
LikeLike
[…] this theme were magna-tiles, rainbow crayons, rainbow colored blocks, rainbow puzzle stacker, a sensory table filled with colored rice or pasta or other colorful items, a water table filled with water beads of […]
LikeLike
[…] conveyor belt and grain auger in this post on Specialty Toys We Use in our STEM class). Check out The Ultimate Guide to Sensory Tables, and The Ultimate Guide to Water […]
LikeLike
[…] the sensory table, we built an apparatus from cardboard and styrofoam to pour brown rice over and through. At the water table, we made a […]
LikeLike
[…] with ideas for art projects, crafts, recommended songs, games, books, science experiments, sensory play, building projects, snacks, free printable worksheets and more, all grouped by […]
LikeLike
[…] could use sand or any sensory material to bury foundations into to increase the stability of the […]
LikeLike
[…] Activities include art projects, crafts, recommended songs, games, books, science experiments, sensory play, building projects, snacks, free printable worksheets and […]
LikeLike
[…] with or build a zoo or farm. This could be a playdough activity, or you could put items in a sensory bin with beans or rice, or could be nature play with sticks and rocks, or combined with building toys […]
LikeLike
[…] conveyor belt and grain auger in this post on Specialty Toys We Use in our STEM class). Check out The Ultimate Guide to Sensory Tables, and The Ultimate Guide to Water […]
LikeLike
[…] in the room, such as: a dress-up corner, pretend kitchen, dress-up clothes, block play area, sensory table, writing table, trains, equipment for large motor play, a science / nature station and a book area. […]
LikeLike
[…] you could make some truly lovely apparatuses for sensory play or water play: https://inventorsoftomorrow.com/2018/06/22/sensory-bins/ […]
LikeLike
[…] Sensory bin play – read my Ultimate Guide to Sensory Tables […]
LikeLike
[…] Imaginary play and/or large motor play tied into the days theme. Sensory play. […]
LikeLike
[…] conveyor belt and grain auger in this post on Specialty Toys We Use in our STEM class). Check out The Ultimate Guide to Sensory Tables, and The Ultimate Guide to Water […]
LikeLike
[…] dressed, talk about how their socks are tight and stretchy, their shirt is loose and soft. Make sensory bins for them to play […]
LikeLike
[…] parents or teachers first introduce a child to sensory bin play, they usually make a big […]
LikeLike
[…] you’re new to sensory play, check out my “Ultimate Guide to Sensory Tables” that gives all the basics. (And my post on teaching your child how to use a sensory bin […]
LikeLike
[…] out the Ultimate Guide to Sensory Bins to get LOTS more ideas about what sensory bins you could buy, what materials to fill them with […]
LikeLike