

Whether you’re a preschool teacher or a parent of an elementary age child, if you want to teach kids what science is, the best way to teach them is through letting them experience science hands-on and eyes-on. Here’s how we covered it in our class, which serves families with kids age 3 – 7. As with all our topics, class included: experiments, observation activities, art projects, sensory play in the water table, dramatic play, stories, and songs to reinforce the key ideas about science tools, science process skills and the scientific method. [Note: many of these activities could also be adapted for a “Mad Scientist Birthday Party”]
It’s important to know that we’re a play-based program. All the activities listed below are stations in our classroom. We have 10 – 20 kids in the class, and most have a parent by their side. The children choose which activities to try, how long to do them, and when to rotate on to the next. So some of the kids try most of the activities, and some will only do one or two. The ways that our 3 year olds interact with each activity is different than how our 7 year olds interact, but we try to be sure each activity has something to offer to each age group.
Exploring Science Tools
One of our goals was to introduce some of the tools that scientists use and some tools we use in class. (Using a wide variety of tools is also a way we help our young students develop their fine motor skills.)
Protection (A Dress-Up Activity)

We had a variety of kids’ lab coats, safety goggles
and safety glasses
, rubber gloves from the dollar store, and a clamp to hold plastic test tubes with. If your space works for water play, it could be fun to add in a spray bottle of water to test whether the goggles would protect their eyes from a chemical spray. This was a dress-up / imaginary play activity, and during circle, we talked about how / why scientists might need protection in a lab.
You don’t have to spend a lot on a dress-up lab coat. You can simply take an adult large size white t-shirt and slit it down the center of the front and it makes quite a good lab coat. If you have older students, they could decorate these by drawing on pockets full of lab supplies like beakers, magnifying glasses and safety goggles. (On More Time to Teach, they use washable markers – I recommend using color-fast fabric markers.)
Microscopes and Magnifying Glasses
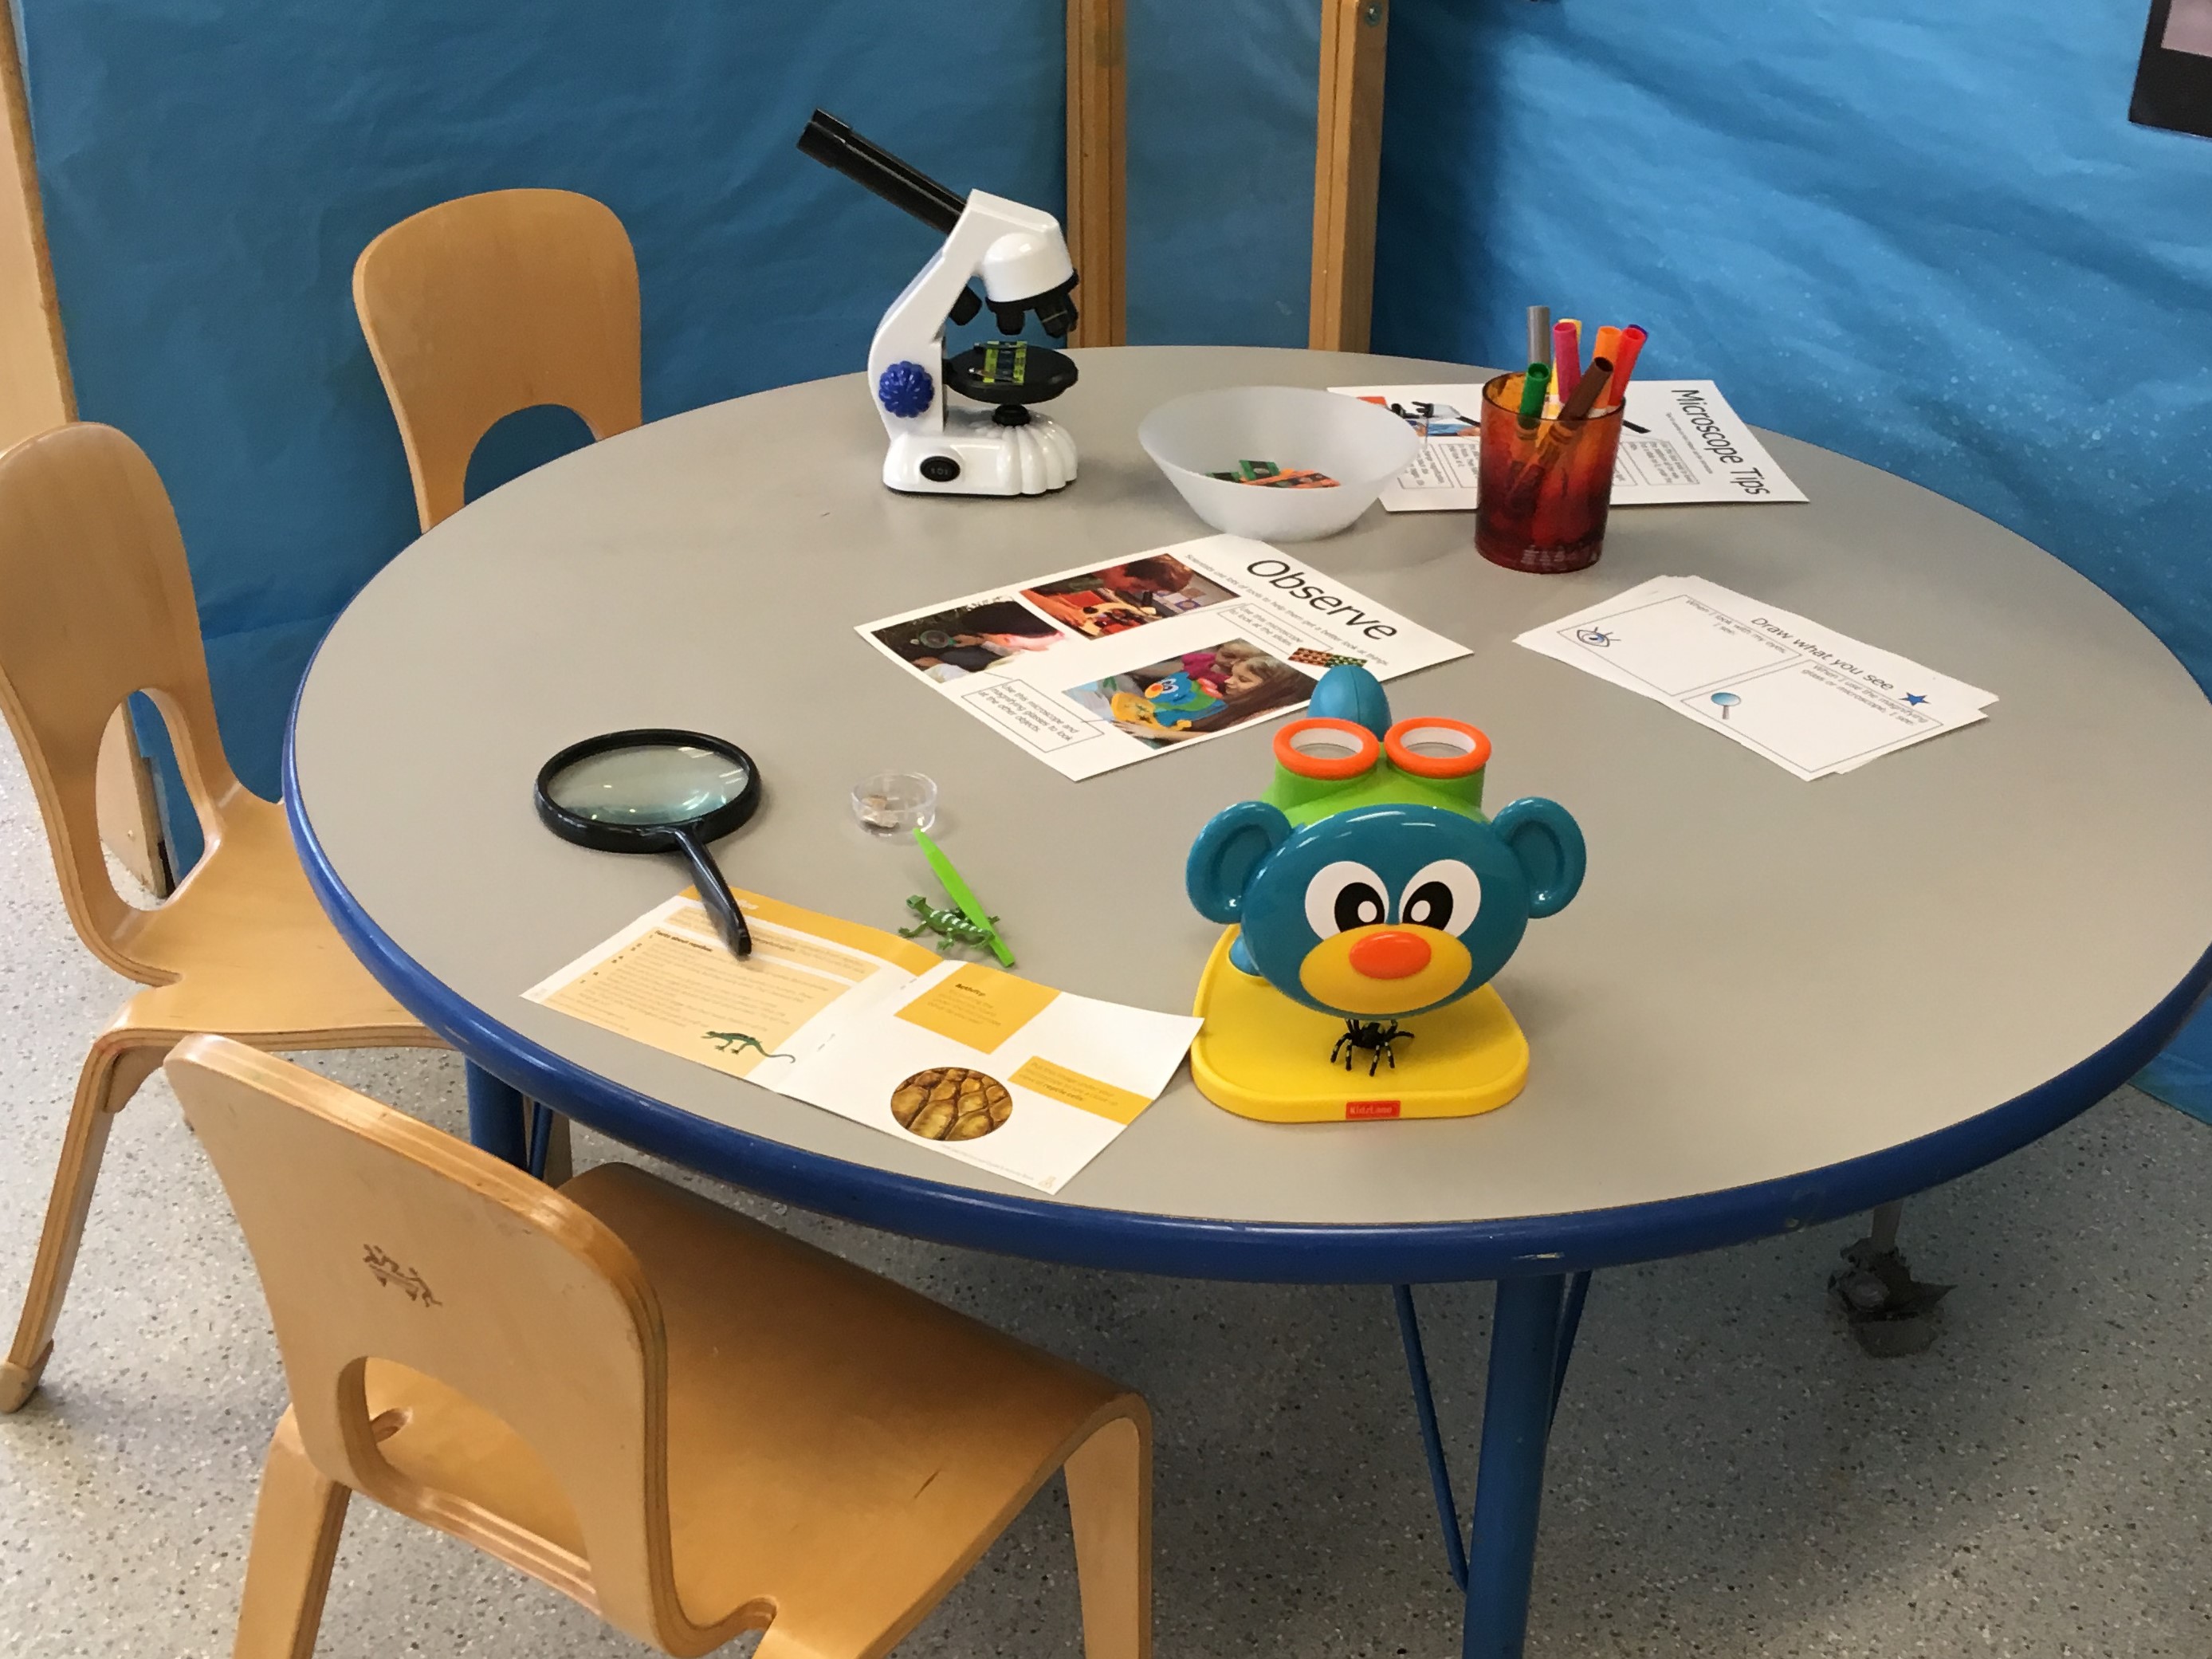
We set up a table with microscopes and magnifying glasses for the kids to test out.
For children 3 to 5, I would recommend a very basic microscope, such as the Kidzlane microscope (the monkey microscope in this photo), or Learning Resources Viewscope, which you can purchase separately or in the lab set shown in the photo below. These are about the same strength as a magnifying glass (8x for Kidzlane, and 20x for the viewscope) so they’re good for looking at items like printed words on a page, rocks or shells, or plastic bugs. They are very easy to use, and pretty sturdy, and good enough that the kids get the key idea that microscopes make things look bigger so you can see more detail than you can see without them.
For elementary age children, I liked My First Lab Mini-Duo Scope. It has three levels of magnification: a 10x eyepiece means that the lens function as 4x = 40 times bigger, 10x = 100, 40x = 400. It was pretty easy to use and focus. We bought prepared slides to use with the microscope.

Art
We made worksheets encouraging them to draw what they could see with their naked eye, and what things looked like when they looked through the microscope or magnifying glass.
We also got a digital microscope which we set up next to the easel. It magnifies 54x. We put out a variety of things for them to look at – a lid with writing on it, some fabric, some wood, a coin…. and we encouraged them to also use it to look at their skin, or the fabric on their clothes, or whatever else inspired them, and then paint a picture of it. Because we’re working with 3 – 7 year olds, sometimes unexpected things happen. One of our little ones enjoyed fingerpainting, then using the microscope with his paint covered hands, and touching the laptop screen with his paint-covered hands. Good thing this was an old battered laptop! We wiped off most of the paint after class.
Chemistry Lab
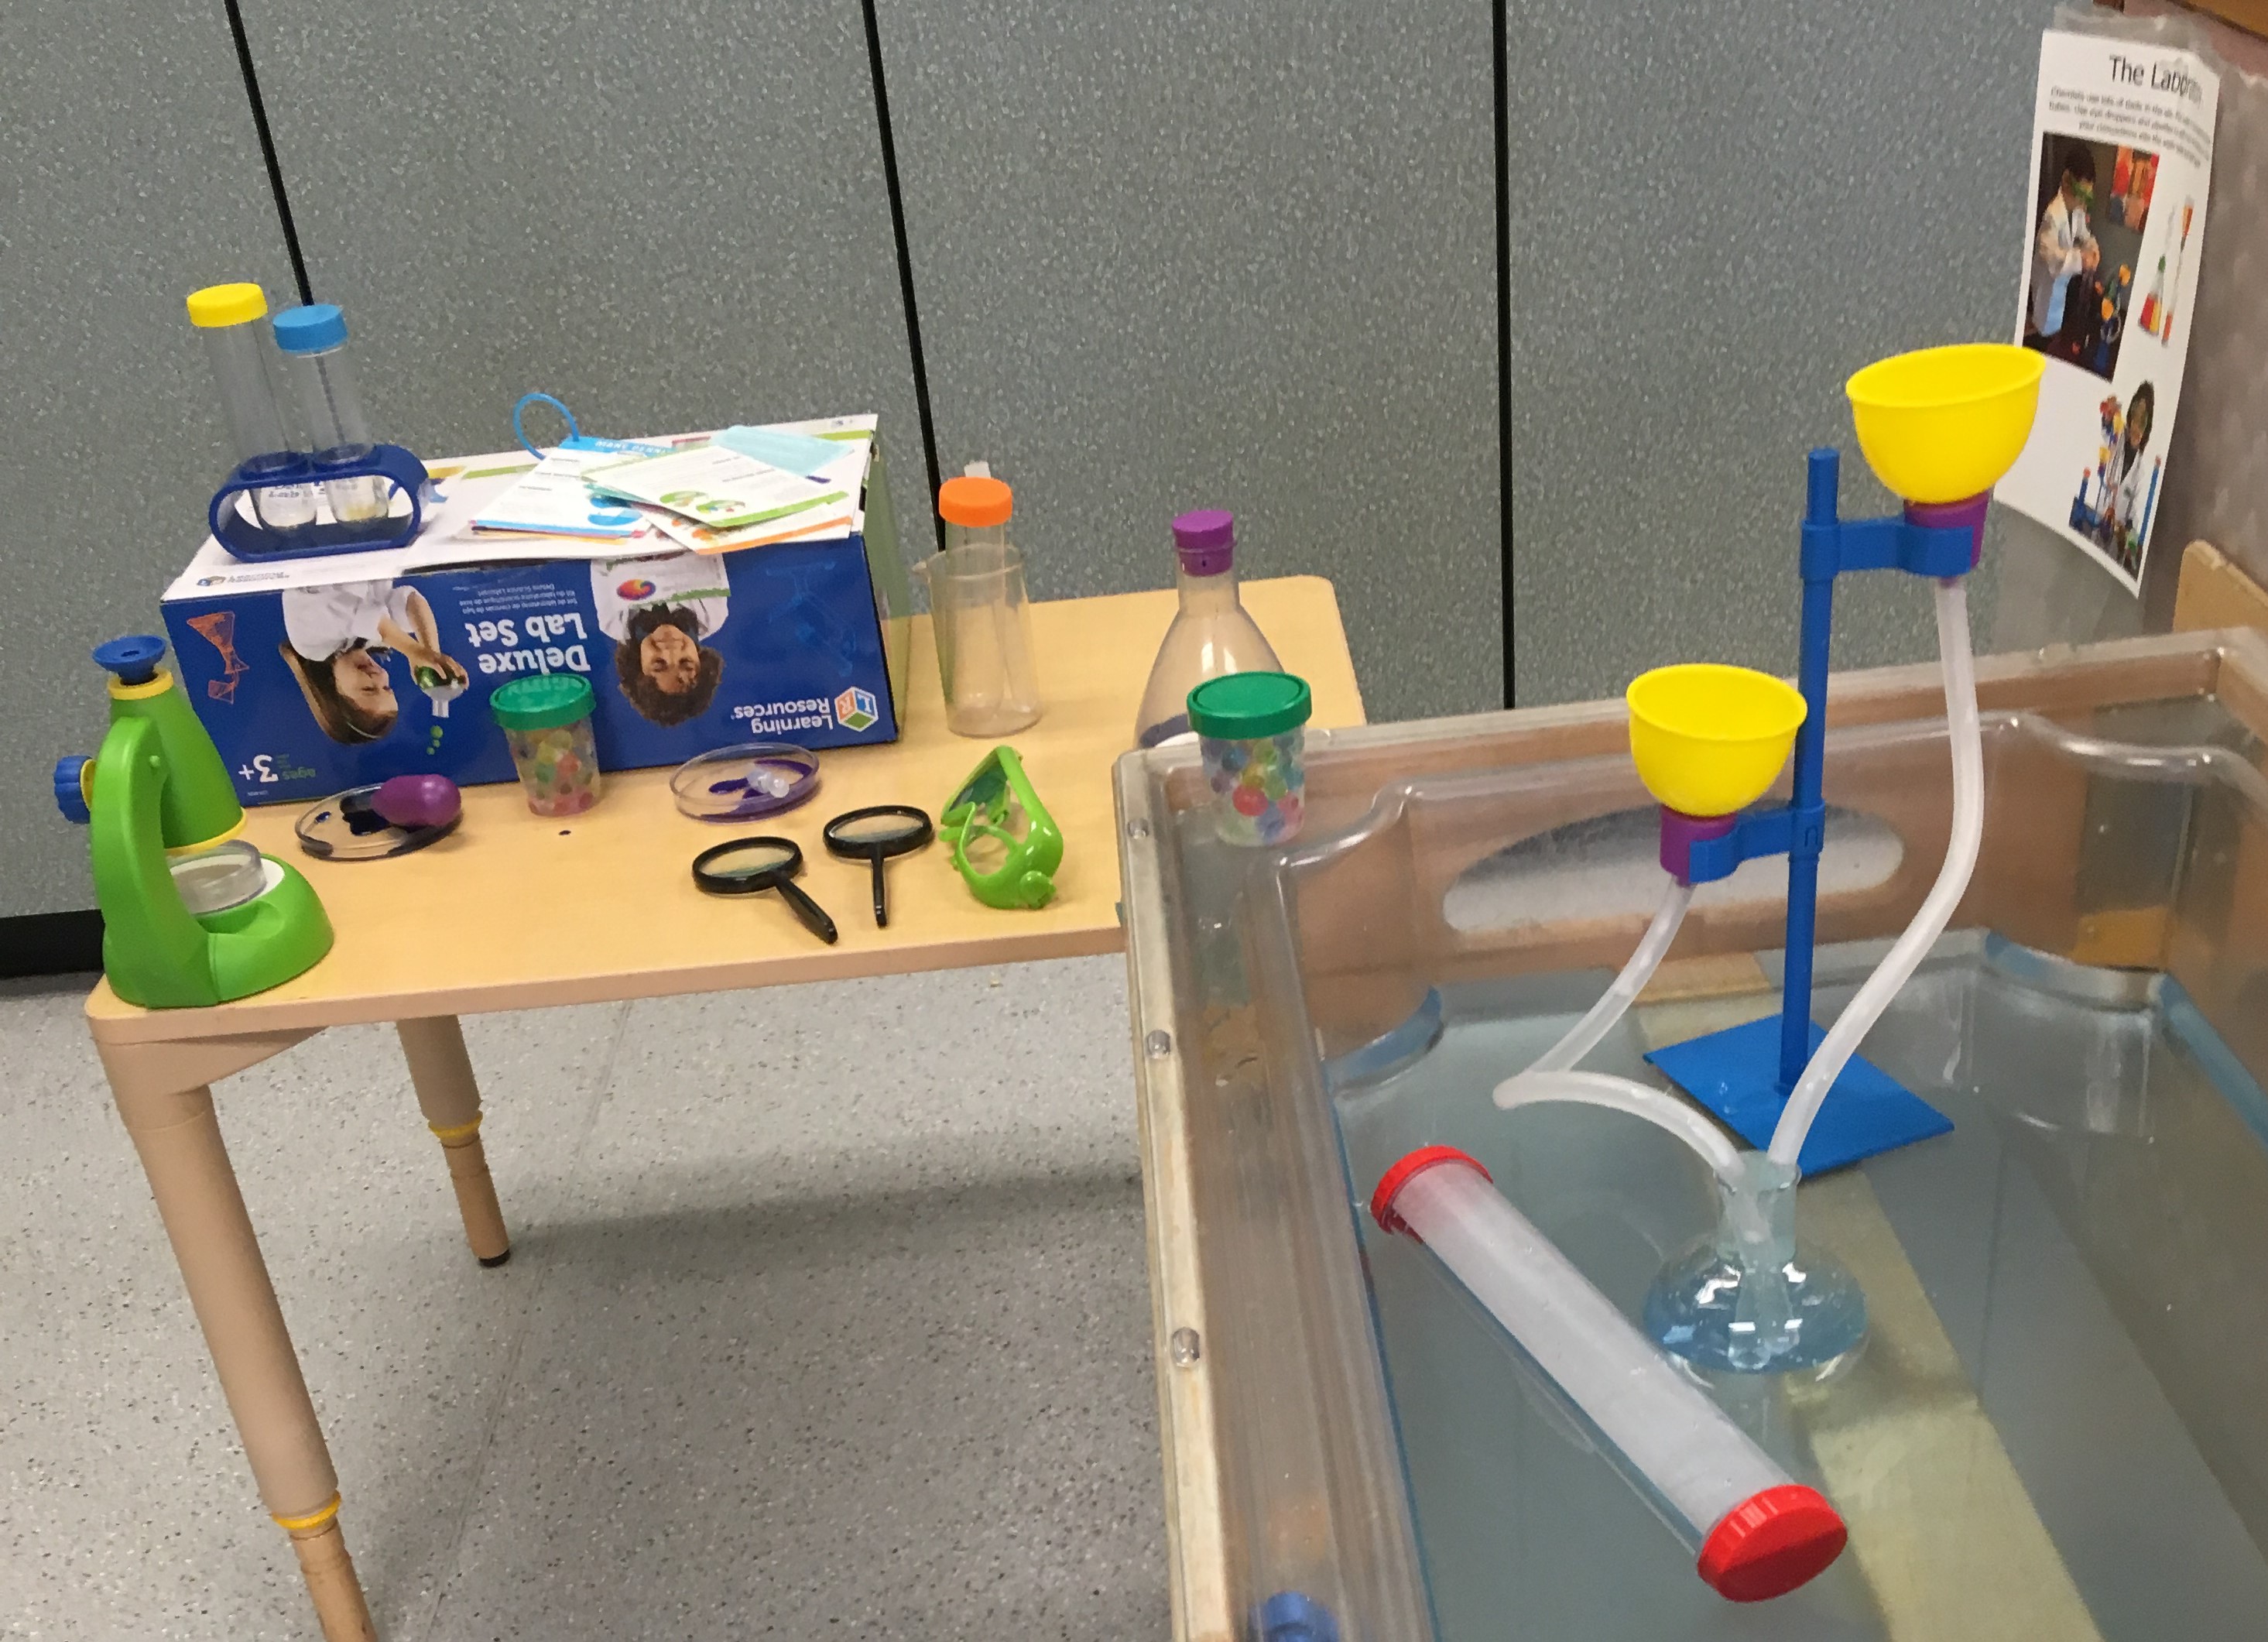
We had toy beakers, test tubes, petri dishes, and funnels from this Lab Set. We added pipettes and eye droppers, handy scoopers
, and a few containers of water beads. We put some colored water in two of the beakers. This was a water play station where kids scooped, poured, and mixed to their hearts’ content. It was VERY popular with our 3 – 4 year olds. (And a good reminder to us to stash a couple towels under the water table when we set up!)
 Balance Scale (A Math Activity)
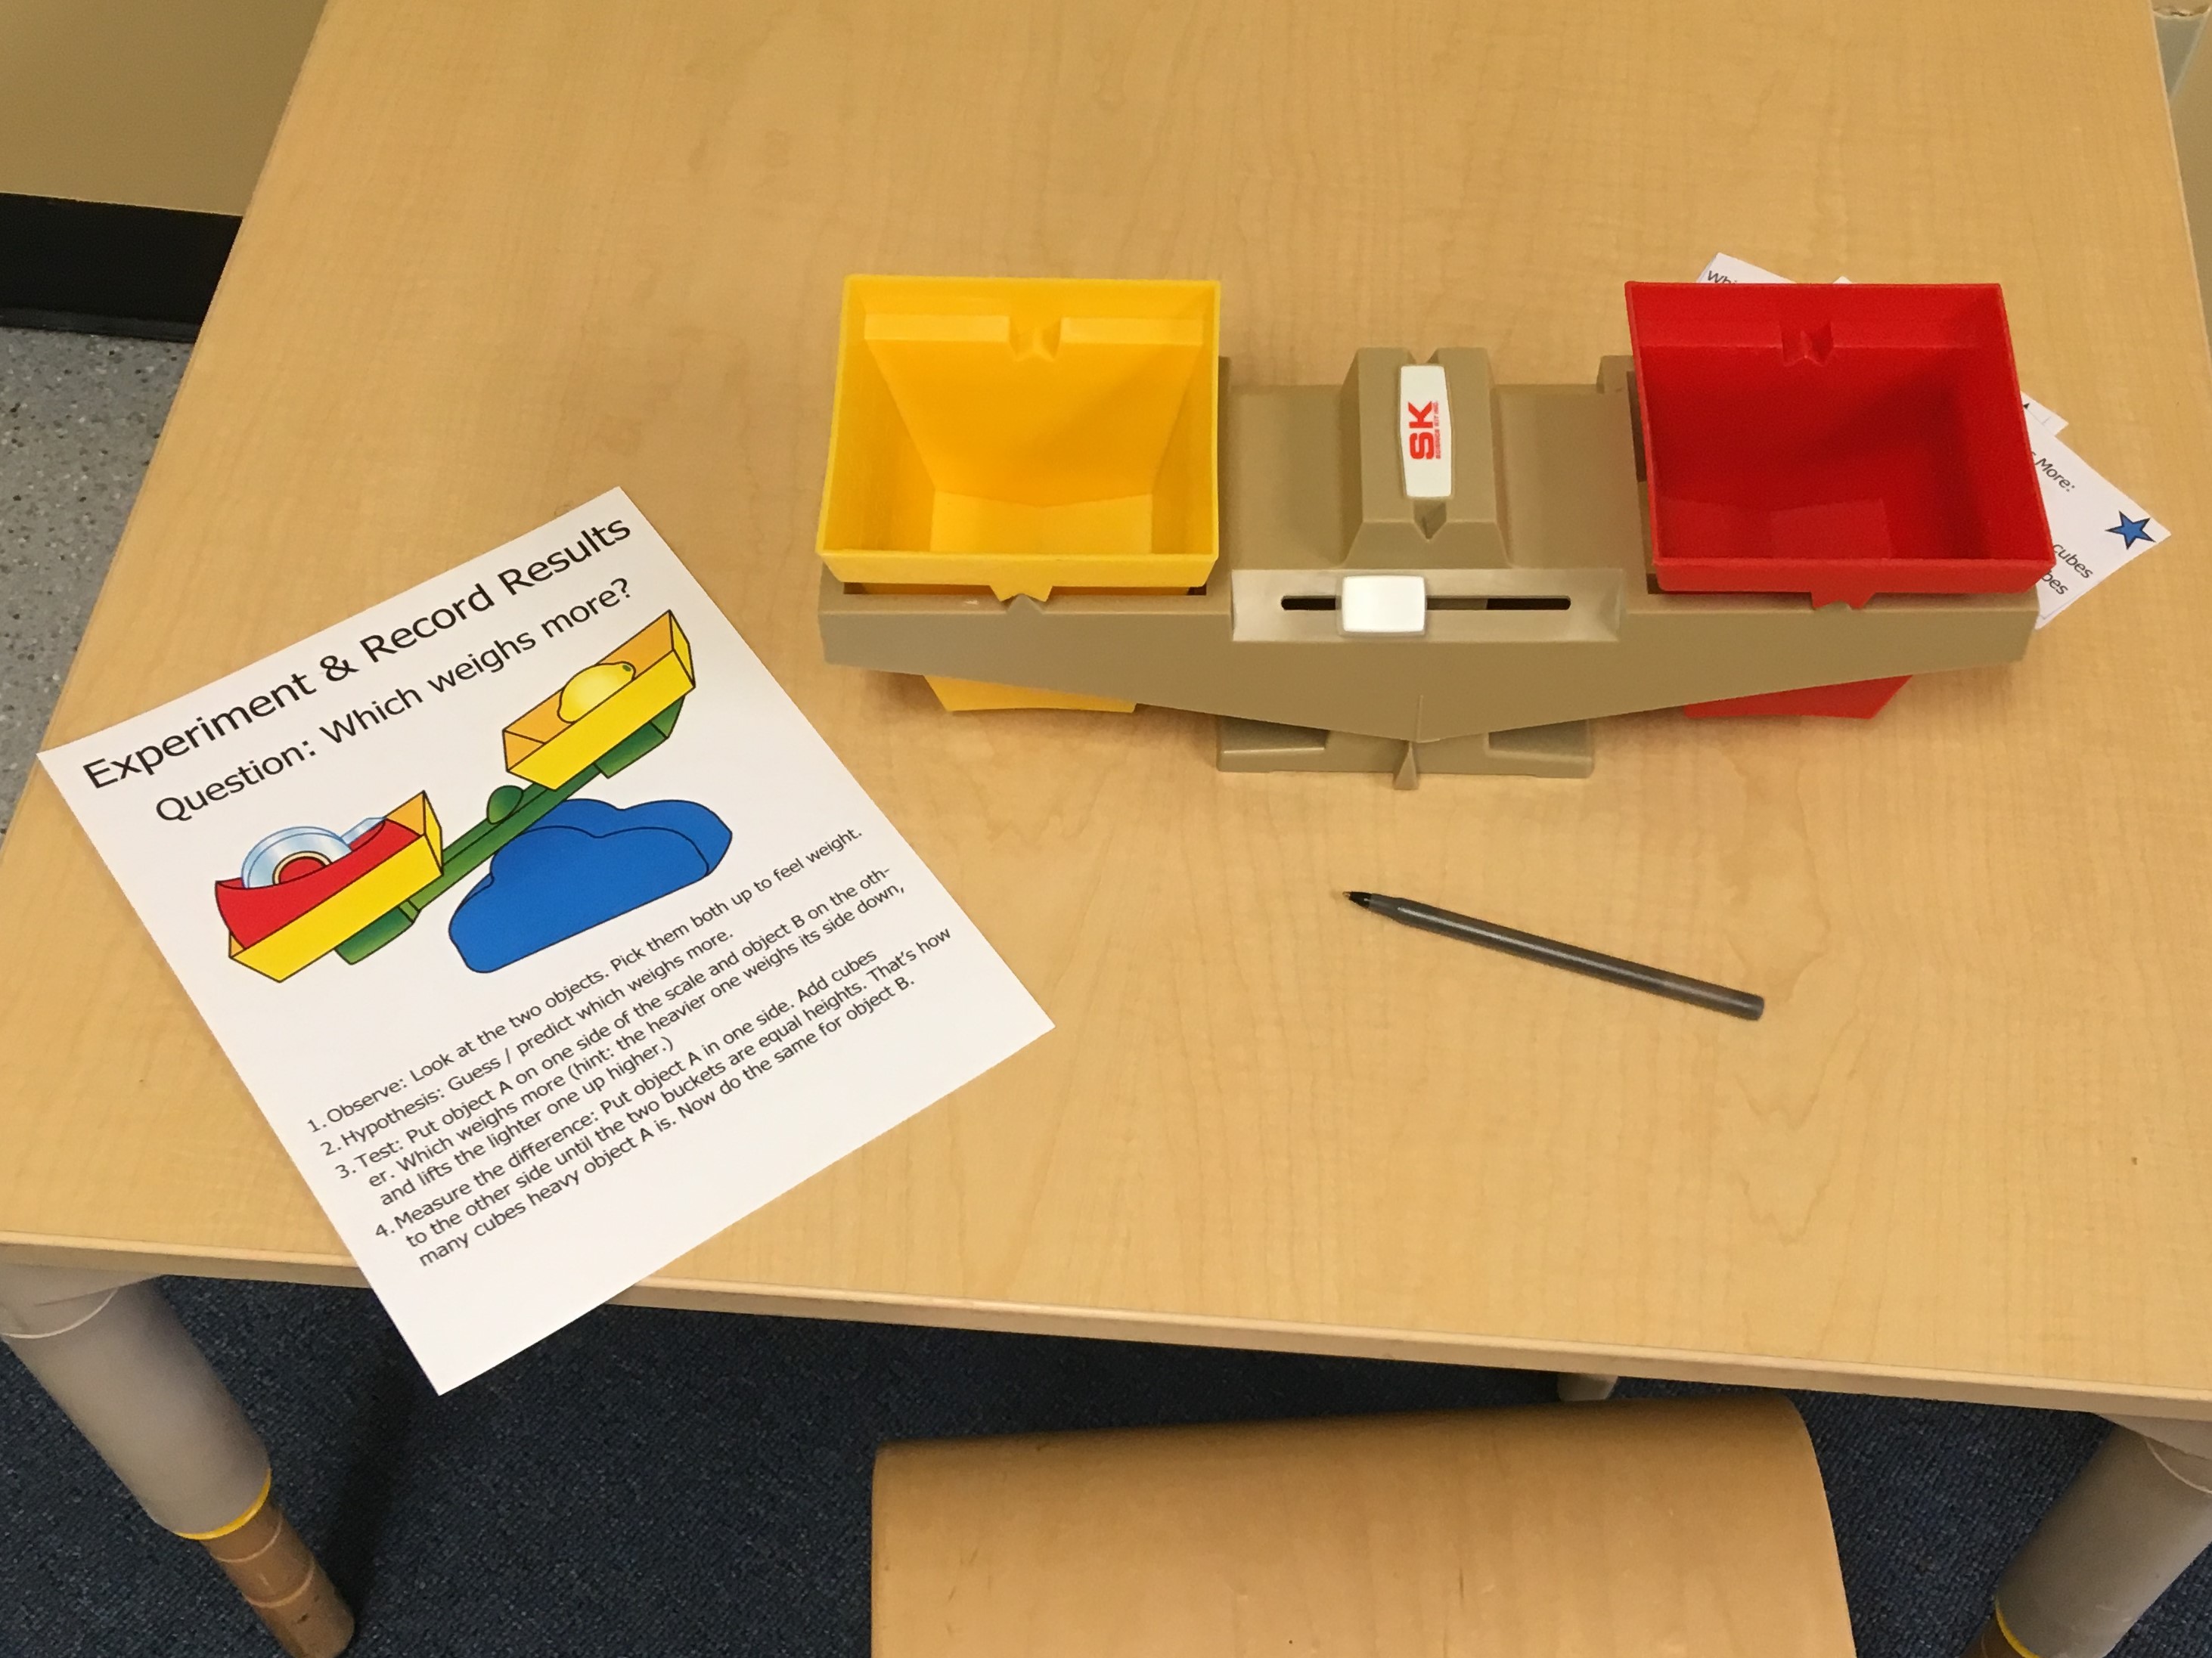
We put out a balance scale, then added two toy turtles – one was big but lightweight, the other was smaller but heavier. And, we added a jug of dominoes. Kids could see how the turtles’ weights compared, and then use dominoes to weigh how heavy each was, or count out equal numbers of dominoes for each bucket to see that they balanced. Our 5 – 7 year olds understand the math of this. For the little ones, it’s just fun to pour dominoes.
If you don’t have a balance scale, you can make one with a hanger and some cups.
Science Tool Sort

I used the materials from www.teacherspayteachers.com/Product/Science-Tool-Sort-2570198. I printed an 11×17 copy of the sorting page, then printed and cut out cards of science tools that they could sort into categories based on what you use for protecting, measuring, and so on. I only used about half the tools from the card set, as I only wanted to use things we’ll actively work with in class. There are two other resources you might find helpful with similar activities: Science Tool Workstations from Jena Snowden, and Science-Tools-Differentiated.
Science Experiments
Shrinky Dinks
If you’re not familiar with this idea: kids draw on a special piece of plastic, then put it in an oven or toaster oven for just a few minutes, and it shrinks down to about 1/3 its original dimensions and 9 times thicker. We used Shrinky Dinks Ruff n’ Ready Ten sheets is plenty for 30 kids. On the Ruff n’Ready, you can use colored pencils for nice results (we outlined with Sharpie). On the clear sheets, you have to use permanent markers. You could also use #6 plastics from the recycling bin – take out sushi containers work best, but results are not nearly as good as the commercial product. (Read here about Shrinky Dinks from Recycled Plastic.)
All the kids traced and decorated an item. (They could free draw instead of tracing, but it was hard for them to really get how big they had to make things.) For the youngest kids, we helped them cut out. Our older kids cut them out, and punched the holes… you need to punch three holes together in a triangle shape if you want to make key rings or charms with these – a single hole punch shrinks too small for this. We then took them over to the toaster oven to bake them. Each child would watch as theirs baked (of course, we warned them to be careful of the hot oven). We asked them before we put it in to predict: “what do you think will happen?” They had noticed in our samples that they had shrunk, so we’d then say “so, your hypothesis is that it will shrink?” Then we told them “Let’s start the experiment. You watch it and tell me as soon as it starts to change.” As it heats, it curls and rolls. (You can find videos on YouTube, such as www.youtube.com/watch?v=hXiEqJfg-pM) Then we say “tell me when it gets flat again.” And wait till it’s completely flat before you take it out. That’s what tells you it’s done. (And if you take it out while it’s curled, it can stick together in that position.) We lifted ours out with spatulas, and sometimes the hot plastic would bend a little when we did that… we just slid it off onto a hot pad and used the spatula to press it flat while it was still hot.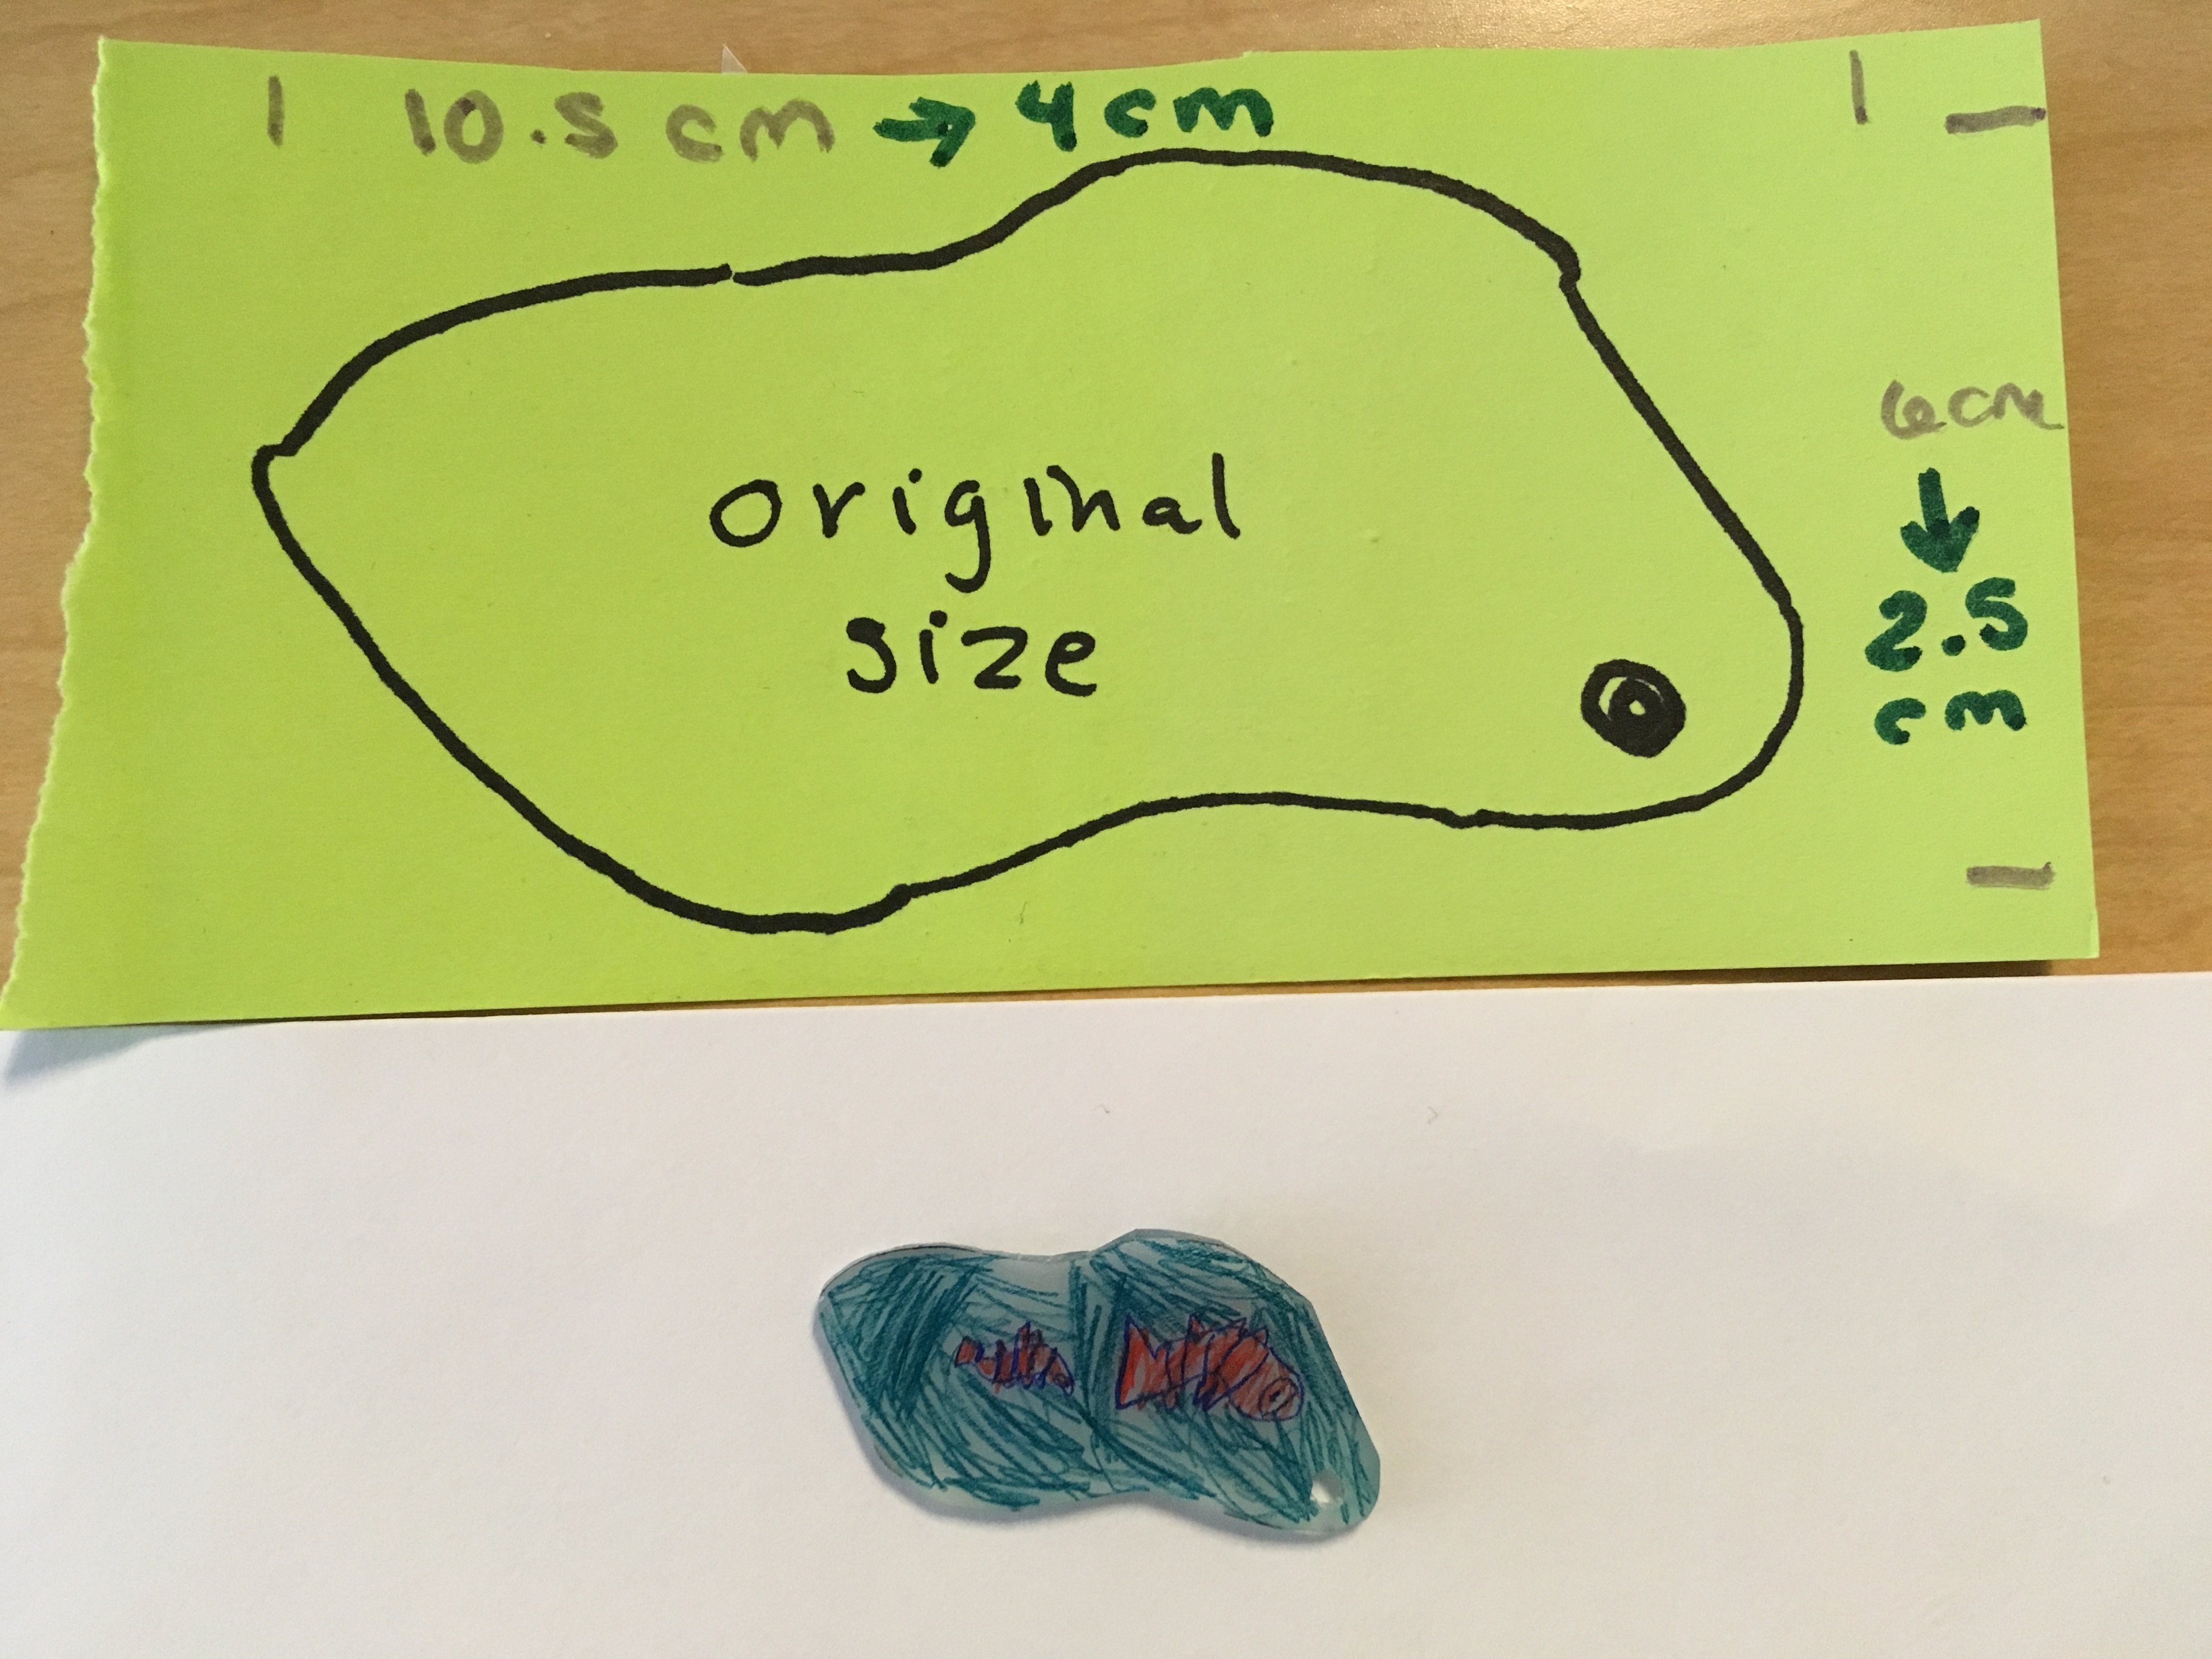
Then we asked the child to observe: “what’s different about it than before?” Then, once it had cooled enough to touch, we told them to share their results with a parent or kid.
For the older, kids, we had them trace their original art and measure it so that they could compare the original with the result.
Read about the Science of Shrinky Dinks here – we didn’t bother explaining this to the little ones. We touched briefly on these ideas with our 6 and 7 year olds, and left a summary of this article out for parents to read.
Expanding Ivory Soap
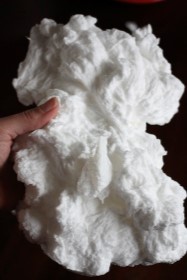 I got this idea (and the picture at the right) from Happy Hooligans. Take a bar of Ivory soap. Have the children feel how hard it is, and observe its size and shape. Put it on a microwave safe plate.
Microwave for 1 – 2 minutes. Watch it as it bubbles and puffs and expands, to fill the microwave. When you open the door, it will deflate, like a soap soufflé. When it cools, have the kids feel it (it’s fluffy), and observe its size and shape. Explain the science behind it – there’s lots of air in Ivory soap, and as you heat it, the air expands, pushing the soap up and outward.
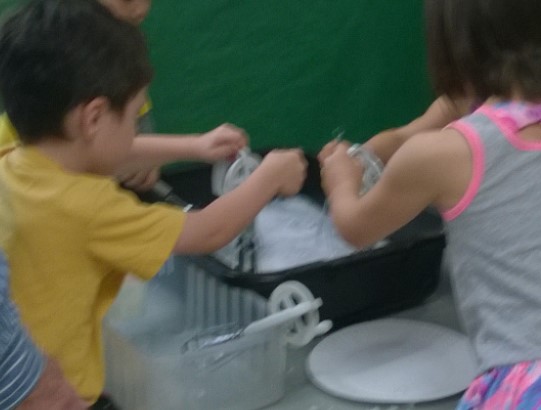
Tool of the Week – Egg Beater
We have a featured tool every week. The goal is just to introduce a wide variety of tools, and let kids begin practicing the motor skills needed to use the tool, and start gaining the understanding of when/where the tool might be used. This week’s tool was whisks and egg beaters. At the beginning of class, we had them out next to a tub of water. After we did the soap experiment, we told the kids to crumble up the soap foam into the water, and then use the whisks and beaters to beat it till it made lots of foamy bubbles. 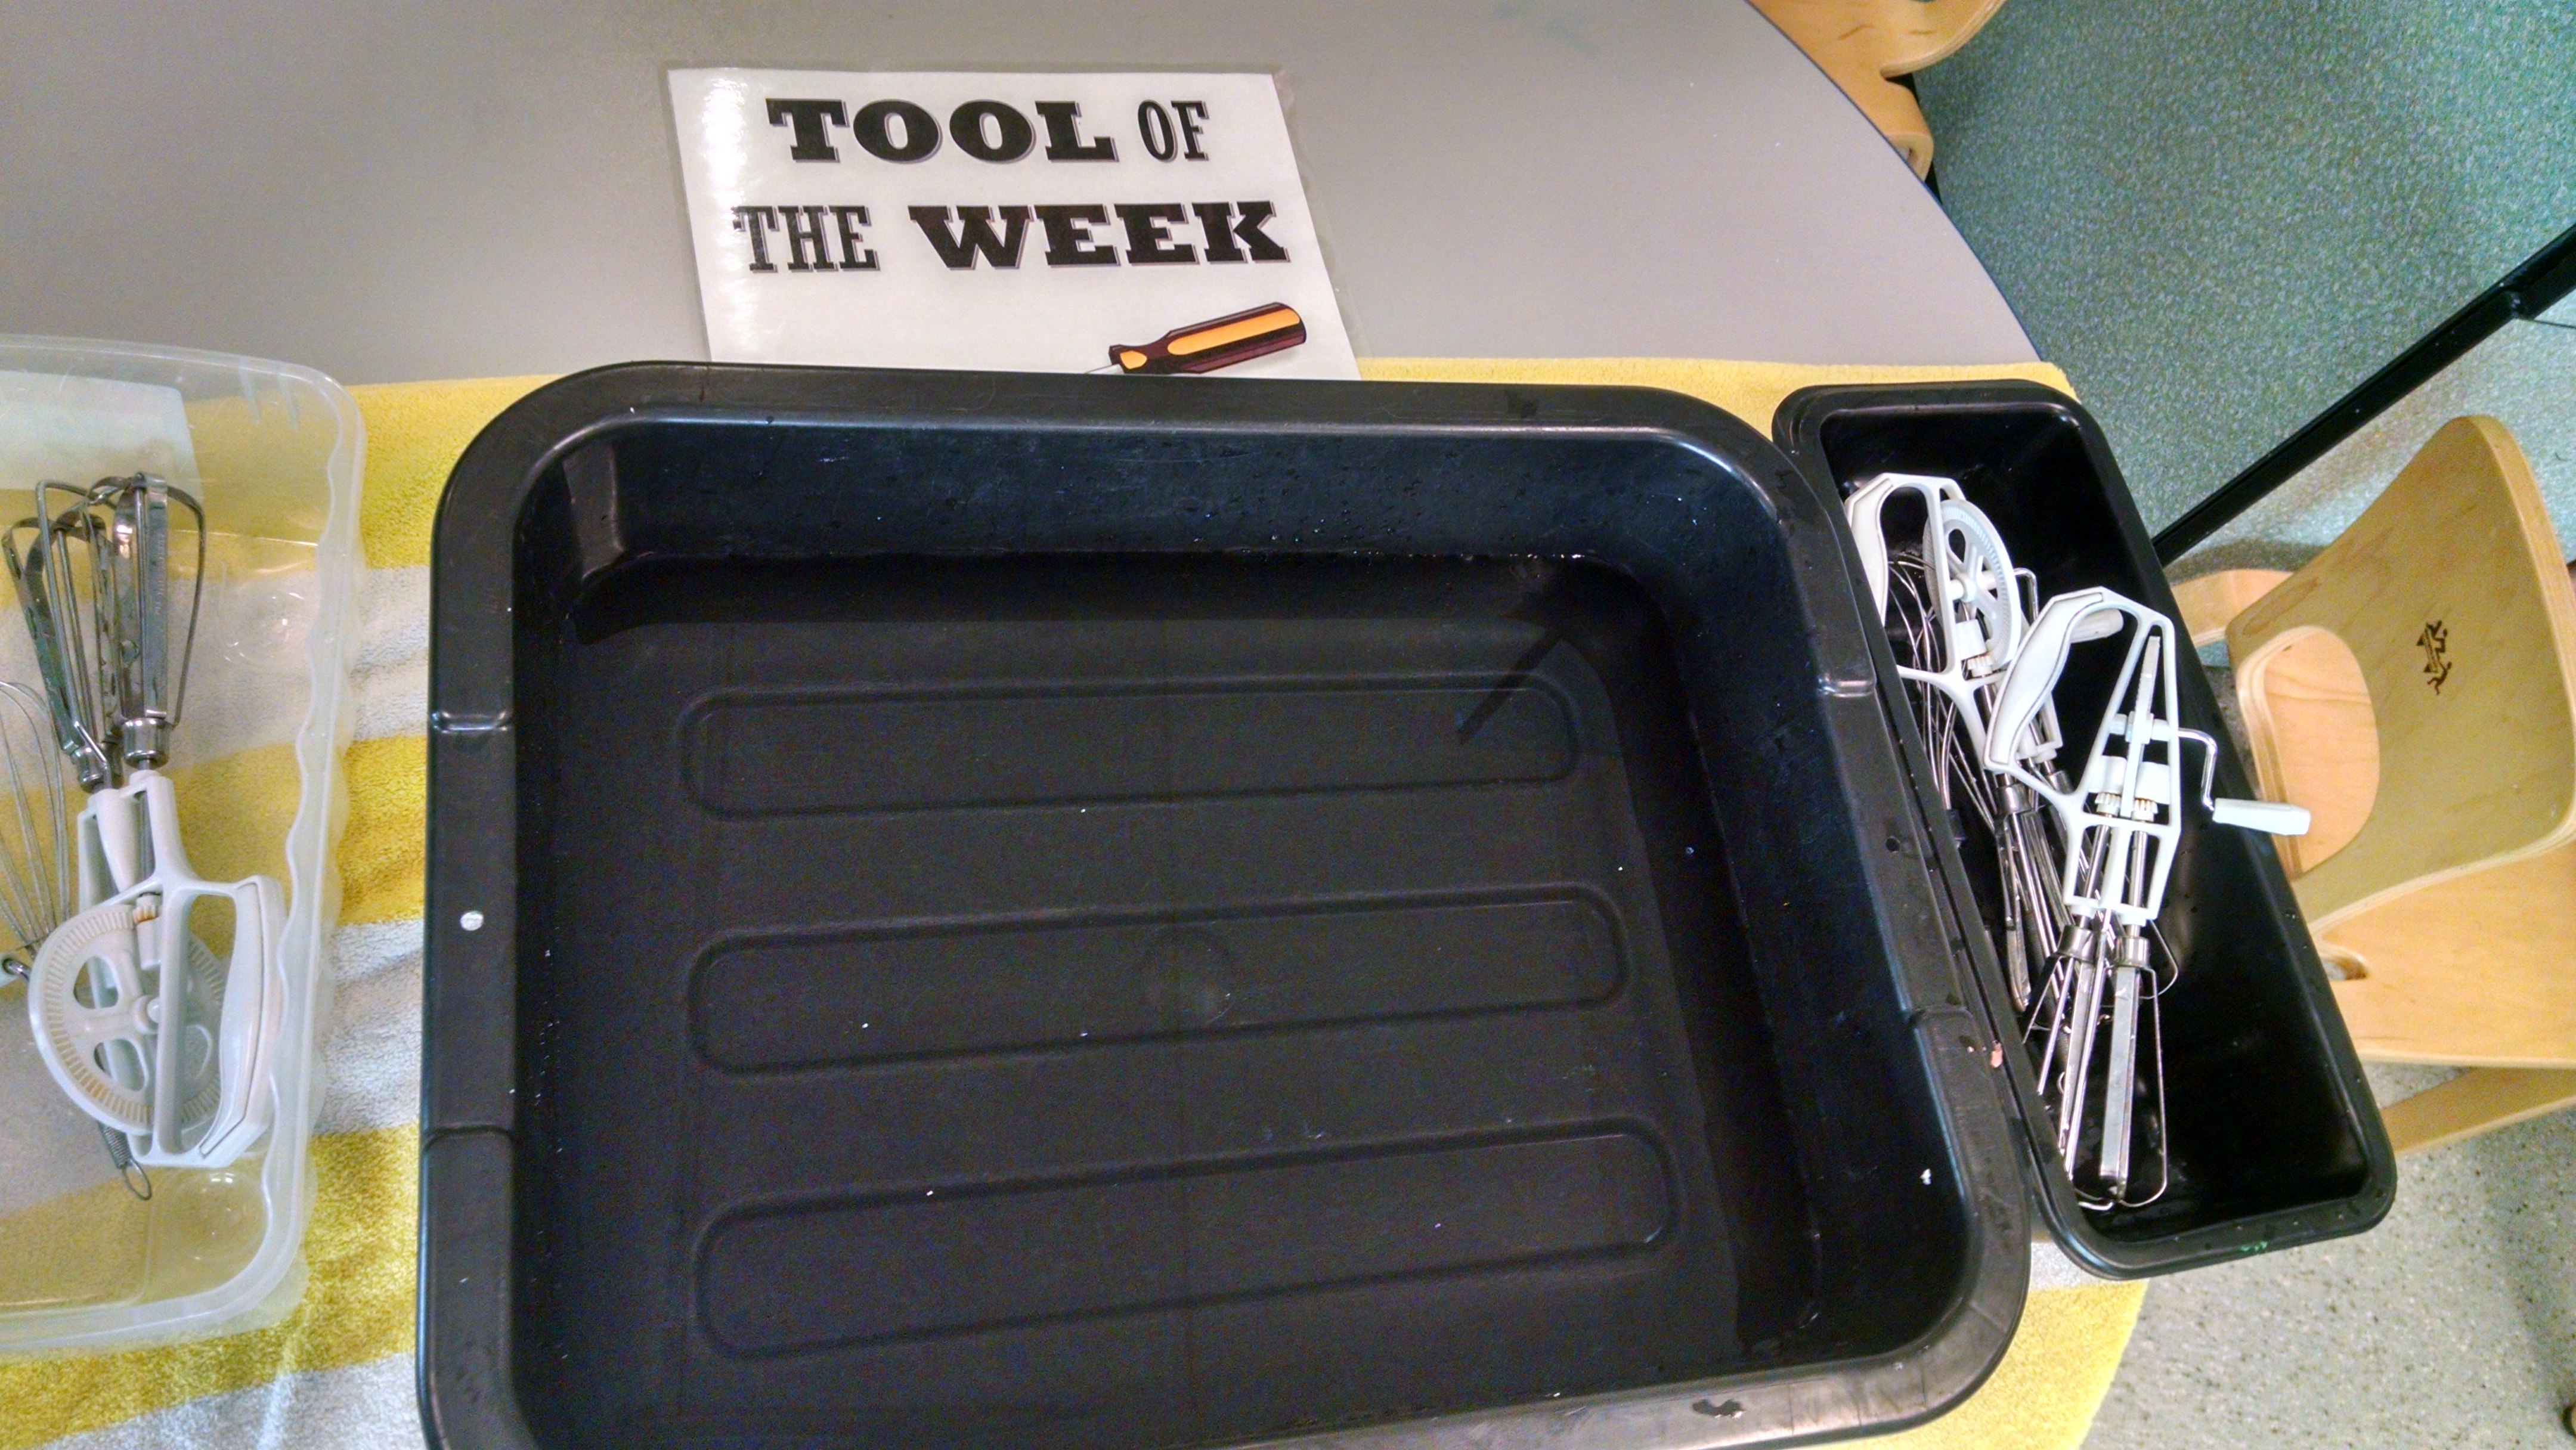
Measuring and Recording Data
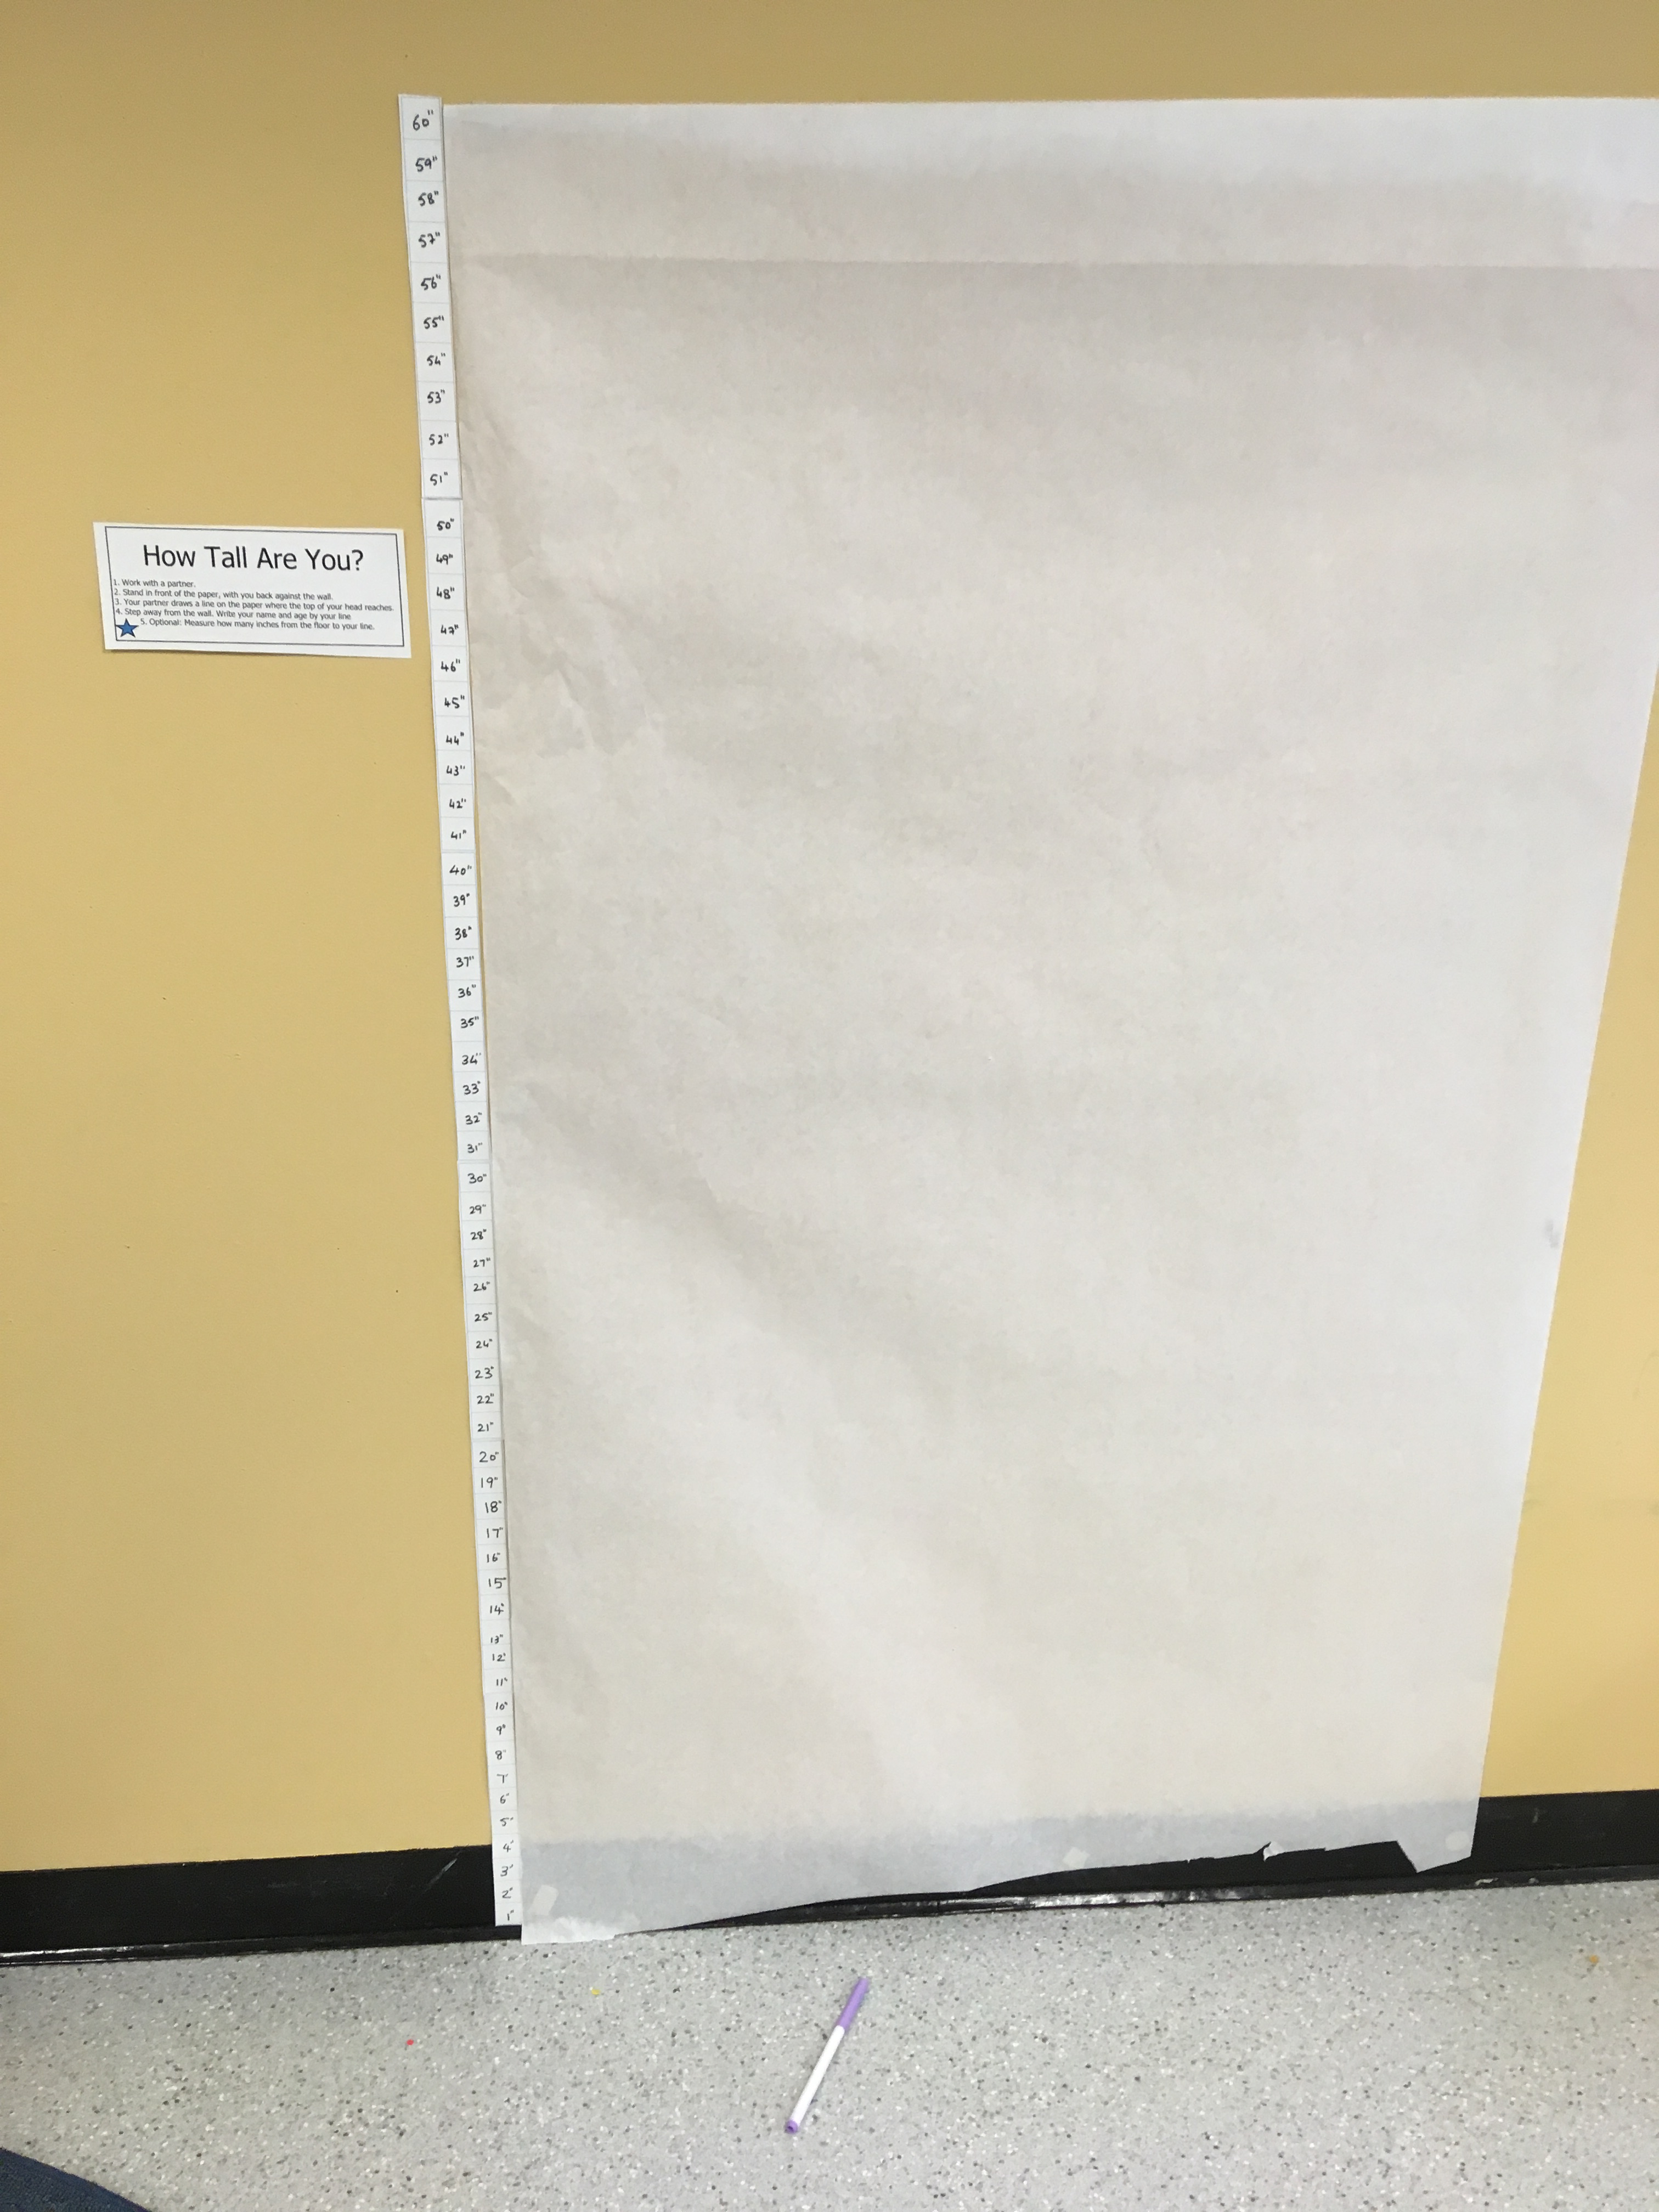
How tall are you? We put a measuring tape on the wall next to a big piece of paper so we could mark how tall all the kids are. It’s our first class of the year, so if we remember, we’ll break this data out again in the springtime to compare.
How fast can you jump? We had an hourglass style one-minute timer and a sheet to record data on – it asked the children to test how many times they could jump in one minute. (This was fun for all ages… the older kids could compare data, and see who jumped more than they did.
How far can you jump? Back when we tried a unit on Measurement, we had a canvas drop-cloth taped to the ground with measurements marked on it, and kids were challenge to see how far they could jump. We pulled that back out for this class.
How hot or cold is it? We had an ice pack and a heating pad. We set a Thermometer on each one, and then gave children cards with drawings of thermometers, where they could color in a red line to show the temperature of each one. Older kids were encouraged to write in the number too.

Charting Data. We offered three charts they could color in: 1) to show whether they preferred cats or dog, 2) what their favorite color was, and 3) the results of a coin flip. We could have used these in closing circle – asking kids to predict what they thought the answers would be, then comparing to the data.
Opening Circle
First we asked them to share their thoughts on “What is a Scientist” and “What do Scientists Do?”
Then we talked about the Scientific Method. We made a Scientific Method Poster to show the steps.
- Ask a Question
- Gather information – look, listen, taste, touch, smell, read, ask an expert
- Form a hypothesis – guess the answer
- Test the hypothesis – do an experiment to see if you’re right
- Share the results – tell other people what you’ve learned
Book
We read Scientists Ask Questions. (Other alternatives listed below.) As we read, we used props (a ketchup bottle, two pencils and a ruler) to illustrate the examples shown in the book.
Song
Then we sang our Scientific Method song (which we wrote, to the tune of What Do You Do with a Drunken Sailor.)
Closing Circle
Science Tools
We used the cards from the sorting activity above. We passed out a card to each child. Told them to talk to a partner (parent or other child) and tell them what the tool is and what it’s used for. If they didn’t know, they could ask their partner.
I wrote the categories on the board and explained that we’re learning about tools that are important to scientists. I said: “One important thing that scientists do is Observe – that means they use their senses to learn more about the world around you. Some of you have tools that help people to look more closely at tiny things or things that are far away. If you have a tool for observation, stand up! Now tell us what you have and what it’s used for.” And so on through the categories.
- Gather Information / Observe: magnifying glass, binoculars, microscope.
- Test / Experiment: pipettes, funnel, beaker, test tube, syringe.
- Measure: ruler, measuring tape, scale, balance, measuring cup, thermometer, stop watch,
- Record Results: Graph / chart. Calculator. Camera. Science journal.
- Protect: Goggles / Safety glasses, Lab Coat, Gloves.
Book: Charlotte the Scientist is Squished (see description below)
Height Experiment
We said: “The scientific method starts by making observations and asking questions. So, I’m going to ask about what you’ve observed. Are kids bigger or smaller than adults? Are young kids bigger smaller than older kids? Is that ALWAYS true? OK, I’m going to make a prediction…. If I put all you kids in order from the oldest to the youngest, then you’ll also be in order from tallest to shortest. So, my hypothesis – the older you are the taller you are.”
I had all their birthdates in a spreadsheet, so it was easy to calculate exact ages and put the in order. So, before class, I made that list. In class, I called the oldest kid first, then second oldest, and so on, down to youngest.
I asked” Is the hypothesis true?” (Help them observe that, on average, older kids are taller than younger kids, but not guaranteed for individuals.) I then said “I know that I’m older than that dad. Do you think I’m taller than him?” I called him up and he was much taller than me. So, I summarized that: “Adults are older than kids and, in general, adults are taller than kids. But once you get to be an adult, how tall you are depends on how tall your family is, not how old you are. _____’s family is taller than mine is, so when he grew up to his adult size, he ended up being taller than my adult size.”
Books and Videos

A note on representation. It is important that classrooms include “mirrors and windows.” We want places where the children can find themselves and their families reflected, and we also want to offer them windows into other families and ways of living. Of the fiction books below, Mad Margaret, Ada, Cece and Goodnight Lab all have protagonists that are girls and are people of color. (Charlotte is a female rabbit.) All the books, both fiction and non-fiction reflect a broad diversity of characters.
Fiction / Storybooks
- Charlotte the Scientist Is Squished
by Andros. Charlotte the rabbit has a hard time doing science because she’s always squished in with all her brothers and sisters and there’s just not enough room to experiment. So, she build a rocket ship and flies into space. This is a very fun and engaging story that appealed to all my students, from age 3 – 6, and did a nice job of reviewing the steps of the scientific method.
- Mad Margaret Experiments with the Scientific Method
by Braun. Margaret uses the scientific method to help a friend figure out why he sneezes every time he visits another friend’s house. Nice story, nice exploration of the scientific method. Better for age 5 – 6. I feel like there are more engaging questions the author could have used, but the kids who have cat allergies in their families did relate to this story.
- Ada Twist, Scientist
by Beaty. Beaty’s other books, Iggy Peck, Architect
and Rosie Revere, Engineer
, are among my favorite books about Inventors. This book is just fine. I like that it shows Ada being curious and trying lots of experiments. Good, but I’d choose one of the first two over this one. Age 4 – 6.

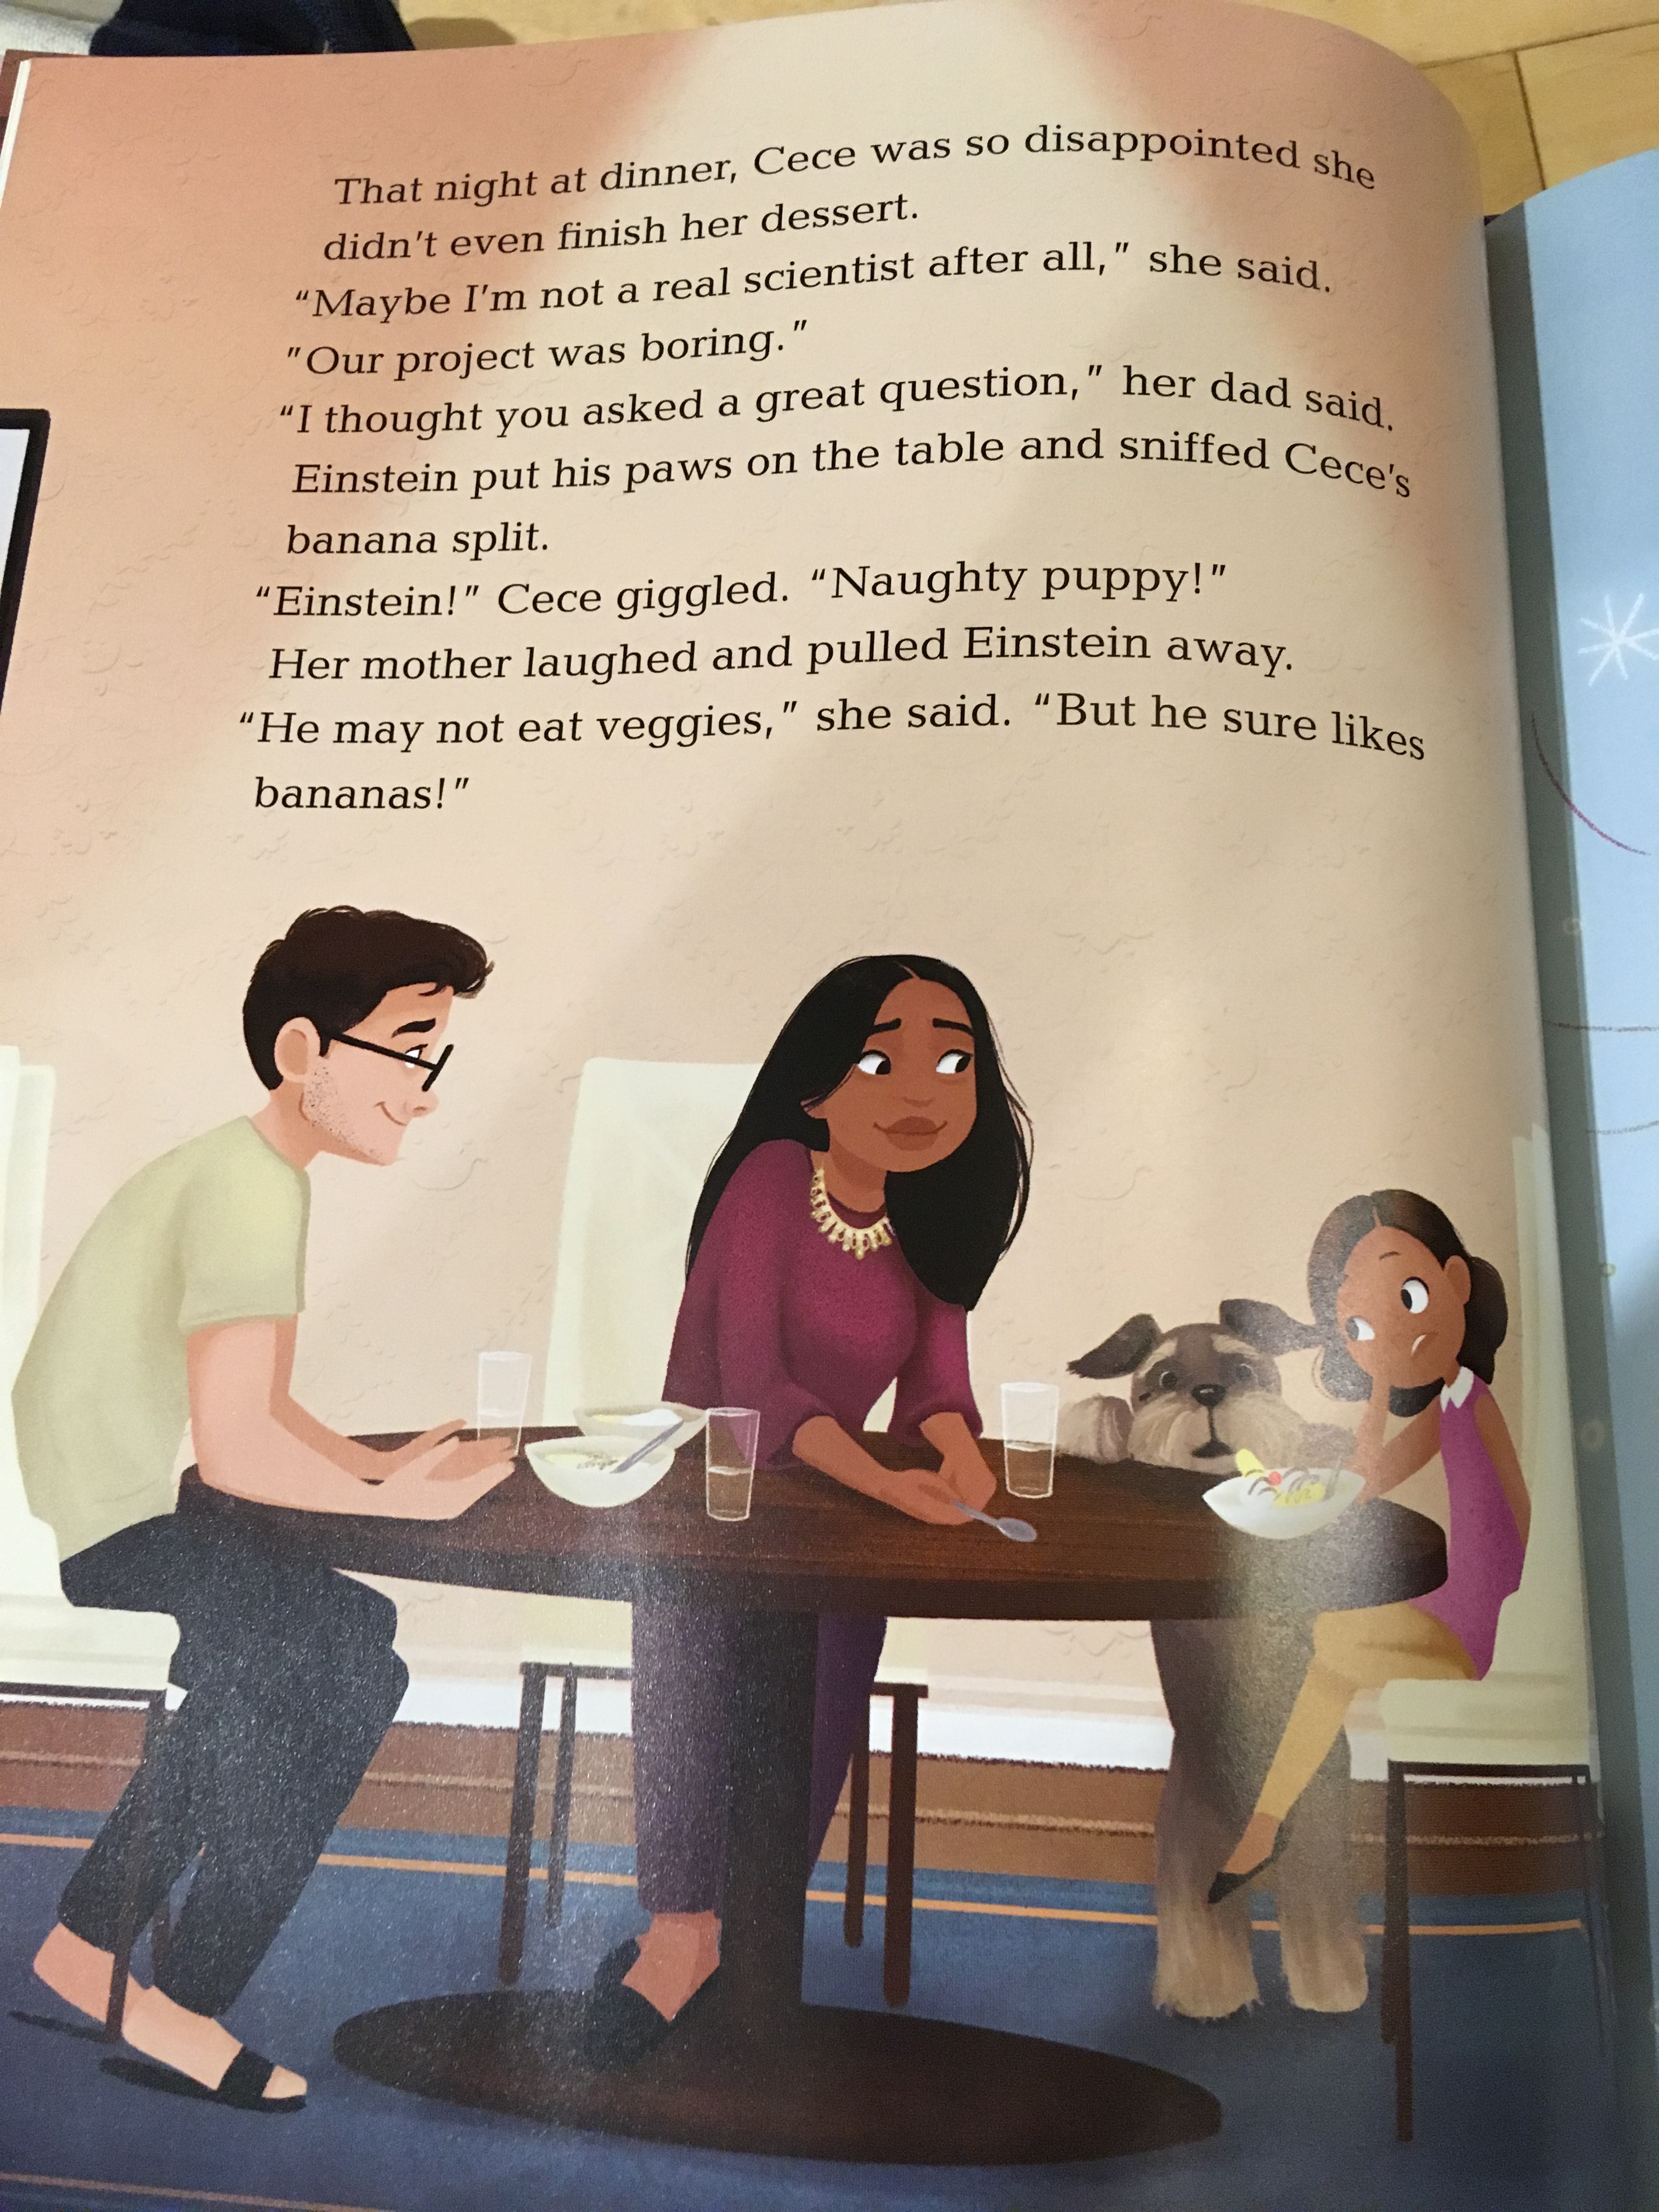
- Cece Loves Science
by Derting. This is a fun story of two children designing and carrying out an experiment to determine whether dogs will eat vegetables. It’s a nice walk through the scientific method. It’s too wordy for a read-aloud with my age group (see photo of a sample page). Excellent option for ages 6 – 8, or for reading one on one with a younger child.
- Goodnight Lab: A Scientific Parody
by Ferrie. Like many parodies, this is funnier for adults than for kids. Some of the concepts are over the heads of little ones. That said, if they read Goodnight Moon a lot at home, this might have appeal as a play on that story.
Non-Fiction Books
- Scientists Ask Questions by Garrett. nice overview – introduces science tools and the scientific method. Note: Amazon says this is for ages 6 – 7. I think it’s fine for age 3 – 7 in a group setting. If I was choosing a book for 6 – 7 year olds, I would choose a more advanced one.
- What Is A Scientist?
by Lehn. Ages 4 – 6. Another nice overview, showing kids thinking like scientists.
- I Use Science Tools
by Hicks. Nice introduction to science tools. Ages 4 – 6.
- What Is Science?
by Dotlich. Rhyming text and lovely illustrations about different kinds of science. Nice gentle read-aloud for ages 3 – 6.
- S is for Scientists: A Discovery Alphabet
by Verstraete. Each page talks about a scientific discovery from history – there’s an illustration, a short rhyming text (e.g. “B is for build. A drafty space, this tunnel built from scraps of wood and wire, but the perfect place to test the Wright brother’s super flyer.” “E is for Experiment. In his classic experiment, Ivan put his dogs in the mood of licking their chops and slobbering, even without having their food.” …. you’ll notice it’s not the best writing… ) and a very long description (“In the early 1900’s, Russian scientist Ivan Pavlov observed something interesting while using dogs in his study of digestion. Normally, the sight and smell of food caused the dog’s salivary glands…” and about 120 more words…) It says it’s for ages 6 – 9 years. I think the best use of it would be for the adult to read it in advance, and then just flip through the book, telling a child about each of the experiments in their own words in an age appropriate way the child could relate to. Fine to have on the shelf, but not something I would read aloud.

- Look I’m a Scientist
by DK. Simple hands-on experiments in a format that would appeal to kids. I like the way it gets them to identify as a scientist. See the sample page for a better idea of contents. (Click on it for a larger image.)
- Odd Boy Out: Young Albert Einstein
by Brown. A biography of Einstein that’s accessible for ages 4 -6. Speaking of representation, I like this book for representing the kids who feel like the odd boy out. Children on the autism spectrum may find him especially relatable.

Videos
Sid the Science Kid has a full episode on Super Science Tools. Or, for a quick introduction, try this 2.5 minute video on “The Nature of Science.” www.youtube.com/watch?v=fpeLuU6hxkA
More Science Activities
I have 40+ complete lesson plans on all sorts of science topics. You can find links to all of them on the Inventors of Tomorrow home page. Just a few of the science themes are: Planets and Space Travel; Human Body; Chemical Reactions Light and Shadow; Sink or Float.
This post contains Amazon affiliate links. If you click on these and then purchase an item, it doesn’t cost you anything, and I get a small financial kickback. I put the links there because hopefully it makes it easier for you to jump right in and try these projects without having to do a lot of problem-solving about how/where to find supplies. However, I also strongly encourage you to check out your local Goodwill or other thrift shops and consignment shops, so you can re-use items rather than always buying new – saves money and it’s much better for the environment!

[…] binoculars, and a bug catcher. For recommendations for microscopes and other science tools, read my What is a Scientist […]
LikeLike
[…] or Float is a great way for kids to experience the scientific method. All you need is a container filled with water, and some random household items to test. With each […]
LikeLike
[…] the steps of the scientific method. Here is a YouTube read-aloud of Charlotte. I have more book recommendations about scientists […]
LikeLike
[…] wrote three special songs for the class. In the quarter where we study “What is a Scientist“, we sing “What Can We Do with the Scientific Method” sung to the tune of the sea […]
LikeLike
[…] For recommendations for microscopes, safety goggles, lab coats and other science tools, read my What is a Scientist […]
LikeLike
[…] for microscopes, safety goggles, lab coats for dress-up and other science tools, read my What is a Scientist […]
LikeLike