
A newer version of this post appears here.
On the second week of our Simple Machines unit, we studied wedges and levers.
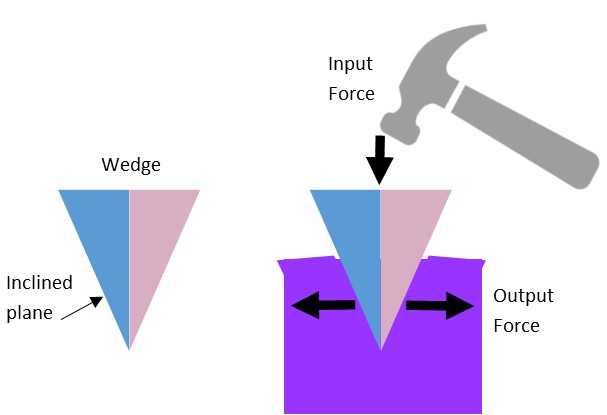
Key concept of wedges: A wedge is two inclined planes, brought together in a sharp edge. You place that sharp edge on an object you want to cut or separate, then you add force to the flat side (input force, shown with the hammer above). The wedge pushes into the object, with the force pushing outward to separate it (output force).
A demonstration: Give a child a pile of play-dough. Say “I want to cut this in half.” Have them try using the flat palm of their hand. They’ll figure out it doesn’t work – it just squishes the play-dough, it doesn’t separate it. They may figure out they can use the side of their hand. (Or you can suggest it.) That works better. You can give them a table knife. Even better! You can also show scissors, which have two wedges that lever together.
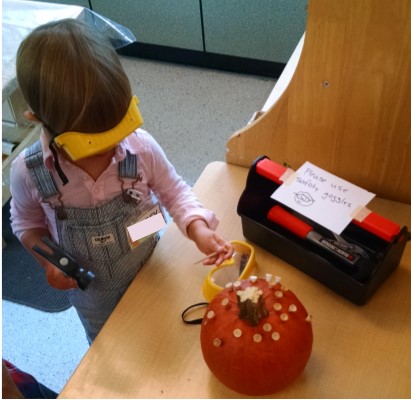
Nails: Nails are wedges. They are usually pushed through one object and into another to hold the two objects together. If you have kids over 4 or 5, they can use real nails, and a real hammer (better if it’s not a claw hammer…) with training and supervision. In our classroom, we used toy hammers (I love these ones from Black and Decker – we also use them when we build houses from foam insulation panels) and golf tees. We pounded them into thick pieces of Styrofoam and into a pumpkin. Note: safety goggles are a good idea! If the tees went all the way through the Styrofoam and were against the table, and the kids hammered hard on them, the top of the golf tee can break and fly up.

 Scissors: Scissors are both wedges (the edge of the blades) and a compound lever, so this is a good week to have a scissor practice activity. For example, put out papers with zig-zag and curved lines and have them practice cutting.
Axes: Another common use of wedges is splitting wood. I have not figured out how to simulate wood chopping in any safe way in a classroom of pre-school age kids. Tell me if you have ideas!
Play-dough table: Put out play-dough with an assortment of tools – have them test which ones cut best.

Sensory table: Fill with rice or sand or whatever. Put in some square blocks and some triangles (wedges). Which are the easiest things to push through the sand?
Water table: Put in toy boats (can make from milk cartons if desired – just search on Pinterest for PLENTY of directions on how to do this). Show how the bow (front) is a wedge, which helps it move through the water. Have them try pushing it through the water backwards (stern first). It doesn’t move as well.
Snacks: Make your own fruit salad. The littlest kids can slice bananas with table knives or seedless watermelon. Middle-size kids could use scissors to snip marshmallows (or maybe grapes) into smaller pieces. Older kids could cut apples, or oranges. You could also use a melon baller or a chisel to cut the melon.
Snack time lesson: Have kids bite into an apple slice with their front teeth (wedges). They cut through the slice easily. Then have them chew with back molars (not wedges). These grind the food.
Another use of wedges: Doorstops, shims and wheel chocks are all wedges. They’re like ramps you shove underneath an object rather than shoving an object up a ramp. It’s a little tricky to explain to kids how this counts as a wedge, but they can definitely see what makes each of these tools a useful tool to know how to use.
Do at home: Let your child practice cutting with scissors and with knives. Check out this post for thoughts about how/why to do this: Go Ahead, Give Your Toddler a Knife. And, for a little food for thought for when your child gets older, check out this TED speaker’s view on kids and pocket knives: https://www.youtube.com/watch?v=Pn_awAPYlGc. (fast-forward to 4 minutes into video…)
For more ideas, and a simple machines song: Read Inclined Planes and Wedges Lesson: http://iijuan12.hubpages.com/hub/Inventions-and-Simple-achines-Inclined-Planes-Wedges-and-Physics

[…] the next few weeks, I will add posts about each of the simple machines. Inclined Planes, Pulleys, Wedges, Levers, Screws, Wheels & […]
LikeLike
[…] Wedges. Gosh, I really want there to be some kind of fun toy axe with fake wood that it splits apart, kind of like the toy food toy food where you cut the Velcro apart with a toy knife. But sadly, such a product does not exist… […]
LikeLike