There is an updated version of this post here.
During our Simple Machines unit, we learned about levers.
Key Concept of Levers:
You place a long bar onto a fulcrum (pivot point). You apply force in one direction, and the pivot point re-directs the force in another direction. You may need the same weight, or more weight or less weight on one end to lift the other end… all depending on where the fulcrum is.
If you’re working with small kids, you can stick to that basic point, and skip all the details I’m about to give on classes of levers!
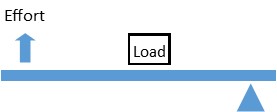
First Class: There are three classes of lever. A first-class lever has the fulcrum in between the effort and the load (e.g. between you and the weight you’re trying to lift). You push down on one end, and the other raises up.
If the fulcrum is in the middle (like on a seesaw or a balance scale), then to lift ten pounds of weight, you’d need to apply ten pounds of force. There’s not a mechanical advantage (i.e. the lever doesn’t let you lift anything heavier than you could normally lift). If you place the fulcrum very close to the load, and have a long bar to press down on, this gives you a mechanical advantage – it makes it easier to lift the load.
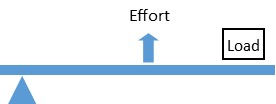
Second class: The load is in between the fulcrum and the effort. The best example is a wheelbarrow. You lift up on one end, and the fulcrum rests on the ground.
Third class: The effort happens between the load and the fulcrum. “A hammer acts as a third-class lever when it is used to drive in a nail: the fulcrum is the wrist, the effort is applied through the hand, and the load is the resistance of the wood. Another example of a third-class lever is the human forearm: the fulcrum is the elbow, the effort is applied by the biceps muscle, and the load is in the hand.” (Source)
A Demonstration:
A see-saw is your ideal demonstration. You can put similar size kids on each end, and they see that it balances out. Then you can put an adult on one end, and see how many kids you need to lift the adult. And then you can try having the adult sit in the middle of the beam on their side, and one kid sit all the way at the end on their side and search for the balance point.
If you don’t have a see-saw, can you create one? It may be hard to easily build something strong enough (and safe enough) to lift an adult and kids, but you could lift a basket of books using something as simple as giant tinker toys.
I’ve listed several activities below. I’ve divided them by which class of lever they are. (I think I’m right on all these – let me know if you disagree!) But again, you can ignore the whole idea of different classes of lever and just treat them all as “levers” if that’s better for the age group you’re working with.
First-class lever activities:
See-saw: See above.
Balance scale: If you have a balance scale, this is a great time to get it out and let the kids experiment.
If you don’t have a scale, you could also build one with a variety of materials, including Tinker Toys (see top of post) or K’NEX.
Or you could build a balance with a coat hanger: http://inspirationlaboratories.com/balancing-with-mms/
Or, with Dixie cups, string, and a popsicle stick. (See my post on measurement.)
Crow bar: Use a crow bar to pry up a heavy load. Or use a stick balanced over a small rock to lift a big rock. Or use a stick balanced over a brick to tip a cinder block over. Or take a pencil, and a ruler and a book: use the pencil as your fulcrum. Put one end of the ruler under the book, and then press down on the other end of the ruler.
Claw hammer: When you use a claw hammer to pull out nails, you’re using it as a first class lever. If you had the kids pound golf tees into something for the wedges lesson, they can use the claw hammer to pull them back out!
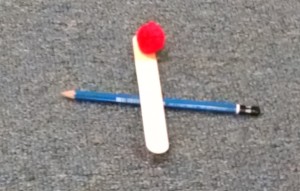
Catapults: Put a pencil on the table (your fulcrum). Balance a popsicle stick over it (your bar). Put a pompon on the lowered end (your load). Strike the other end. The pompon flies into the air. Your kid may repeat for hours. More catapult ideas in this post.
Second-class levers:
Wheelbarrows: If you have access to a wheelbarrow, they are GREAT toys for outdoor time. Let the kids load them up and move them around.
Bottle opener: Let your child open a bottle of soda with a bottle cap.
Third-class levers:
Human arm: We had paper arms kids could decorate, then cut, then fasten together with a brad to create an elbow joint. Then they used yarn to represent the muscle.
Shovel, rake, or broom: When you use one of these tools, you have one hand at one end, serving as the fulcrum. The other hand is part way down the handle, providing the effort. (You could also use a stick to hit a piñata to demonstrate the force.)
Baseball bat: In addition to helping you lift loads, levers can also be used to speed something up by giving it a push. During outside time, use a baseball bat, or tennis racket, or other tool to demonstrate. Your hands are the fulcrum.
Double levers:
Tongs, tweezers, pliers: You could fill a sensory bin with pom poms and tongs. You could get a dried corn cob, and let kids use tweezers to pick out the kernels. Kids could use pliers to pull nails out of something (like pull the golf tees out of the pumpkin from the wedges activity!)
Scissors: Scissors are a double first class lever. Let kids have some scissor practice. (Like cutting out the arms for the activity above.)
Nutcracker: A nutcracker is a double second-class lever. If you’re not a nut-free facility, cracking walnuts open can occupy kids for hours!
Hammer: When a hammer is used to hammer in nails, it’s a third class lever.
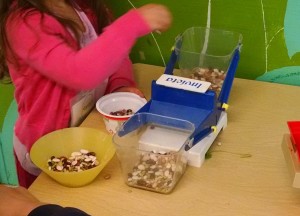
Creation Station: In our classroom, we have a creation zone filled with recyclables (toilet paper rolls, margarine container lids, and so on), and small dibs and dabs (buttons, interesting pasta shapes, shells, plastic gems, and so on). There’s always an open table with some glue and kids are allowed to create anything they want. The oldest child in our Inventors Lab creates something fabulous each week, tied into the theme. On levers week, she built this seesaw.
Building toys: We also have one room called “The Construction Zone” where we put out various building blocks or other supplies. This week we had giant tinker toys. In the picture at the top of this post, you can see what a dad and child created… it was a see-saw like balance scale, but notice that on the end near the child there are free-floating discs. Those are weights that can be slid back and forth to adjust the power of the lift.
Snack: Use scissors to cut something – like pita bread. Use forks or chopsticks to eat with.
Addendum: Next year, we’ll add in this Duplo seesaw project.


[…] First, take a popsicle stick (the bar of your lever), balance it over a pencil (your fulcrum). Put an object (your load) onto the end that’s laying on the table. Hit the high end of the stick, the object launches. This is an easy depiction of the simple machine concept of levers (learn more about Levers here.) […]
LikeLike
[…] you’ve already talked about simple machines, and did the activity showing how the arm is a lever, you might remind them of […]
LikeLike
[…] (For more ideas on building balance scales, see my post on levers.) […]
LikeLike
[…] Levers week, a balance made of popsicle sticks, Dixie cups, and yarn from a thrift store, that will then balance on a pencil. […]
LikeLike
[…] Catapults*. Originally seen in Levers week. We offered the materials to make several types of popsicle stick catapults. We encouraged kids […]
LikeLike
[…] Duplo loads and finding the balance point – it’s overall a helpful lever to add to our Levers class for fun […]
LikeLike
[…] Levers. For both this class, and our Build a House class, I want the kids to have a good quality sturdy toy hammer to play with. We’ve been happy with the one that comes with the Black & Decker Jr. Set. It’s stood up to LOTS of use with kids pounding wood golf tees into Styrofoam, and using the hammer’s claw to pull them back out again. Note: if you’re working with kids age 5 and up, just get real hammers! (Small ones.) […]
LikeLike