I’ve heard that it works to do “Shrinky Dinks” from recycled plastic.
We’ve just made one attempt so far, but I thought I’d share my how-to results.
Gather plastics labelled #1 or #6. Cut into desired shapes, decorate with sharpies as desired. Preheat oven to 350 degrees. Set them in and watch them. In a minute or so, they’ll suddenly curl up tight and then they’ll gradually uncurl. In another minute or so, they’re done. (Note: I wondered if off-gassing would be a problem. I personally didn’t get any chemical smell in this process, and I tend to be quite sensitive to it.)
It’s actually a little hard to find #1 and #6 in flat trays that are easy to use for this craft. I’ve been collecting for a while, and the main thing I’ve found is take-out sushi trays. The three plastics I used looked and felt very similar before cooking, so my son expected them to behave in the same way, but they didn’t!
I made scuba divers (I was thinking about using them in a Cartesian diver bottle.) On the top, you see the drawing. The first batch, I didn’t note whether it was #1 or #6. They shrunk a little and thickened a little. I cooked them in a corrugated pie tin (I don’t know if cooking surface affected my results,)
The second batch was #1 plastics cooked on a silicone sheet on a metal pan. Disappointing. They barely shrunk, barely thickened, and several never uncurled.
Batch #3 was the best shrinky dink, in that they shrunk well, thickened well, and stayed flat. But they shrunk way more than the others and the end result was much smaller than I wanted. I plan to experiment more with time, but let me know what your results are!
This is a fun discovery of various results from similar products. If you really want reliable, consistent results, you’re best off using commercial Shrinky Dinks. At $6 for 10 sheets, they’re a cheap option.
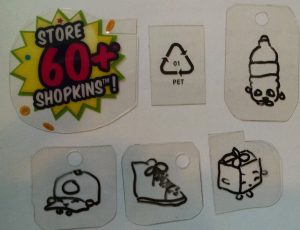
Addendum: My son is really into Shopkins, and his new display case came with this packaging. It was #1 plastic, and I had high hopes that we could cut it apart into all the separate Shopkins, punch a hole in each one, shrink it and have small, hard plastic charms.
So, we decided to test it. We cut out the “60+ Shopkins” starburst, and the recycling symbol, and we also traced 4 pictures with a Sharpie, cut them apart, and used a hole punch to punch a hole in each hypothetical charm.
We heated the oven to 350. Popped them in for a few minutes, They curled up tightly (except the starburst, which just got all rumpled) and turned white and didn’t shrink. We ended up with 6 useless bits of curled plastic. Oh well, back to the drawing board….


[…] If you’re not familiar with this idea: kids draw on a special piece of plastic, then put it in an oven or toaster oven for just a few minutes, and it shrinks down to about 1/3 its original dimensions and 9 times thicker. We used Shrinky Dinks Ruff n’ Ready Ten sheets is plenty for 30 kids. On the Ruff n’Ready, you can use colored pencils for nice results (we outlined with Sharpie). On the clear sheets, you have to use permanent markers. You could also use #6 plastics from the recycling bin – take out sushi containers work best, but results are not nearly as good as the commercial product. (Read here about Shrinky Dinks from Recycled Plastic.) […]
LikeLike
[…] doing shrinky dinks inspired by the glass art of Dale Chihuly. They had clear containers made from #6 plastic that the kids colored on with Sharpies, then put in a toaster oven so they curled up, then glued […]
LikeLike
[…] 1/3 its original dimensions and 9 times thicker. We use Shrinky Dinks Ruff n’ Ready You could also use #6 plastics from the recycling bin – take out sushi containers and the plastic clamshells […]
LikeLike