
You and your child can build a hand-made weather vane and anemometer (tools for detecting wind direction and wind speed) using materials you already have at home or in your recycling bin. These are fun and easy projects for preschool and early elementary classrooms, and for homeschooling families, and are great supplements to a lesson plan studying weather.
Brief how-to tutorials for both these projects can be found in my post on DIY Weather Station Tools. Or, here’s a set of fully illustrated step-by-step instructions you can print. Those instructions give you all the info most people would need to see to build these tools!!
This post has all my notes on the design process and materials options in case you’re one of those parents or teachers who really wants all these nitpicky details. If you’re one of those sorts, read on… if you just want the cliff notes version / final product, click on one of the links above.
Design: The weather vane is basically a horizontal bar that can turn freely in the wind. It turns to indicate the direction the wind is blowing from. The anemometer is cross-bars with cups mounted on them to catch the wind and spin the anemometer around. We can tell how fast the wind is blowing by how fast it spins.
I examined many possible designs for both tools online, and combined them to create the version shown here.
Building the Base
Both of these tools need a secure base to mount them on. It needs to be able to hold a straw (or pencil) upright, straight up and down, while allowing the straw to rotate. It needs to not tip over in the wind. And it’s helpful if you can label the base with the cardinal directions of north, south, east, and west. Some ideas:
- Just poke the straw/pencil down into the ground. The dirt holds it upright. Simple and practical, if you have a good piece of dirt to shove it into.
- Gift of Curiosity has you label a paper plate with the directions, then poke the straw / pencil through the plate and into the ground.
- PBS recommends that you poke the straw/pencil into a lump of modeling clay and mount that on a piece of cardboard for stability. Label the cardboard with directions.
- 123 Homeschool uses a plastic container like a cottage cheese tub with a hole in the lid, playdough to weight it, and labels written on the lid.
- Steve Spangler places the straw/pencil in a cup filled with rock salt or dirt.
- WikiHow has you fill a cup or container with some pebbles, then, if you don’t have a lid for your container, glue a paper plate onto the top of the cup to make a “lid”. Then you flip that all upside down, so you have an upside down plate for stability, rocks for weight, and you punch a hole in the bottom of the cup to poke the straw/pencil through.
I needed something I could easily obtain 30 of on short notice (if I had time, I could collect containers with lids, but I didn’t have that time), and they had to be cheap (so no expensive materials to fill with), and I couldn’t guarantee my students could plant them in the dirt.
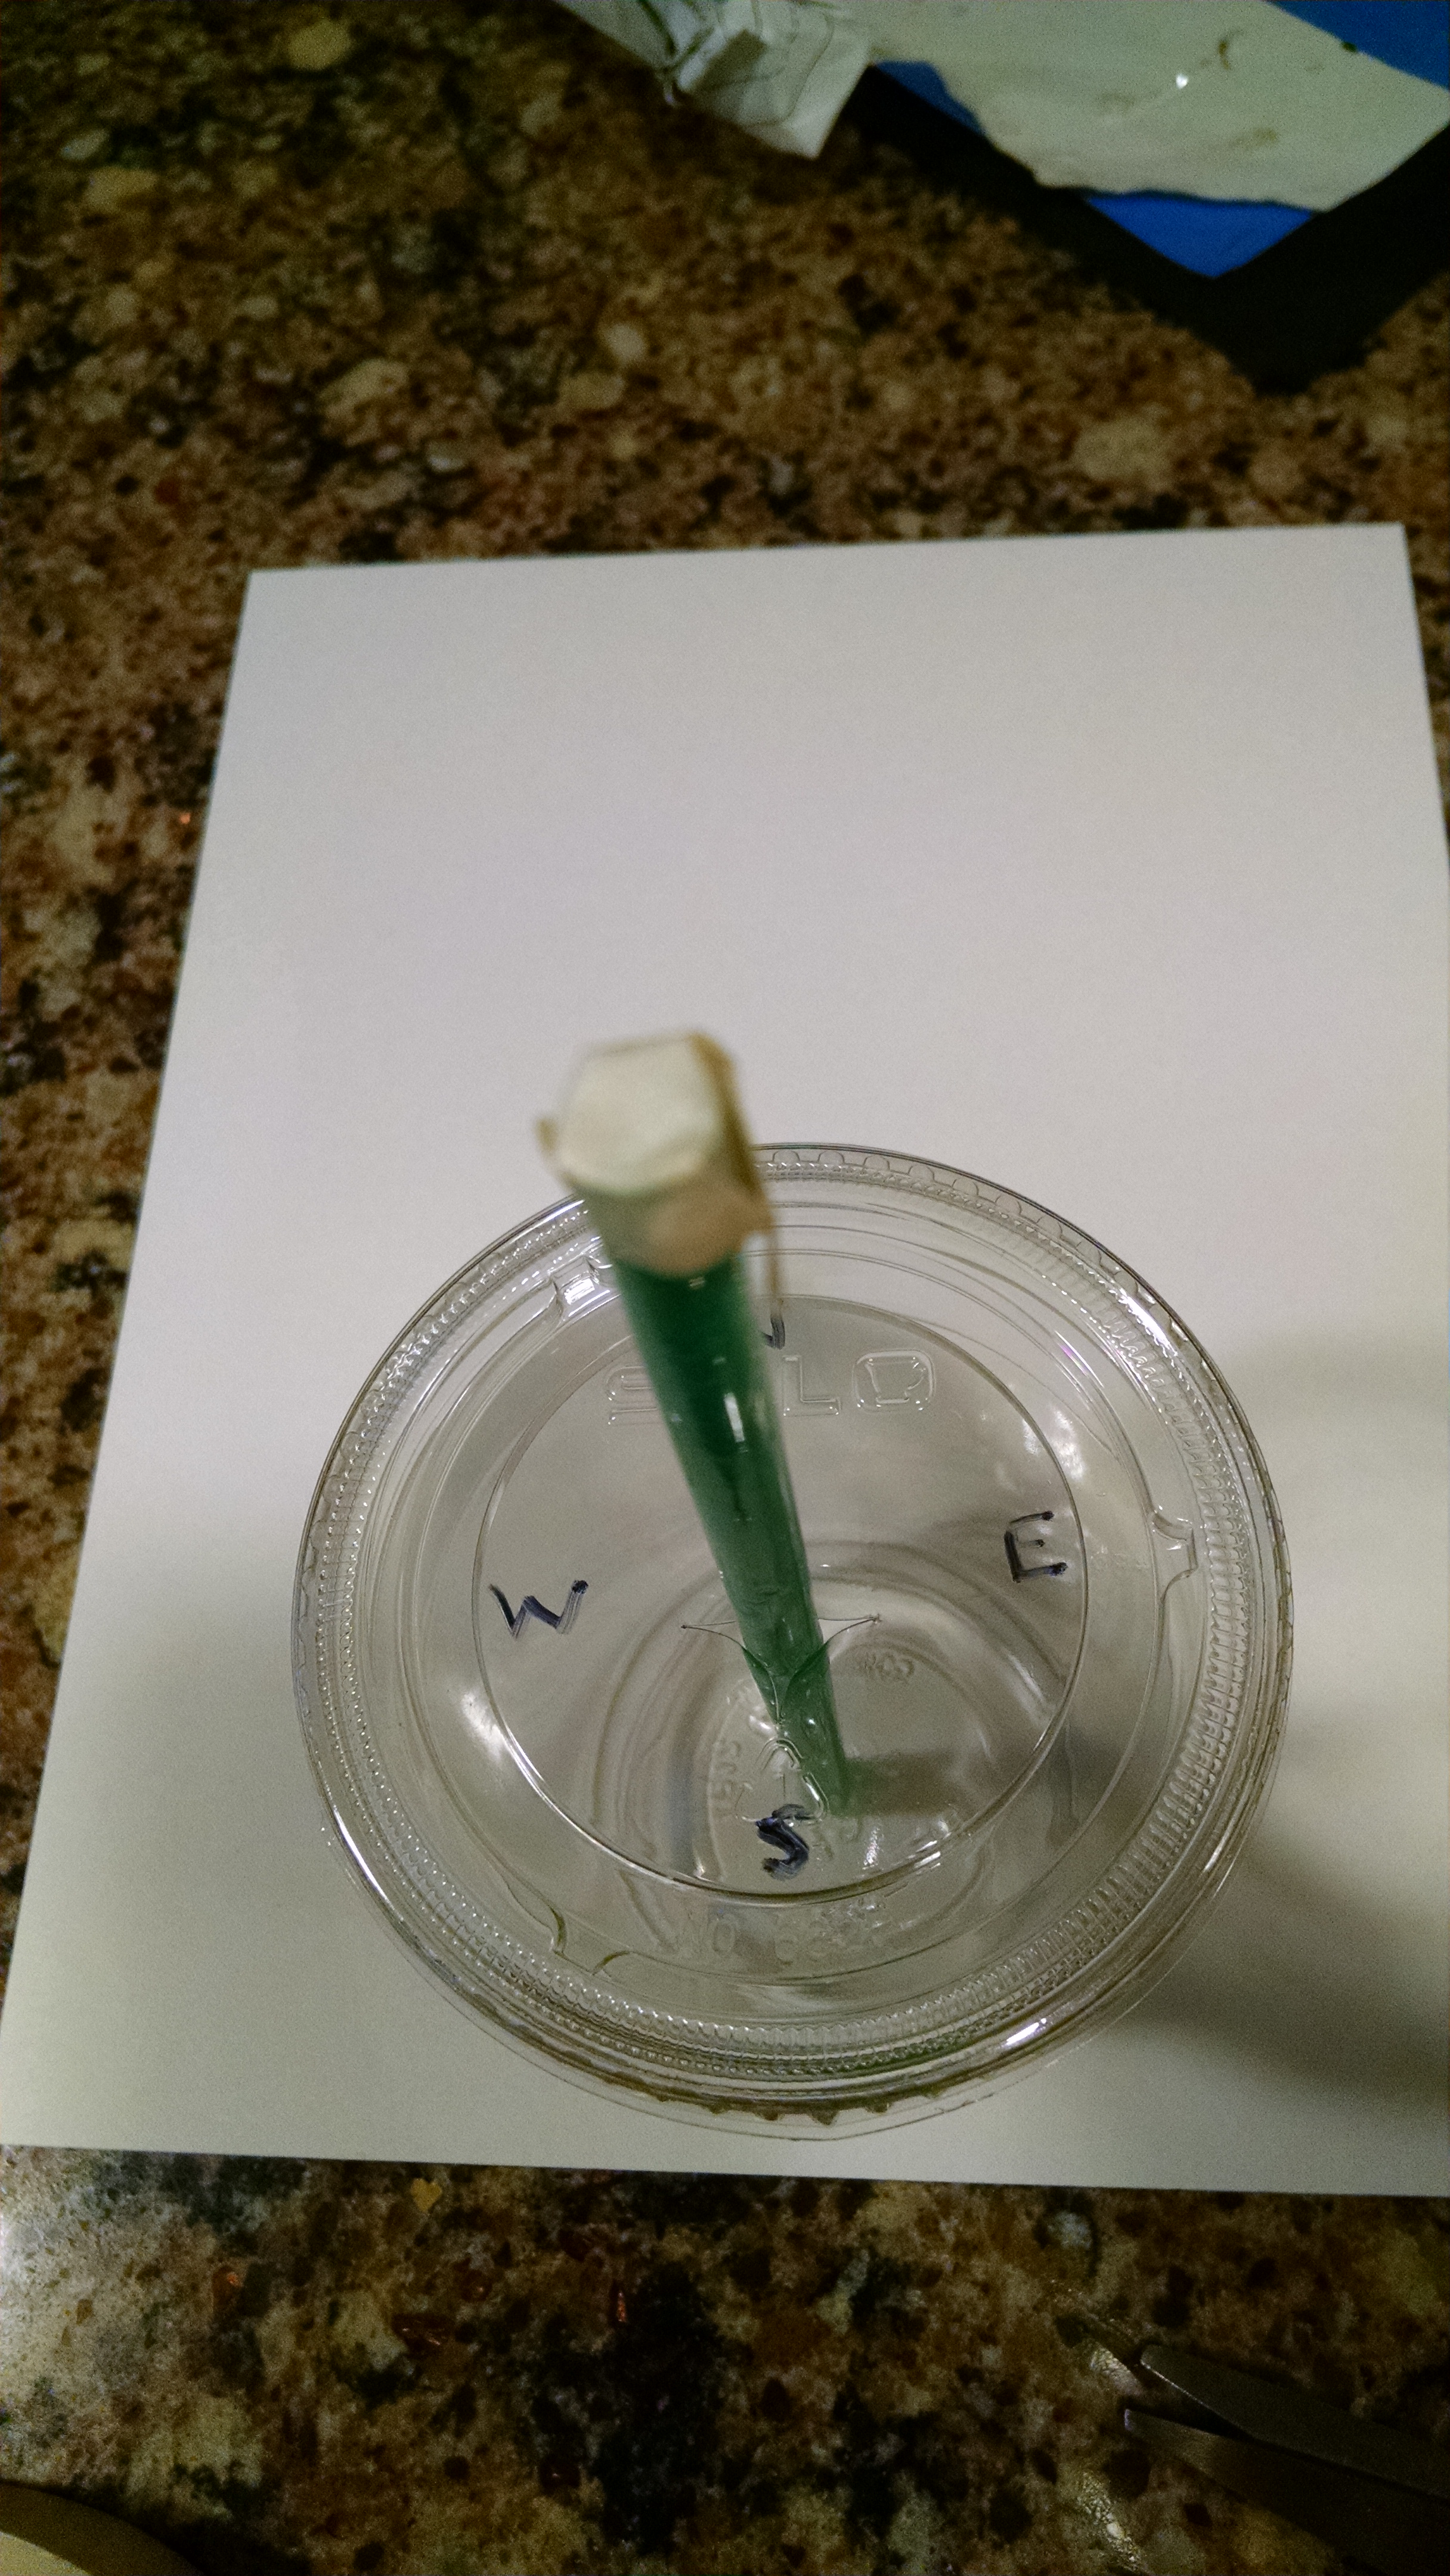
We chose plastic cups with lids that had holes already punched for straws. We filled them with water to weight them. Cheap, and easy to pour out for storage or transportation, and easy to re-fill. I used Solo brand 12 ounce cups and lids from the Pack and Carry store, but they weren’t great, as the lids were hard to put on.
So, once you have the materials: to make the base, just take the lid and label it with N, E, S, and W. Fill the cup partway with water, and put the lid on.

The Vertical Element
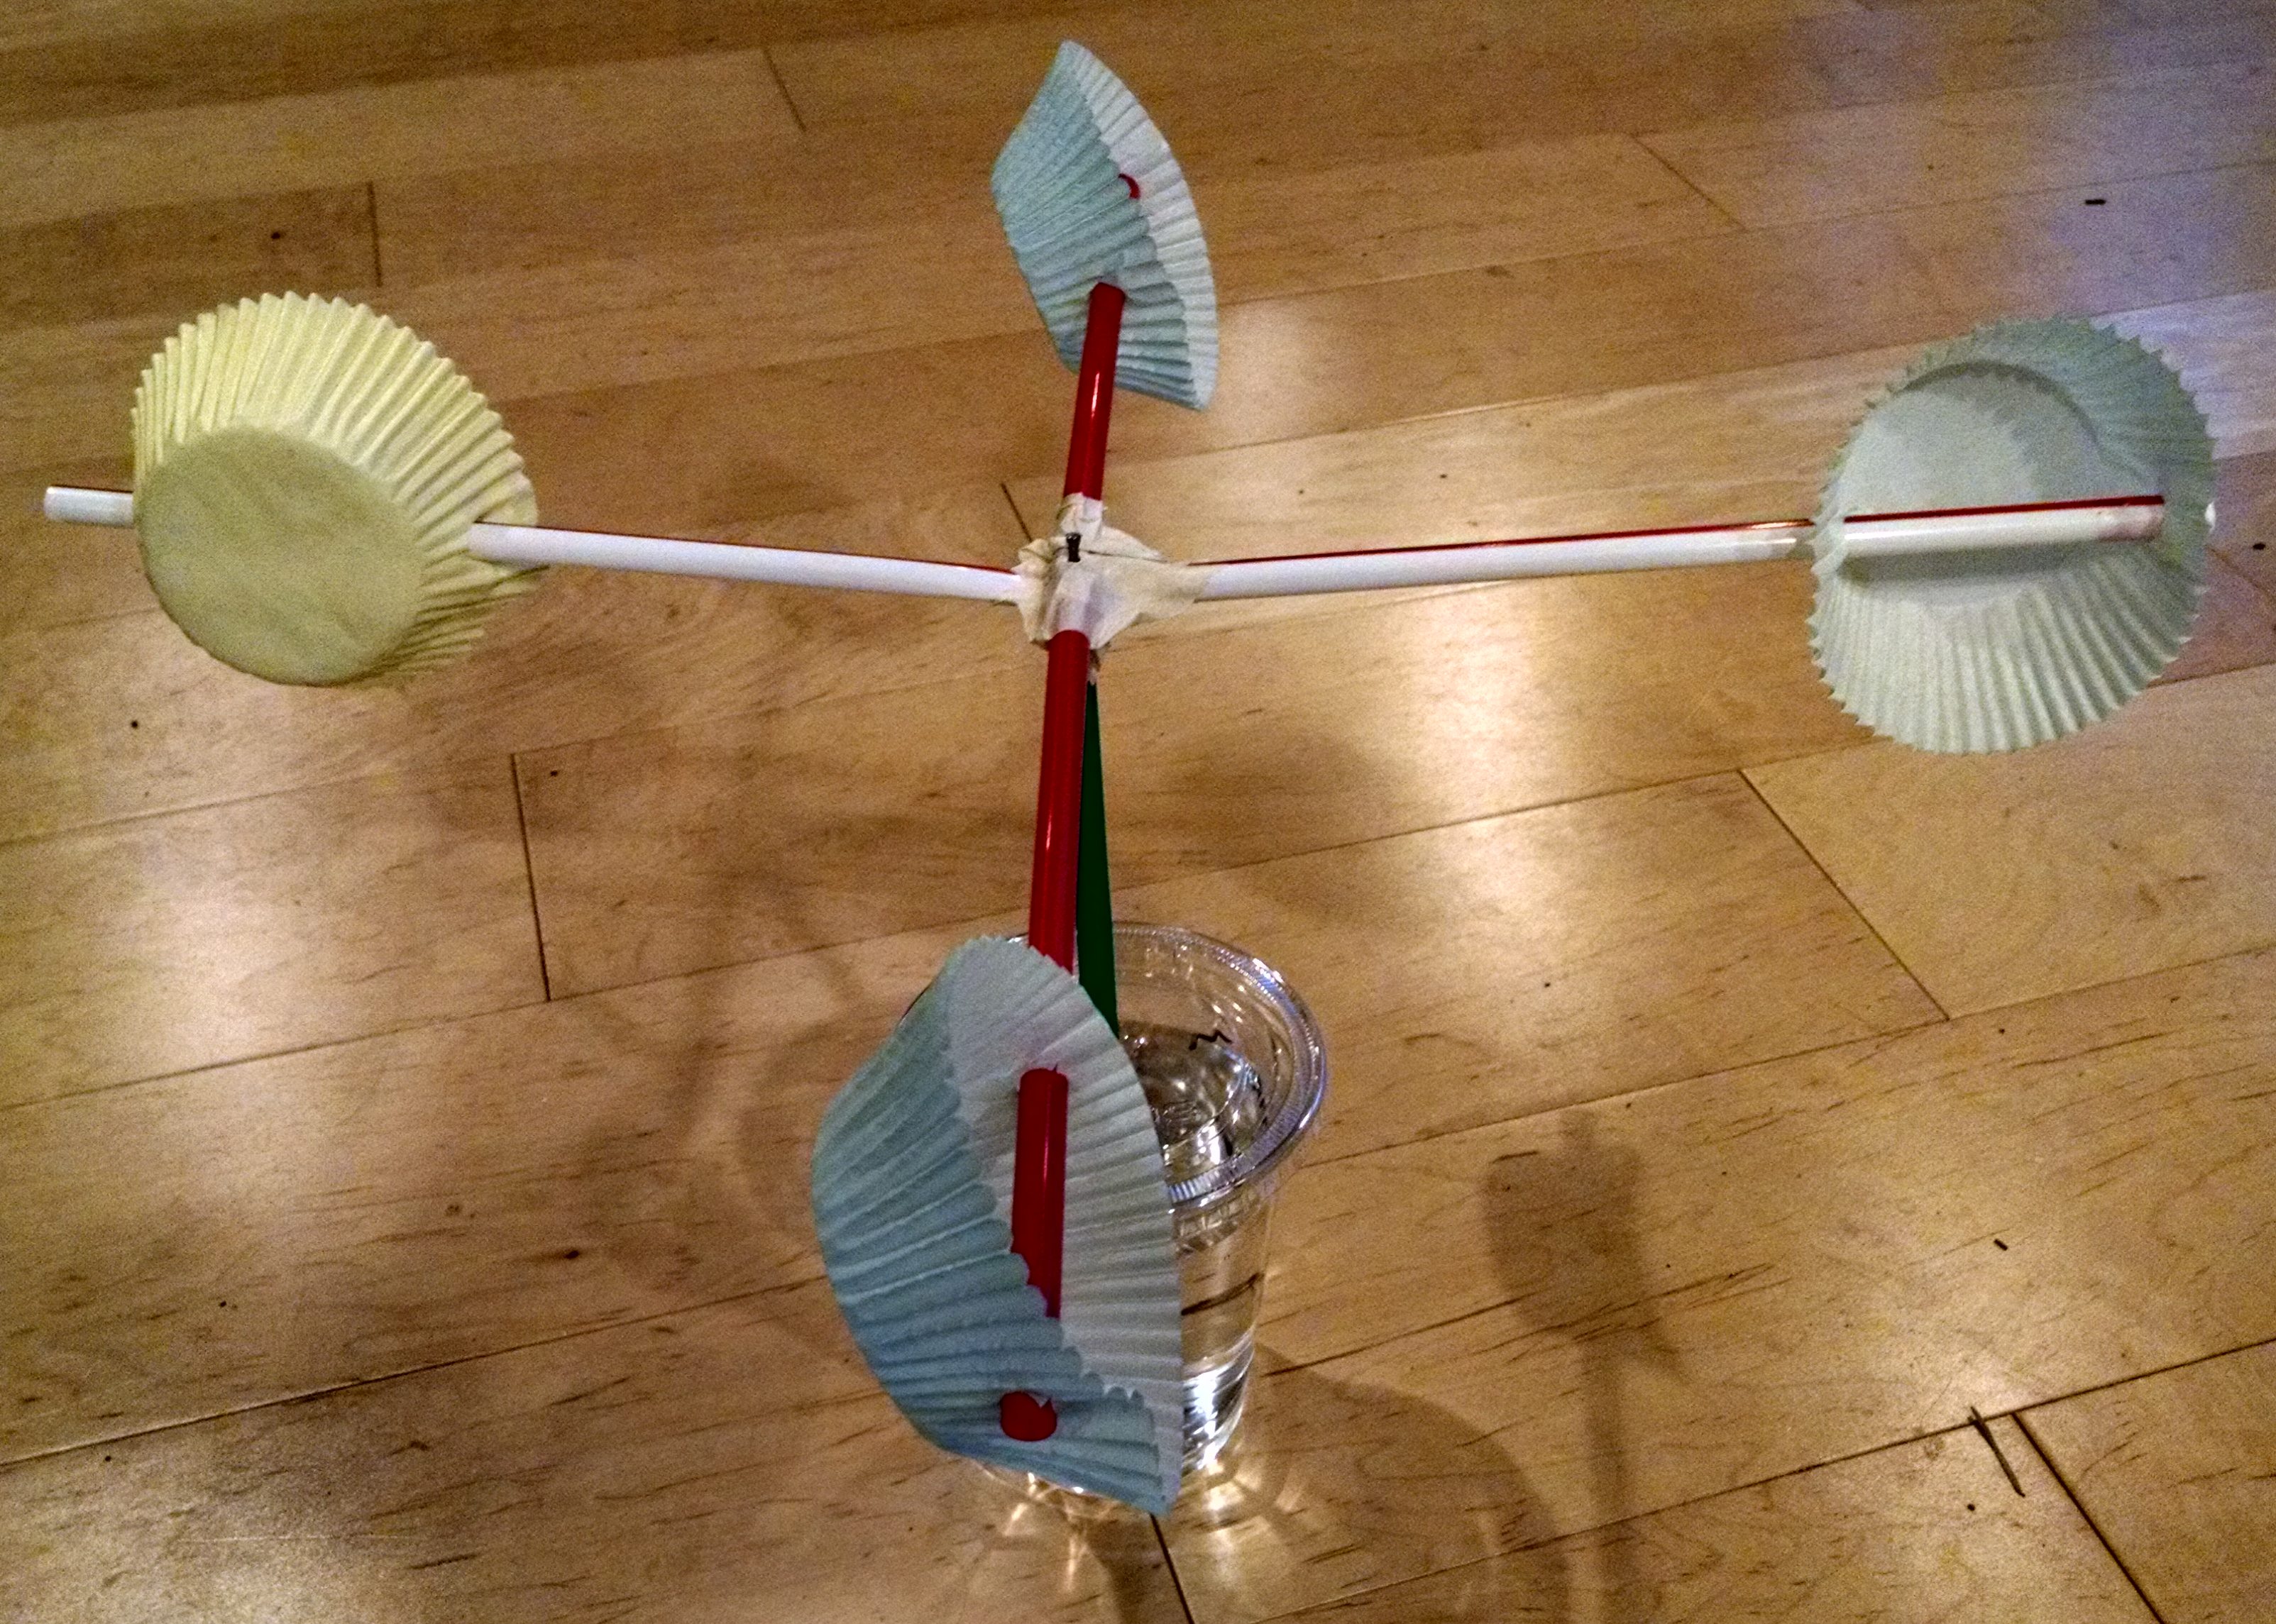
All the online directions I found used a pencil as the vertical element, where you mount your topper on it by poking a pin into the eraser on the pencil. A pencil wasn’t a great option for me, because 30 pencils are a little pricey for my class budget, and also wouldn’t stand up well to soaking in the water I planned to put in the base. So, we used straws instead, with tape across the top to poke the pins into.
Just insert the straw into the base (i.e. the straw hole in the cup’s lid) then cover the top of the straw with a piece of masking tape. Then cover that with one more piece of tape, just to make it a little sturdier.
It’s important that this vertical piece stand straight up. Some straw holes like to push their straws at an angle. If this is true, you can add some water resistant tape or clay to the bottom of your cup and anchor the straw in that to keep it straight up.
The Weather Vane Topper

Take a straw. Cut slits in each end, about a half inch deep.
Cut out a flag and an arrow from cardstock or lightweight cardboard, such as a cereal box. They could be almost any size and shape, as long as your flag is bigger than your arrow, so it will catch more wind. [If you like specific instructions, here you go: The flag can be a trapezoid shape, around two inches long and two inches wide at its widest edge. The arrow is smaller, a triangle with a base of 1 – 1.5 inches, and about 1 – 1.5 inches tall. (Here’s a template you can print.)] Decorate the flag and arrow if you want.
Slide the arrow in the slits at one end of the straw, and the flag in the slits at the other end.

Balance the straw on your finger to figure out the center of gravity… it’ll be a couple inches from the flag end.
Poke the pin through that center of gravity, so it’s parallel (on the same plane) as the flag and arrow.
Then poke that pin into the tape on the straw on your base. Make sure it turns freely.

To use your weather vane, put it outside in the wind. Turn the cup so that the N on the cup points to the north.
When the wind moves the weather vane, it will tell you what direction the wind is coming FROM.
If you’re in the northern hemisphere: If the wind is coming from the north, the weather will get colder. If it’s coming from the south, it will get warmer. From the east means rain or snow is coming. From the west means the weather may clear.
The Anemometer Topper
My primary source was Frugal Fun for Boys, because I can always trust that her projects will work well, and appeal to kids. But I reviewed lots of othr designs for ideas.
There are four decision points in your design:
- How many arms do you want? 3 arms or 6 arms could work just as well or better than 4 arms, but then you would need to use a tool to be sure your angles are equal between each of them. (I find it easy to eyeball whether two straws are perpendicular – making 90 degree angles. It’s harder for me to eyeball if I’ve got 60 degree or 120 degree angles.)
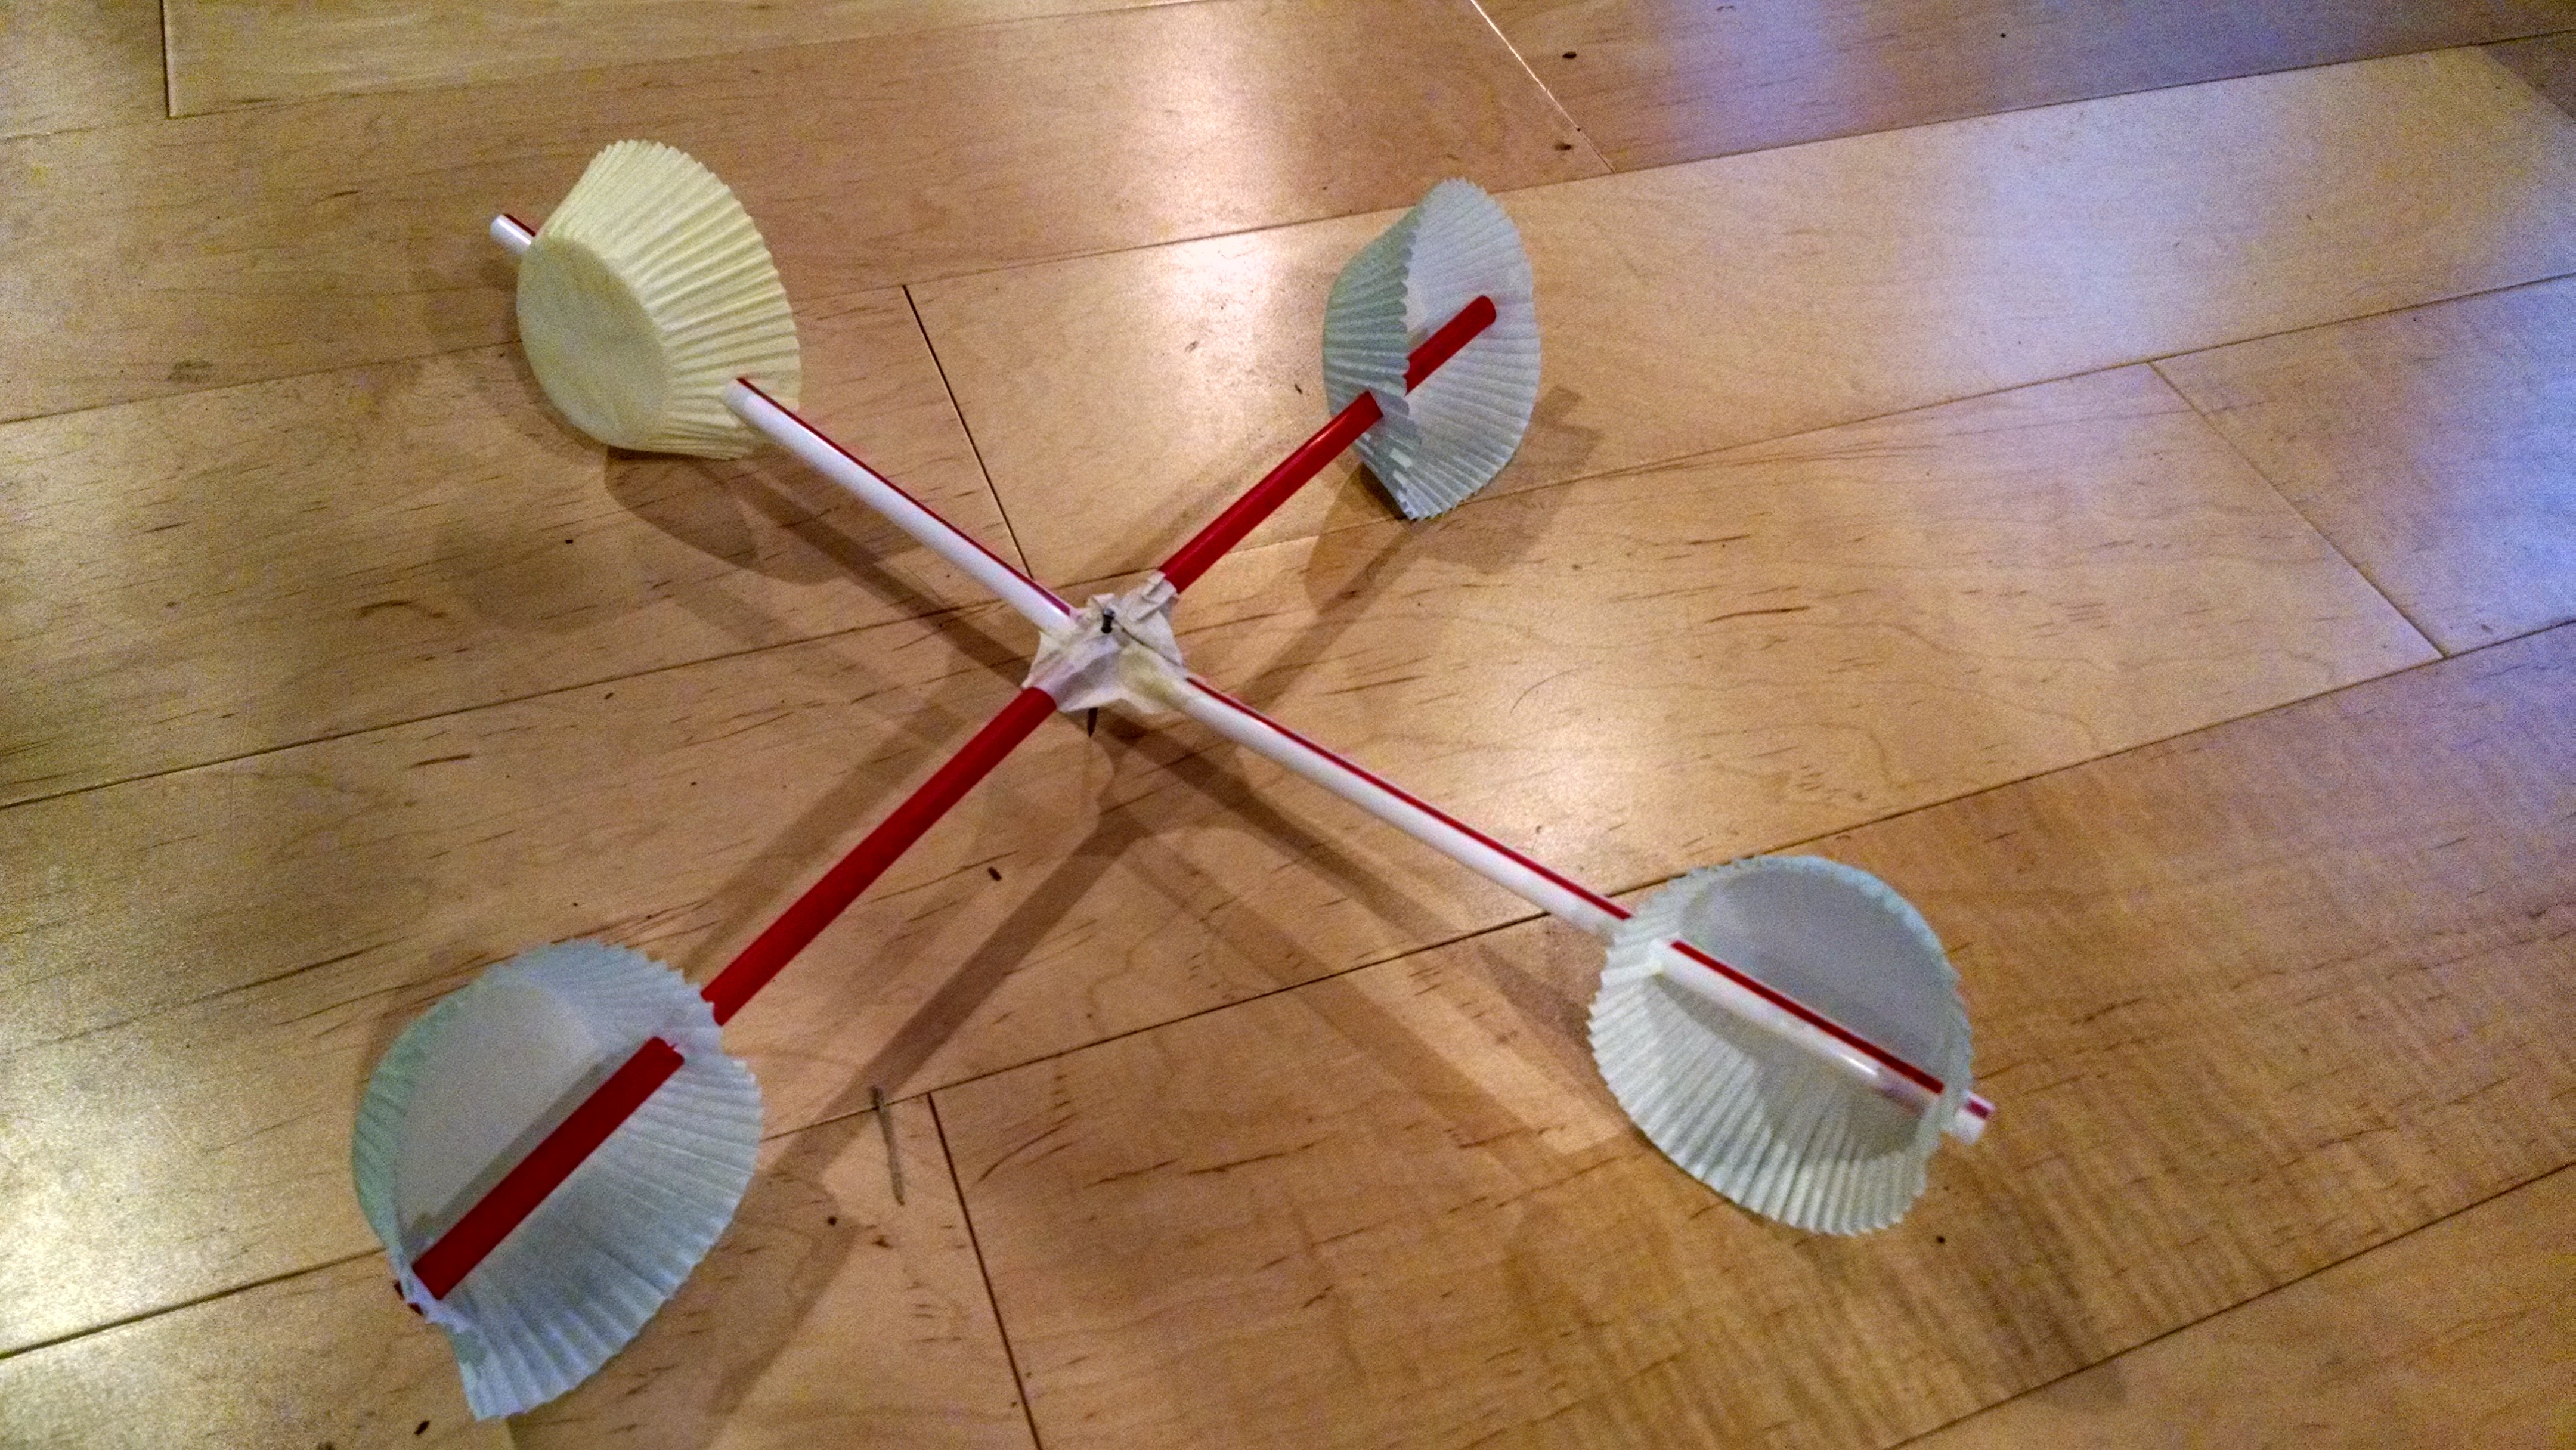
- How long do you want the arms to be? You can just use two straws crossed in the middle. Or, you can make longer arms, using this method: Take one straw. Pinch down one end and slide it inside straw #2, overlapping them by about 1/2 to 1 inch, making an extra long straw. Pinch #3 and insert into #4 to make your second long straw.
- What will you use as your “cups”? I found a few posts online that used plastic Easter eggs. Most use Dixie cups. I tested one with cupcake wrappers, and that worked fine. You could tape them on or staple them on the straws, but I punched holes in them and threaded the straw though. That worked for most. If your cups are flying off as it rotates, you could tape them on, or add a little tape loop to the end of each straw so the cup can’t slip off.
- Will you have a central cup? In my designs, I just have four cups mounted on the arms, and the straws crossing in the center. Almost every design online has a central cup, like in this picture from the SE Regional Climate Center. Mine worked fine without that central cup. My guess is that it is intended to make the anemometer more stable? That could be a benefit, but if you’re using your anemometer outside, that cup could also catch water and debris. If you would like to use this design, there are clear instructions at WikiHow, Instructables, and Education.com.

Here are two alternative methods, both of which worked well for us. (You can see both styles in action in the video at the top of this post. The anemometer in the bottom right corner of the video uses method 1. The others are method 2.) The advantage to method 2 is that it uses less materials (cheaper, better for environment), and there’s one less step, since you’re not threading the straws together. Method 1 creates longer arms, which means it’s longer to do a full revolution, so it’s easier to count your revolutions.
Method 1 –
- Take 4 straws. Pinch the end of one closed, and slide it inside the end of another to make a super long straw. Then do that again with the other two straws so you have two super long straws.
- Make a plus sign + with the two long straws. Poke a pin or nail through the center of the straws, going through both straws.
- Tape them together, being sure the straws are perpendicular, making 90 degree angles.
- Choose 4 cupcake wrappers. 1 in your “special” color, and three others.
- Punch a hole in the side each cupcake wrapper (cup), about halfway down from the top, and then another hole in the opposite side of each cup.
- Mount a cup on each end of both straws. Make sure the cups all face the same way around a circle.
- Poke the nail or pin that’s in the center of the anemometer through the tape on the top of the straw in your base cup. Make sure it turns easily.
Method 2
- Make a plus sign + with two straws. Poke a pin or nail through the center of the straws, going through both straws.
- Tape them together, being sure the straws are perpendicular, making 90 degree angles.
- Decorate one dixie cup in some way – add a sticker, write your name, whatever… just so you can tell this “special” one apart from the others.
- Punch a hole in the side of your dixie cup about a third of the way down from the top, and then another hole in the opposite side of each cup. Do the same to three more cups.
- Mount a cup on each end of both straws. Make sure the cups all face the same way around a circle.
- Poke the nail or pin that’s in the center of the anemometer through the tape on the top of the straw in your base cup. Make sure it turns easily.

Using the Anemometer
Put the anemometer in the wind. (Or test it with a fan, as we do in the video at the top, and this one.)
The cups will spin around. Each time the “special” cup comes round again, that counts as one revolution.
With little kids, that’s all they care about. If you’re charting the weather, they can just describe it as: not moving, spinning slowly, or spinning fast.
With slightly older kids (5 to 6 year olds), you could measure the wind in “revolutions per minute.” You set a timer for one minute, and count how many times the special cup goes by in that one minute.
If you, as the adult, really want to be able to convert those revolutions to know how many miles per hour the wind is moving, you’ll have to do some conversions.
Kids Korner says “if the cup makes 10 complete revolutions in one minute, the wind speed is 10 mph.” Instructables says “Ten turns in one minute is equal to 1 mph of wind speed.” Clearly, both these things (10 rpm = 10 mph, and 10 rpm = 1 mph) can’t be true. SERCC gives you a conversion chart to do this calculation. If it revolves 2 to 4 times in 10 seconds, that’s 1 mph. That would convert to 12 – 24 rpm = 1 mph.
Rather than just following one of these random guidelines, you could do a calculation. Weather Wiz Kids and Tornado Chaser say “To calculate the velocity at which your anemometer spins, determine the number of revolutions per minute (RPM). Next, calculate the circumference (in feet) of the circle made by the rotating paper cups. Multiply your RPM value by the circumference of the circle and you will have an approximation of the velocity of at which your anemometer spins (in feet per minute).” (Which you could then convert to miles per hour.)
Or you could calibrate your anemometer by going for a drive. I would recommend you do this with an adult partner. I can’t recommend driving with your kid hanging their anemometer out the car window…. Education.com and WikiHow have detailed instructions. But, basically:
- On a windless day, have an adult drive down an empty street at 10 miles per hour.
- Hold the anemometer out the window and count the number of rotations in 60 seconds.
- Now you know: if at ten miles per hour, it spun 20 times in 60 seconds, then in the future, if you count to 20 in 60 seconds, you know the wind is 10 miles per hour.
- Test different speeds and make a calibration chart.
To learn about how to make other weather station tools (a thermometer, a rain gauge and a weather chart), check out this post on DIY Weather Station tools. For lots of other fun weather related STEM activities for kids, check out our lesson plans on Weather and on Rainbows. You could also learn how to make a sundial in our post on Shadows.

[…] our class, our kids made weather vanes and anemometers. The teachers made a sample thermometer and rain gauge. We set up a testing station, where the kids […]
LikeLike
[…] with a specific set of instructions you have to follow correctly to get it to work (like our anemometer, our retractable badge car, or sundials). Sometimes, they are more process based, where kids are […]
LikeLike
[…] Make a weather vane or an anemometer with a plastic cup, straw, and some dixie cups. […]
LikeLike
[…] – we made ours with dixie cups and straws. We use this when we learn about weather. Find the anemometer tutorial […]
LikeLike
[…] projects, though I’ll have to think about budget differences. We’ve used straws in our weather vanes and anemometers – we might be able to substitute lightweight wooden skewers. And we use straws in our craft […]
LikeLike
[…] our class, our kids made weather vanes and anemometers. The teachers made a sample thermometer and rain gauge. We set up a testing station, where the kids […]
LikeLike
Cool😎
LikeLike
[…] (And of course lots of articulated limbs would function as levers.) Or you could put a spinning anemometer on the top of the robot’s […]
LikeLike