
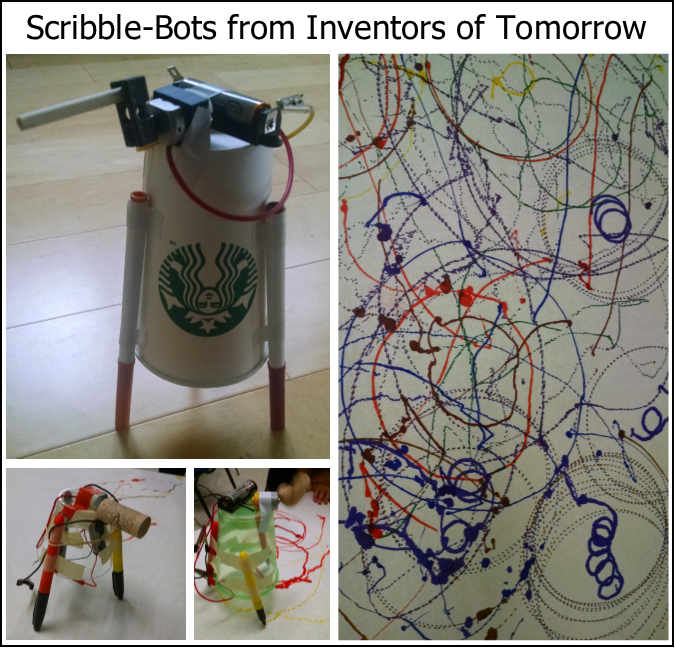
A scribble bot is basically an out-of-balance motor attached to some drawing utensil. As the motor rotates, it vibrates, causing the drawing utensil to jiggle across the paper, making scribble marks. There are a lot of ways you could build one. Here’s a tutorial on the method we used with our class of 3 – 7 year olds with parent helpers. (Click on any picture for a bigger image.)
- Get a cup or bowl.
 We’ve used Starbucks cups, solo cups, and smaller plastic cups, but my favorite solution is 8 ounce styrofoam bowls / take out containers from the restaurant supply. The wider, squatter shape makes it more stable, and you also have a bigger platform to put your battery and motor on.
- Tape three colored markers to the outside of the cup, making a stable tripod. Align the markers so that the lids are just below the rim of the cup, and make sure the legs are an equal length.

- Washable markers are your best bet – these RoseArt Markers are 100 for $10. Or you can get 100 Crayola Super Tips.for around $15.
- Options: you could use popsicle sticks or other sticks for two of the legs, and only have one marker. You could use colored pencils or crayons, but they just don’t draw very well – the plastic cup is not heavy enough to put on enough weight to get a good mark out of these things that require some pressure to draw.
- Turn the cup upside down
- Tape the battery pack on top.
- Note, for most of this project, you can use masking tape, duct tape, scotch tape, glue gun – whatever you have. But if the tape might come in contact with electrical wires carrying current, use electrical tape there.)

- Note, for most of this project, you can use masking tape, duct tape, scotch tape, glue gun – whatever you have. But if the tape might come in contact with electrical wires carrying current, use electrical tape there.)
- Tape the motor on top so that the shaft on the motor is hanging off the edge of the cup.
- Un-balance the motor with a cork.
- (This is necessary – if the motor is balanced and spins smoothly, the bot won’t wiggle around – it’ll just sit in place.) We used corks… use an icepick, nail, or something the right diameter to poke a hole into the cork about 1/3 of the way from the end on one side, then put the cork on the shaft of the motor.
- Test for freedom of rotation… spin the cork around a few times. Can it rotate cleanly without banging into anything or getting blocked? If so, you’re good to go. If not, you need to adjust your design. (This project is a STEM engineering challenge, and often needs several steps of test something, re-do, test again to get it right.)
- Decorate the bot as desired, with googly eyes, pompoms, pipe cleaners, etc.
- Put down a BIG piece of paper (we covered a table in butcher paper or you can use easel paper or tape many sheets together). Take the lids off the markers. Set the bot on the paper, then connect the wires on the motor to the battery to complete the circuit, and off your bot goes!
- Some bots work perfectly right away. Some don’t. (Remember, this is a STEM engineering challenge – it’s OK if it doesn’t work perfectly the first time – we learn from our mistakes and re-build!)
- If it tips over on its side, you may need to spread out the legs a little more evenly to make the most stable tripod possible.
- If it just stays in place and doesn’t wiggle around the paper, it’s because it’s too balanced. Take the cork off and re-mount it.
- If bits fall off or the wires become disconnected by the jiggling, re-engineer a solution for the problem.
- If the cork flies off, you may need to glue it on, or find a different way to unbalance the motor
- Here are videos of bots in action:

Where do you get your motor and battery pack?
Some sources recommend taking apart an electric toothbrush, or a small fan. I wanted a 1.5 – 3 V motor and a single AA battery pack. Here’s what I found:
- TeacherGeek sells a small motor with leads, mount, and battery pack for $3 per set. They are quite nice quality and are the easiest ones for clipping the motor to the batter pack,
- TeacherGeek also offers a wiggle-bot kit. I was impressed with the high quality of the kit components, and also all the great downloads they offer, such as this overview, which includes Science Standards addressed with this project.
- Other options: I liked these Motors with Alligator Clips, which were $18.95 for ten. (And Sci Supply offered great customer service. I’d accidentally placed a duplicate order, and they called me to double check how many motors I wanted.) I used these Batteries and these Battery packs which were fine (cost 64 cents each), but had wire leads you had to clip the motor to. I preferred the battery packs from Teacher Geek which are 60 cents each, and have metal terminals you can easily clip the alligator clips to.
- I also have purchased motors from Vetco, because they’re local. Their motors did not have clips, so I had to spend an evening stripping wires and attaching alligator clips in preparation for class. (Here’s how to attach an alligator clip. Here’s a wire stripper / crimping tool.)
What else can you do with a motor when your kid gets bored of the scribble-bot? Check out five fun project ideas here: https://inventorsoftomorrow.com/2018/05/21/what-can-you-do-with-a-small-motor/
One note for clarification: Although we do this project in our Robot themed class, a scribble bot does not meet our definition of a true robot (which we said has three parts – sensors, processor and actuator) or this definition on Galileo: essential characteristics include sensing, movement, energy, and intelligence, or even the Merriam-Webster definition of a device that automatically performs complicated often repetitive tasks. It’s really just a motorized toy.
Additional resources on how to build a scribble-bot:
- Scribble-bots video
- Robots that Draw from art4edu. Clear directions, a nice set of questions on “can scribble bots make ‘art'”, photos, and video. They use a 4-battery pack – I found one battery was plenty of power for our motor.
- Science Sparks’ How to Make a Scribble Bot. Instead of using a battery pack, they use a rubber band to hold the motor’s metal leads onto the battery, and a glue-gun gluestick instead of a cork to unbalance it. The body is a Pringle’s container… we prefer the plastic cups – having the edges that spread outward helps set your markers at an angle that makes for a very stable tripod.
- Lemon Lime Adventures’ DIY Scribble Bot tutorial shows taping the markers to the inside of the cup – we found it was easier for kids to tape them to the outside, uses a clothespin instead of a cork to unbalance it, and tapes the leads to the battery pack (they turn the bot on and off by taking out a battery or putting it back in.
- Red Ted Art’s Mini Robot is a wiggle-bot; it doesn’t scribble. It uses three toothhbrush heads for the legs, the motor is the body, and the battery is the head.

[…] Scribble-Bots – STE(A)M Project for Kids […]
LikeLike
[…] projects, and wrote full blog posts on the design process: anemometer, retractable badge car, scribble bots, a cardboard finger, a constellation viewer, sailboats, and Cartesian diver bottles. Each one of […]
LikeLike
[…] We made scribble-bots this week. (Learn how: https://inventorsoftomorrow.com/2017/05/22/scribble-bots/) […]
LikeLike
[…] Scribble bot: We used to do this in Robot week, but it doesn’t fit our criteria for a robot (a true robot needs to have sensors and a processor) but it’s such a great project we’re keeping it – just moving it to Contraptions week. […]
LikeLike
[…] culminates in our Robot unit. Read the full Robot Lesson Plan for all of our hands-on activities, a scribble-bot project, book recommendations and […]
LikeLike
[…] I have a complete tutorial with more lots photos and videos here: https://inventorsoftomorrow.com/2017/05/22/scribble-bots/. […]
LikeLike
[…] experiment is a great lead-in to a future project: making a scribble bot. That unbalanced cork is what will make your scribble bot travel around the […]
LikeLike