

In the first week of our Engineering Unit, we studied Towers – stacking one block on top of another block to build something tall. This week, we looked more at more complex structures, and also at the idea that we can make structures stronger by choosing different materials, using different shapes, construction techniques and fasteners.
We build with: index cards, toothpicks and gum drops, binder clips and craft sticks, blocks and sugar cubes. We experiment with fasteners, bridge the gap with building toys, and build forts together. We also read books and sing a couple great songs.
Concept Exploration
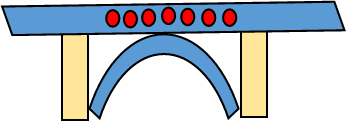
Index card bridges
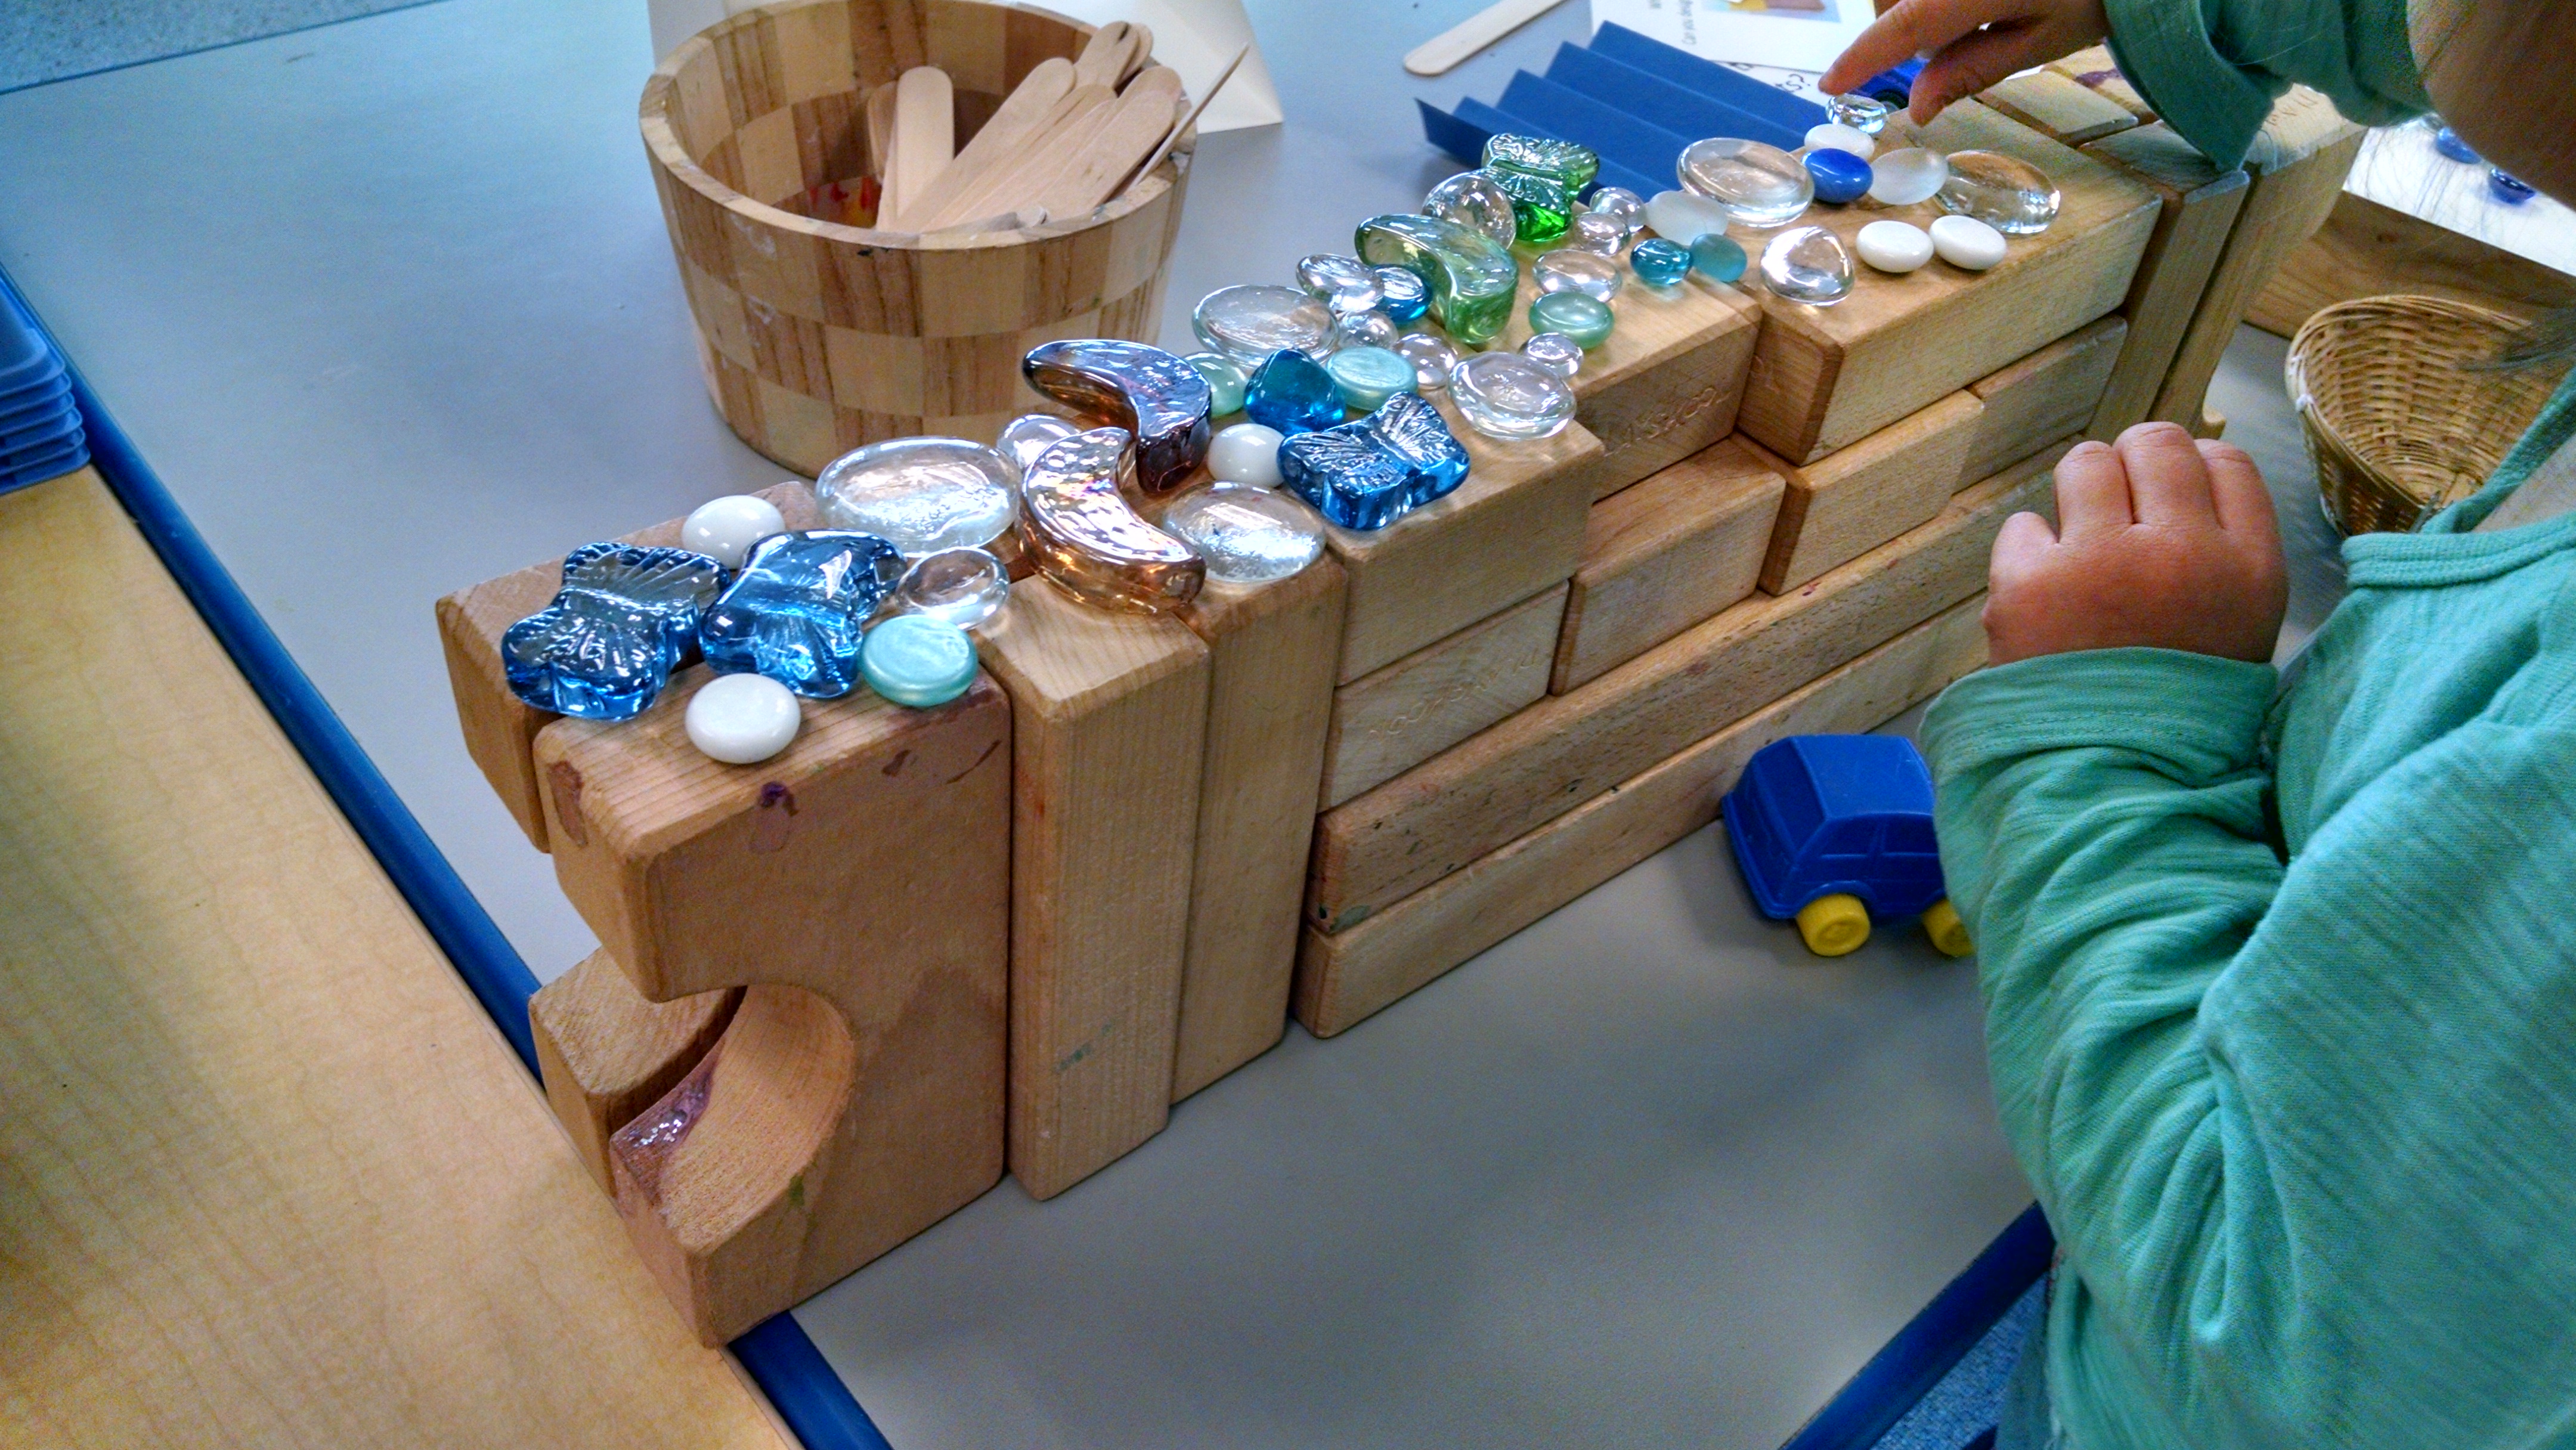
We had a table with blocks, index cards, and glass stones. As children came in, we would demonstrate three types of bridges to them and tested how many “stones” it would hold. (We got this idea from Stay at Home Educator). We showed them:
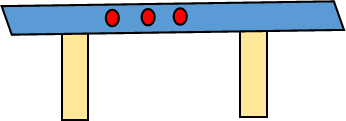


- Beam bridge – set two blocks up, put an index card spanning the distance between them. That will hold just three stones (unless kids were clever enough to rest the stones directly on top of the blocks rather than in the middle of the index card bridge)
- Arch bridge – insert one index card BETWEEN the two blocks, to form a support arch, then lay another index card on top of it for the flat bridge deck. That generally would support 7 stones.
- Accordion beam: take two index cards – fan fold them. Lay those on the two blocks, then put a flat index card deck on top of them. That would easily hold 20 or so stones.
We would demonstrate these three ideas, then challenge them to test as many other ideas as they could come up with. We walked away and let them tinker, exploring different materials and ways of using them in order to build stronger bridges. Our littler kids just played with the basics of bridges. Our older ones really took in more of the message about testing different methods. I only caught a few pictures of the process, but you can see a variety of methods were explored.


Toothpick Structures
You can do these with gum drops, jelly beans, mini marshmallows, apple cubes, grapes, cheese cubes, or other foods. If they’re healthy foods, this can be a snack time activity – build a structure, then eat it! When we used marshmallows, if I told them they weren’t allowed to eat them, it became a battle. If I told them they could eat one at the beginning and one at the end, that worked well for most kids. Mostly, we use these spicy gum drops. They taste one and decide they’re nasty and don’t eat any more! And we’ve been able to re-use these gum drops for years.
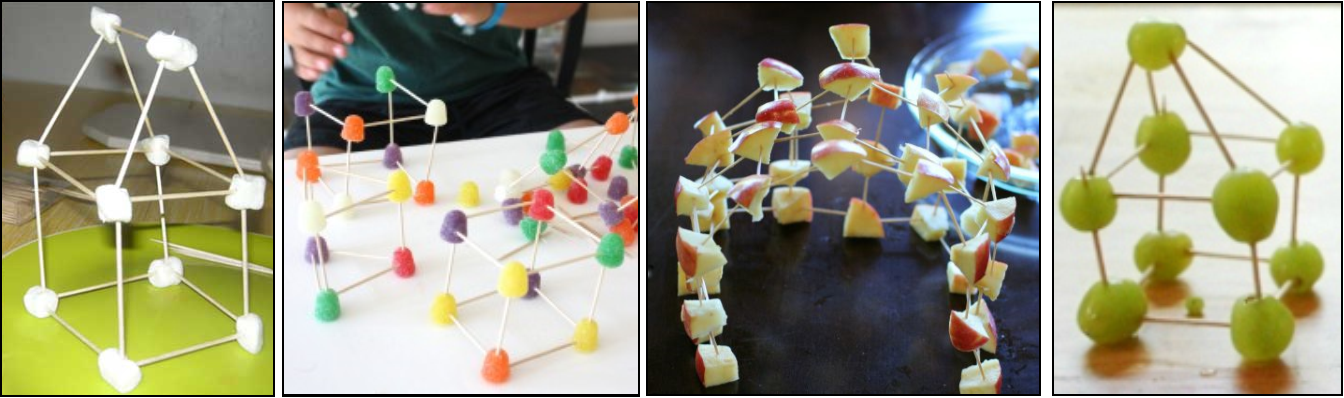
One of the things I like about this project is that kids discover the strength of the triangle, and build trusses to support their structures. If they want to make square shapes stronger, they can use a long toothpick (or cut skewers to the right length) to create a cross-brace.

Clothespins, binder clips, popsicle sticks
I got this idea from https://frugalfun4boys.com/2016/05/08/engineering-challenges-clothespins-binder-clips-craft-sticks/ We add in straws.


Fasteners
I built a box frame with four pieces of cardboard (and punched two holes in each one and gave them many options for how to attach the corners: tape, binder clips, string, pipe cleaners, clothespins, paper fasteners and Makedo scrus. (That is an Amazon affiliate link and takes you to the listing for makedo cardboard screws which are a fun building tool. You can use their custom screwdriver or 11/32″ hexagon socket screwdriver works with them.) Kids assemble the box, testing all the fastener options and noticing what their strengths and weaknesses are.

Someday I’d love to make a poster like this… (I wish I could credit the source on this, but I lost track of it. But the QR codes on the poster lead me to these videos on cardboard technique.)

Blocks and Big Blocks
We definitely throw open the blocks cabinet on this day and challenge them to build interesting structures – we put out pictures of famous buildings to inspire them.


It’s just fun to build with really big blocks – these are heavy and moving them around feels like an accomplishment. You have to warn the kids not to knock structures over and to be very careful when building up, because these blocks are really heavy and really hurt if a corner of one falls on your toes! You could also use cereal boxes and cracker boxes as big blocks.
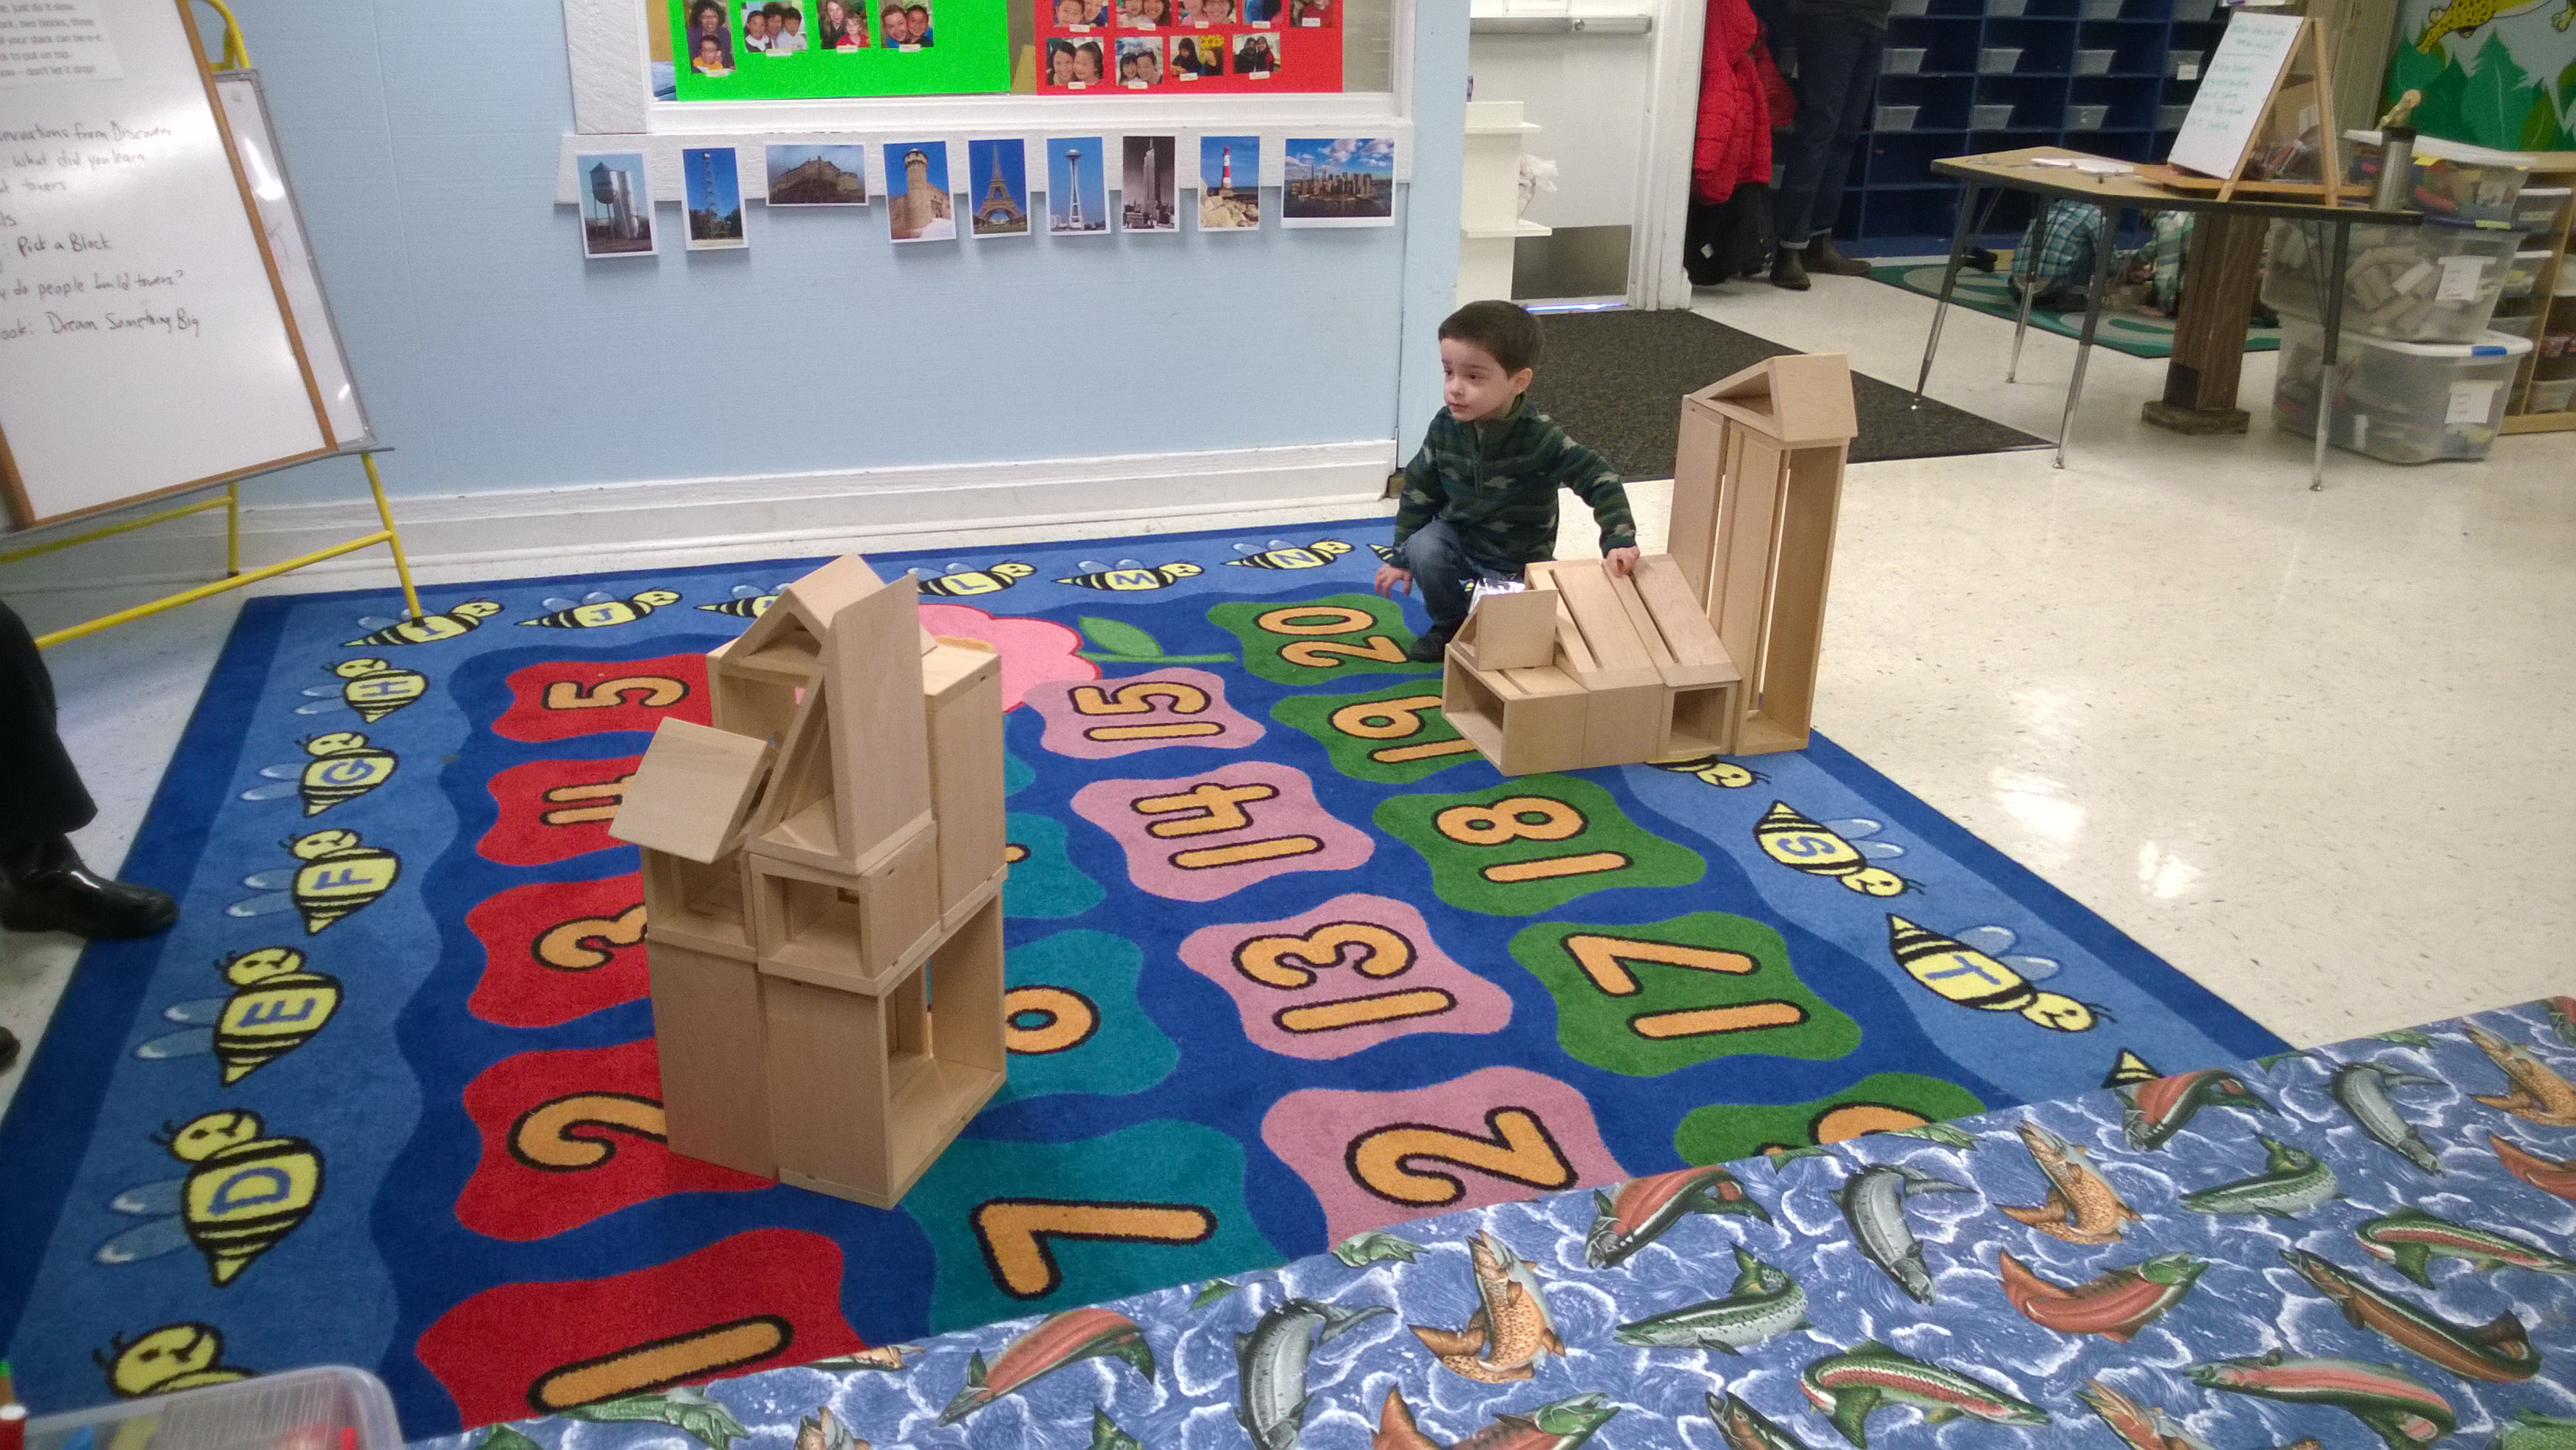
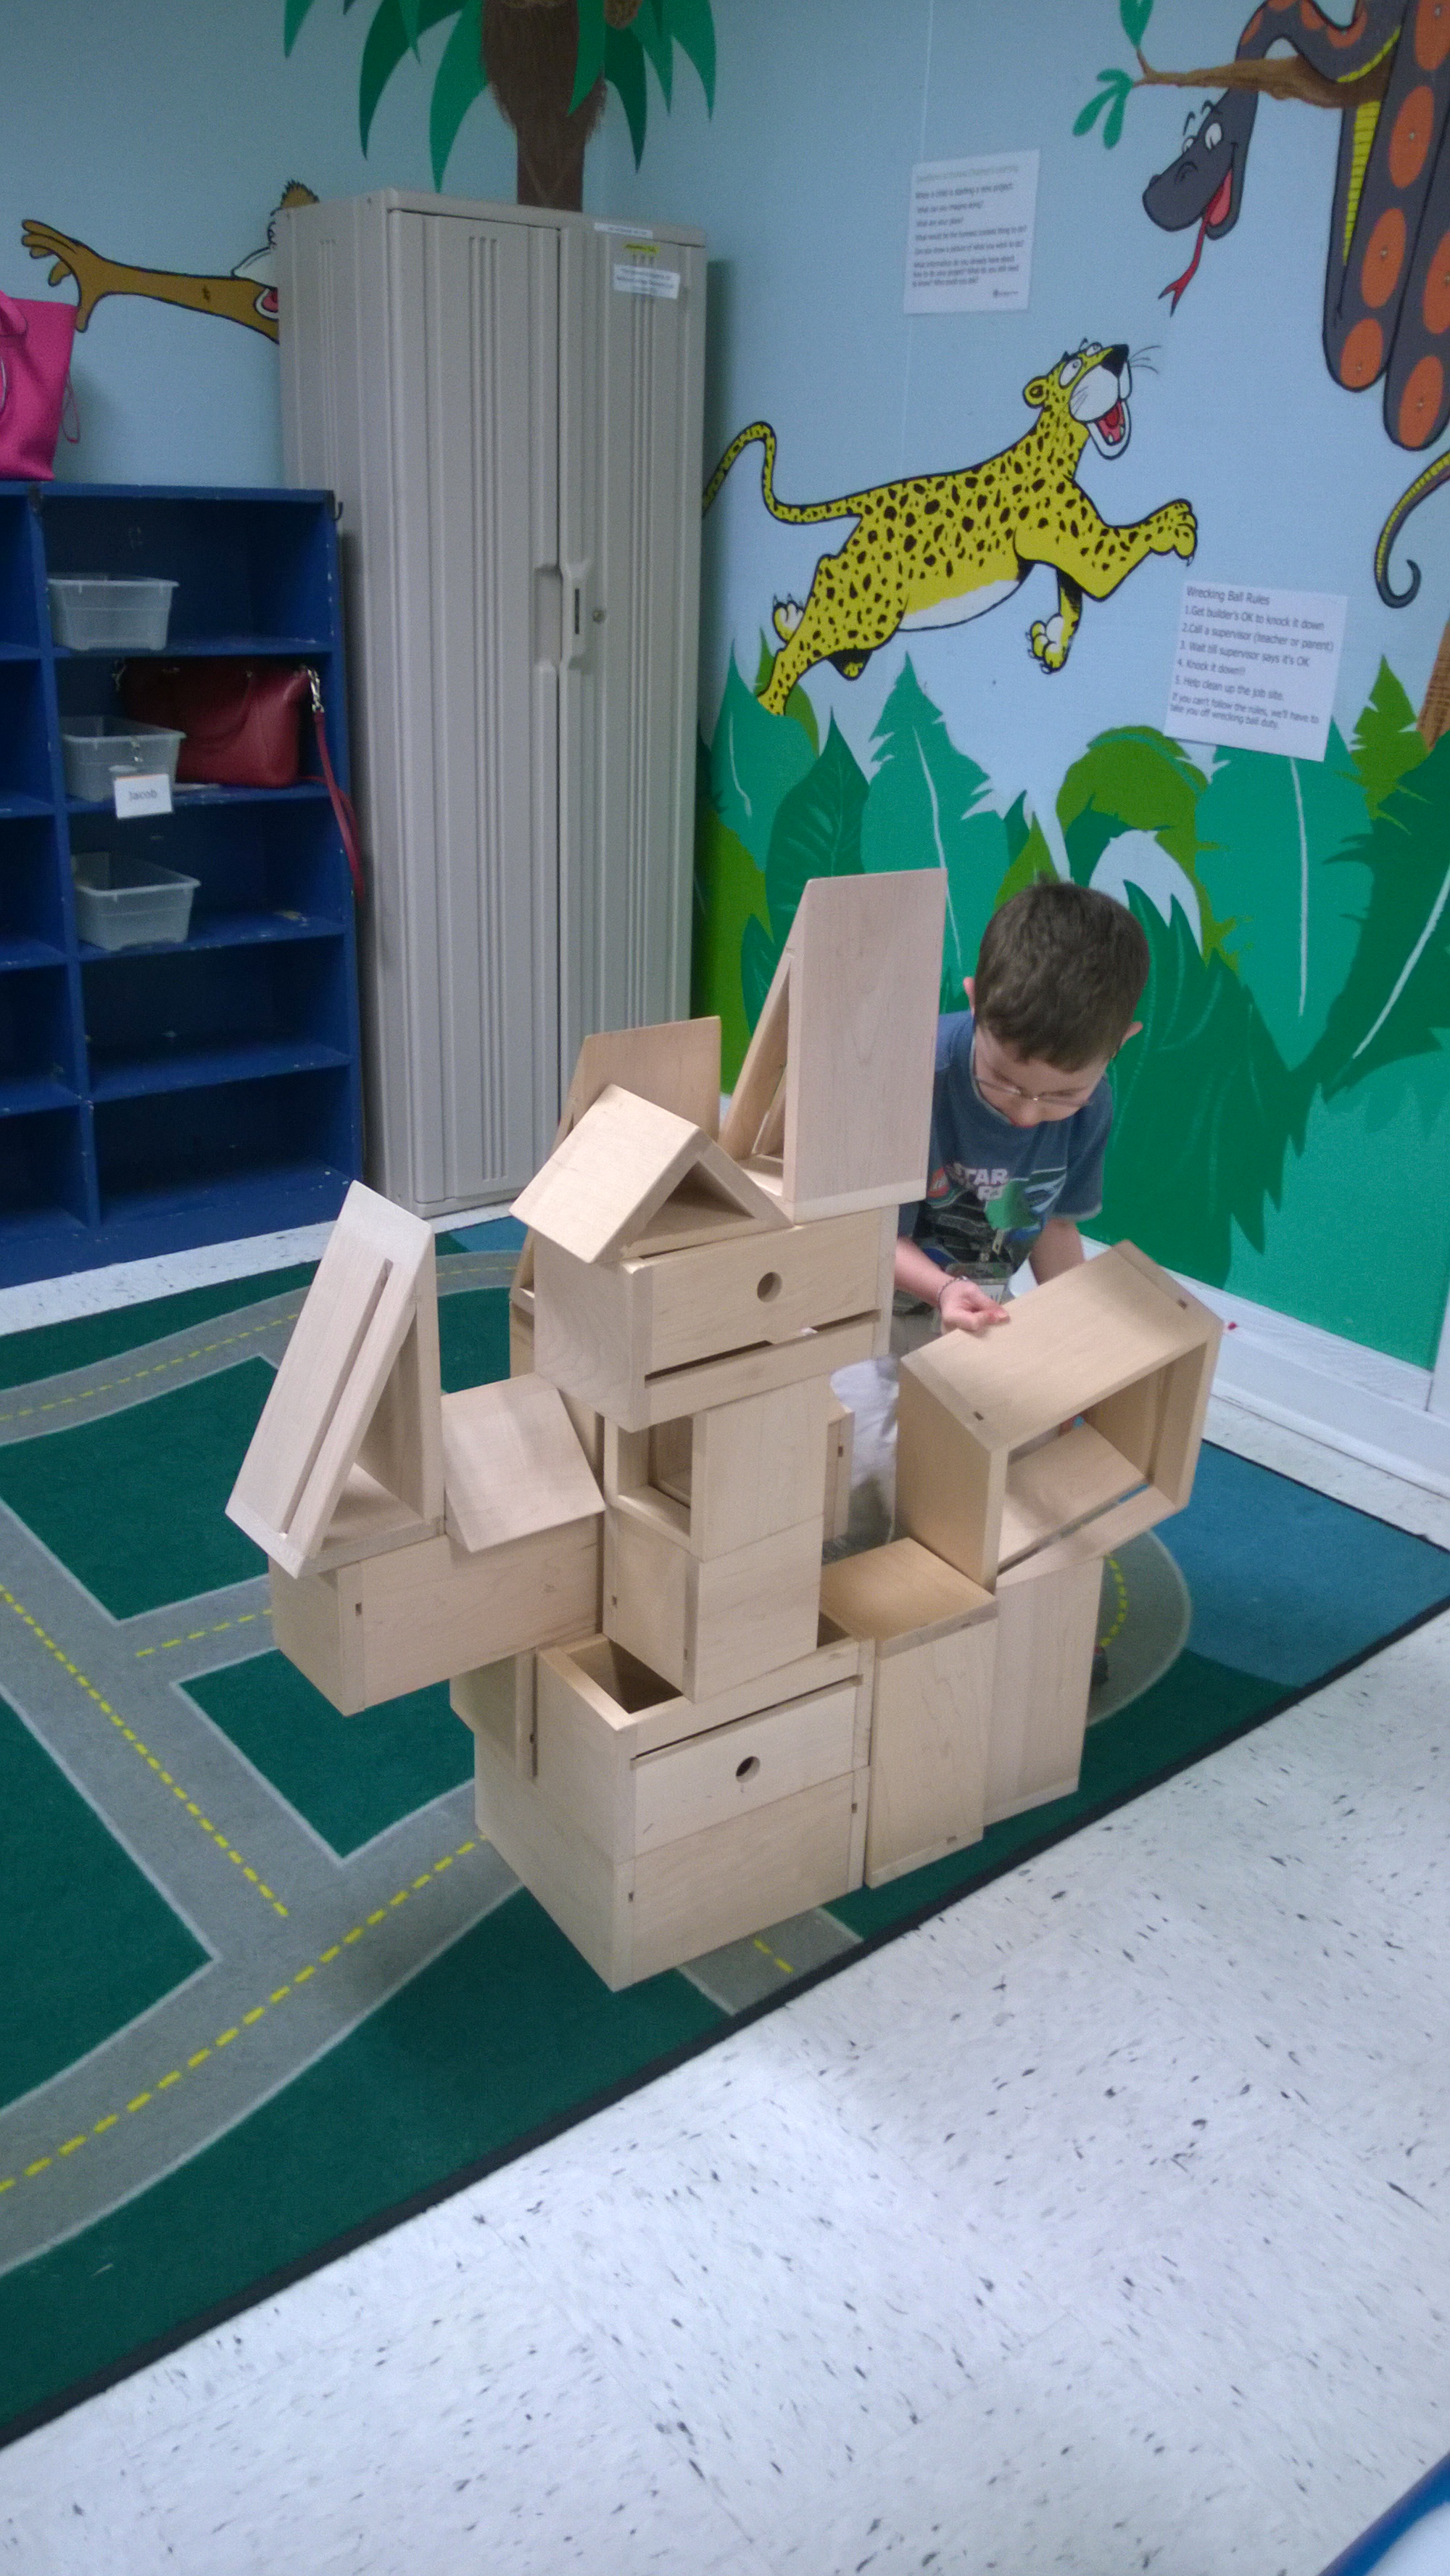
Note, if you have access to big blocks (wood, foam, or cardboard) I love the idea from Not Just Cute of taping out a pattern of blocks on the wall and having kids match that pattern.
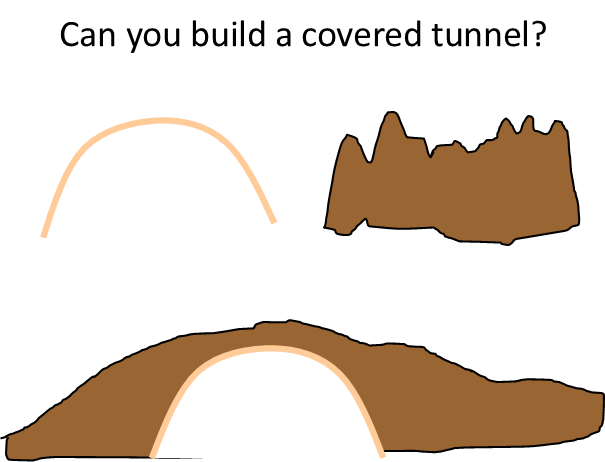
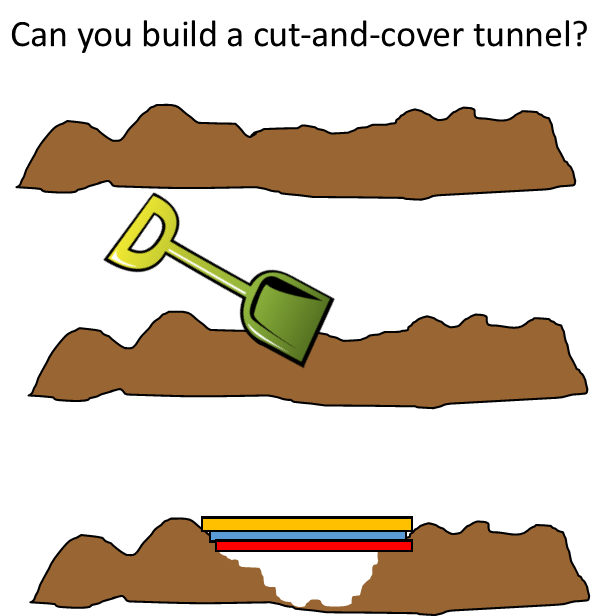
Tunnels in the Sensory Tub
We made a cloud dough with flour, cocoa powder and vegetable oil. It smells good, it’s somewhat moldable (like kinetic sand), it looks like dirt, and it won’t hurt you if you eat it. Last year, we placed it in the tub with rocks, dishes, and tongue depressors, so children could build bridges and tunnels. This year, we used curved arch blocks, and other blocks, plus added a picture of a few ways to build tunnels.


Bridges over the Water Table
We build a bridge with packing tape and jumbo craft sticks. (Tip – just lay the tape out flat on a table with the sticky side up – place all your sticks, then lay another piece of tape over the top to “sandwich” in the sticks. Tape that onto the water table.) Then we give them cars to drive over the bridge and boats to put below it.

Bridge the Gap
Or… sometimes we leave the water table empty, or place two tables with a gap between them and put out building toys and counting bears and challenge kids to find a way to build a bridge that will support 20 bears without falling down into the abyss. (You could also add this challenge to the binder clip zone.)


Building a Wind-Proof Structure
In the IMAX movie Dream Big, they showed a classroom project where kids were given paper or cardstock, and told to build a building that would withstand the wind. Then they tested them by placing them in front of a large fan (like the one we use for our wind tube), starting on the low setting, then adding more and more wind to see whether they could withstand it or would topple.
Igloos / Brick Walls
We have tried building igloos with sugar cubes and glue – it turns out that decorator icing works better. Place a good illustration of igloo building next to this for guidance. (Preschool age kids need to have context. Even if they’ve seen an igloo before, they may not be able to pull up an image of it just by you saying the word igloo. Having the picture helps them really grasp what you’re talking about.) Trying to build a domed igloo shape is really hard (the dome collapses), so we’ve moved from that to using sugar cubes to build brick walls – straight or curved. For extra fun, build on a clear platter, then put the completed structure on a light table with some liquid watercolors to drip on – it’s super cool how you can see the color wick through the crystalline structure of the sugar cubes! We thought this idea would end up with a pile of sugary goo, but it actually wasn’t that messy – the cubes mostly held their shape.


Rejected ideas
As we create our own curriculum, we come up with some activities that are fabulous. They meet all this criteria: fun, educational, adapt to a variety of ages and interest, and easy for us to set up and clean up. And sometimes we have some activities that are OK… but not fabulous – they may miss on some of those criteria. Here are a few we weren’t as happy with.
Pipe cleaners and straws: Kids could thread pipe cleaners through cut up straws, and then bend into various structures. (Idea from Meaningful Mama.)

I really liked this idea. I figured the three year olds would just enjoy sticking pipe cleaners through straws, our four and five year olds might make two dimensional shapes, and our six and seven year olds might make three dimensional shapes. The first year, the materials didn’t really capture kids’ imagination, so the second year, I put out a poster showing lots of examples of shapes they could make, and it still didn’t really engage any kids for very long. It might work better as a collaborative building project, like in this post from the Map is Not the Territory where they make interconnected cubes.
Another idea: Learning Resources has a Dive into Shapes, “Sea” and Build Geometry Set which looks like a fun toy for building structures. We chose not to get it for class because we prefer using materials that anyone can have at home to empower them to tinker at home, rather than purchasing specialty equipment. But you might want to check this out.
Arch Bridge. I made salt dough (1/2 cup salt, 1 cup flour, ~1 cup water), formed an arch, VERY carefully cut it into slices and baked it (250 for 2 hours). I was hoping it might be a stand-up arch bridge. It wasn’t. The pieces expanded just a little when cooking, but it was enough to distort the shapes so the bases would not stand. We did use it in class, but instead of being a cool upright structure, it was a math activity of put the pieces in order by number to make an arch. (We had a picture of a Roman arch bridge next to it so they saw what it related to.)

There are a few kits available of roman arches: Haba Roman Arch,
or the more expensive Montessori Roman Arch. We generally try to build most of our own materials rather than buying specialty products, but this may be one of those places that’s worth buying a product someone else has engineered.
Art
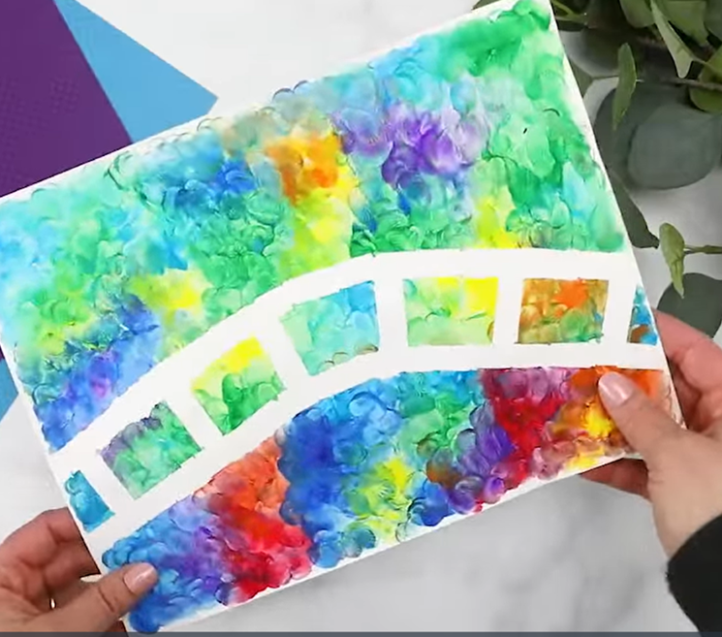
Monet-style Tape Resist Painting
This project is inspired by the Japanese bridge paintings by Monet. (see examples here and here) and by these posts from Crafty Classroom (source for image below), Arty Mommy and Tippy Toe Crafts.)
Prep: tape a bridge shape on paper. Kids dab paint all over it Monet style. After the paint dries, they remove the tape.
Nature / Imagination
Our spring quarter is a Biology / Inventions unit, where we talk about things from nature and biology and also talk about how that inspires human builders and inventors. This week, we brought in the idea of an animal that builds structures.
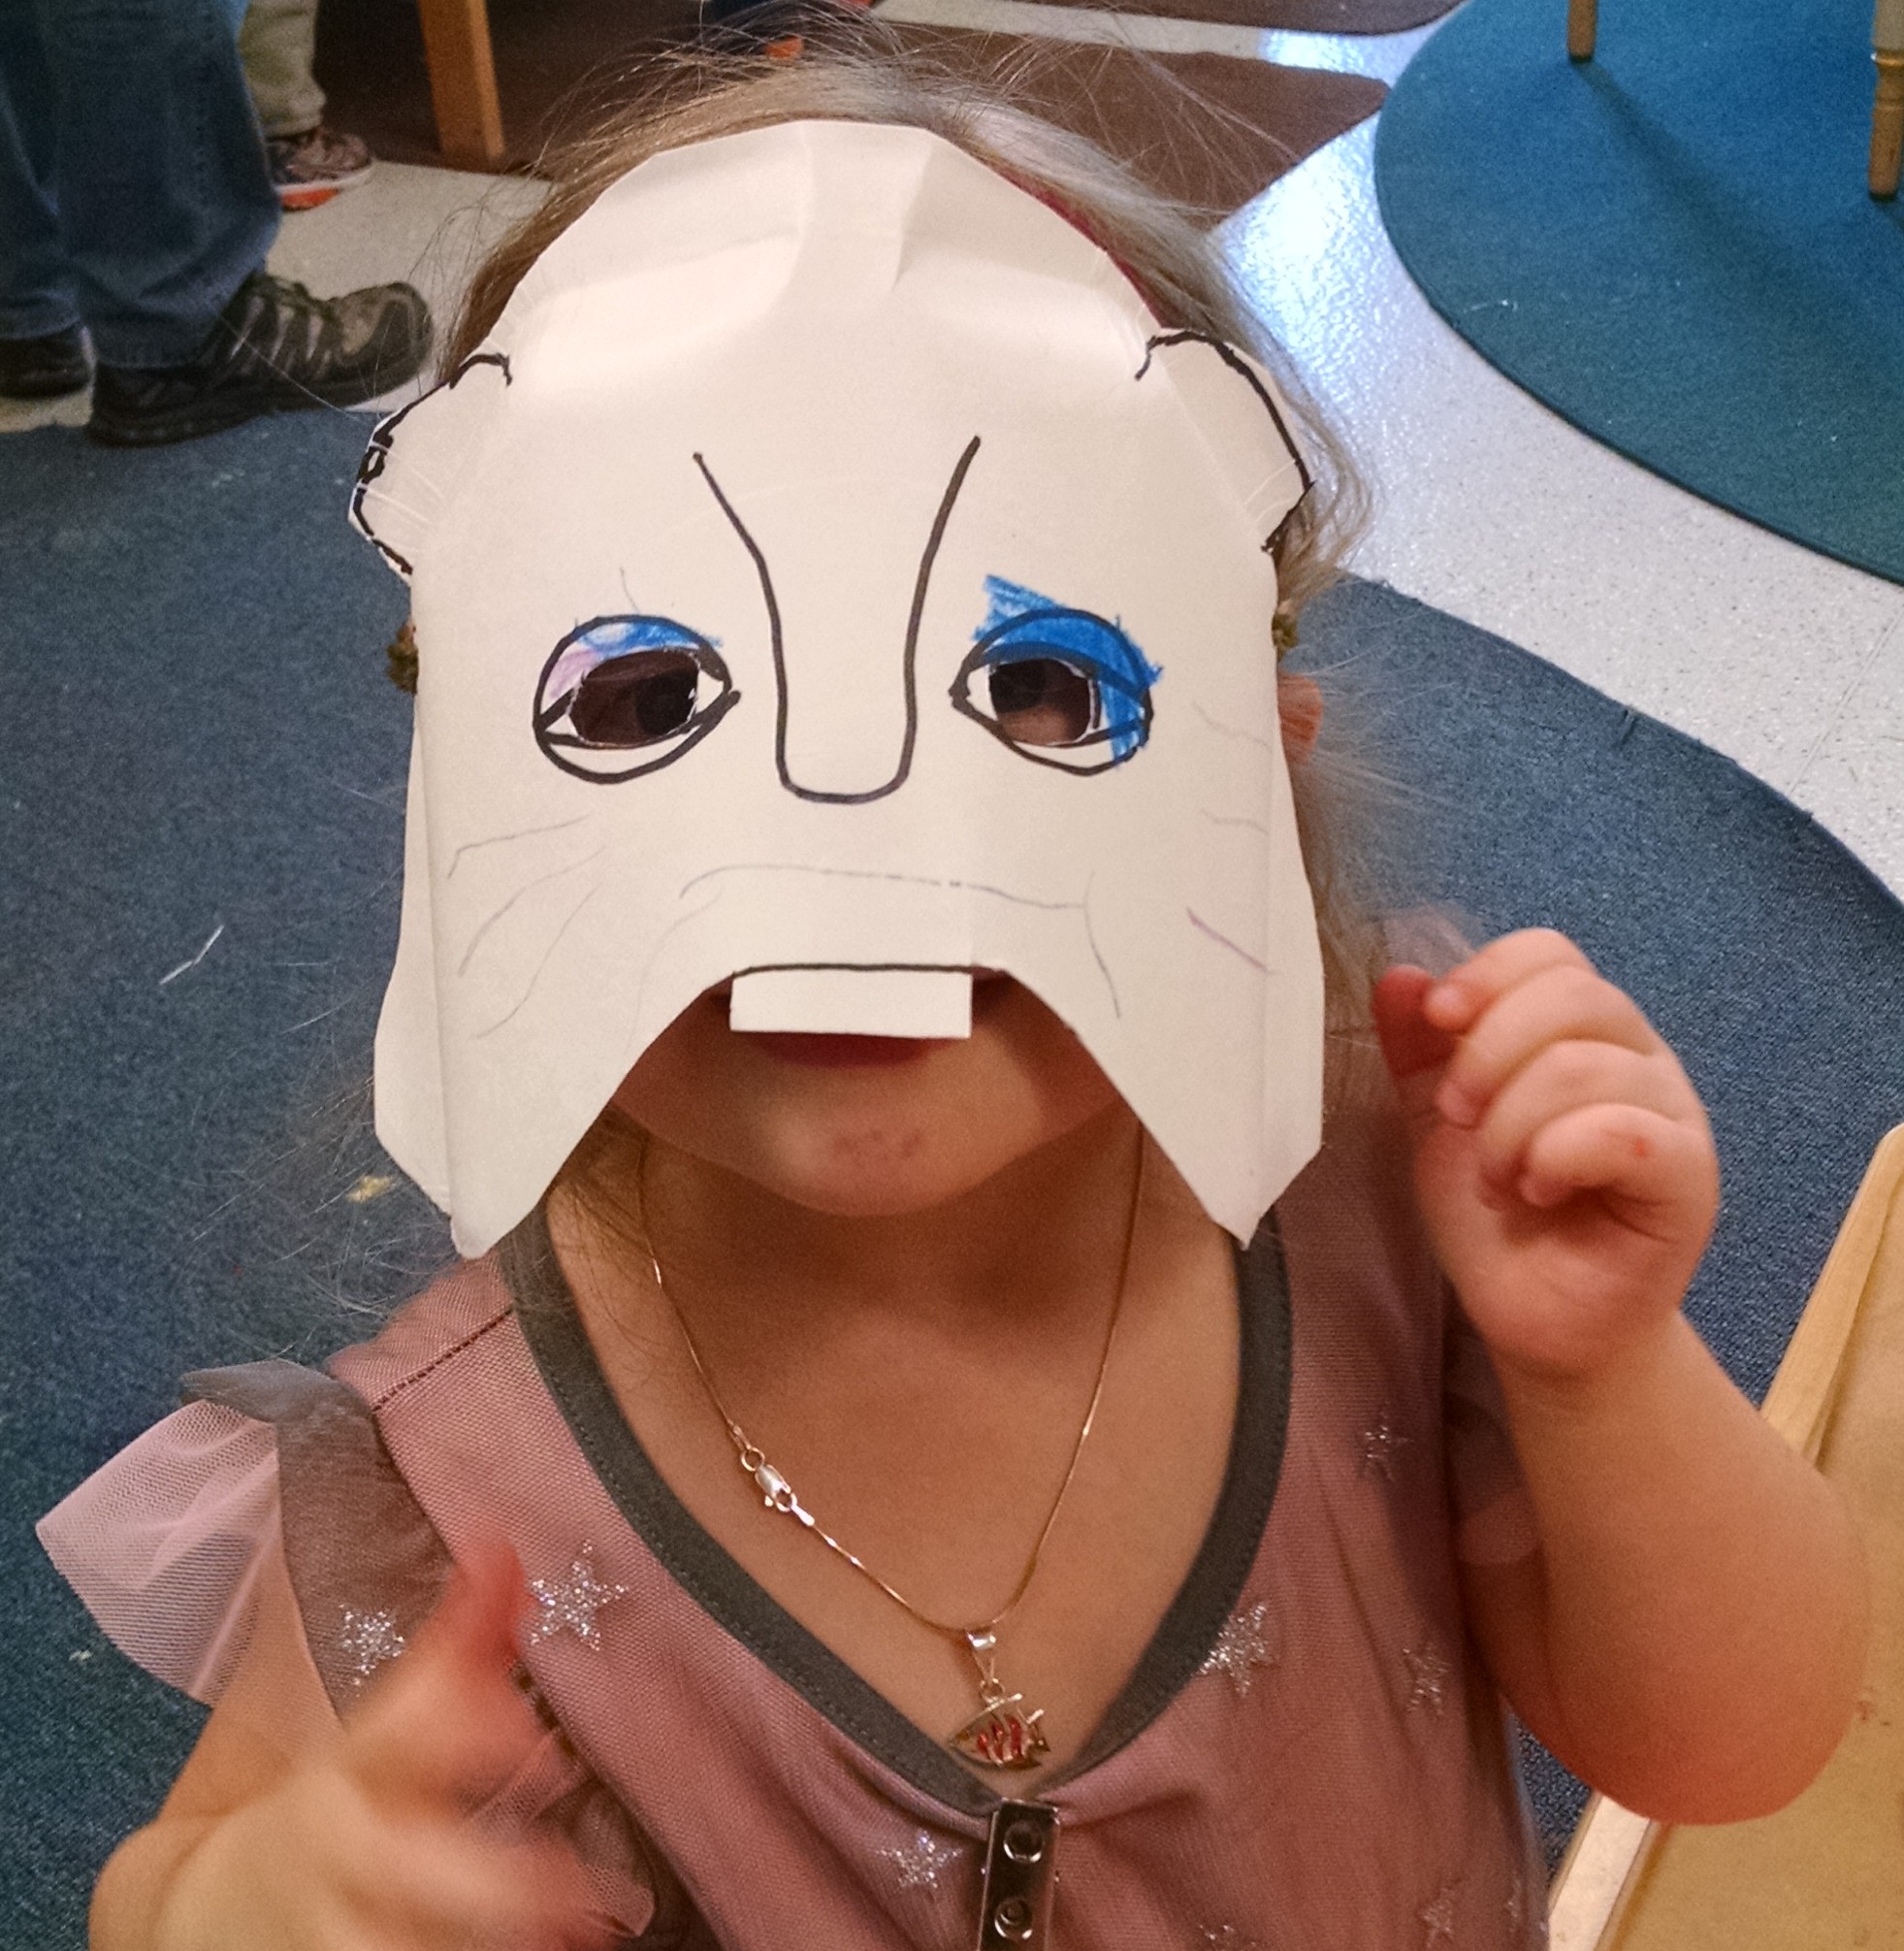
Beaver Masks: Teacher Cym designed beaver masks on paper plates, and cut them out. In class, kids could decorate them.
Be a beaver: We built a set of tongs with paint stirrers, and kids could pretend that was their beaver mouth, and move around “sticks” made with newspaper rolls to build a dam.

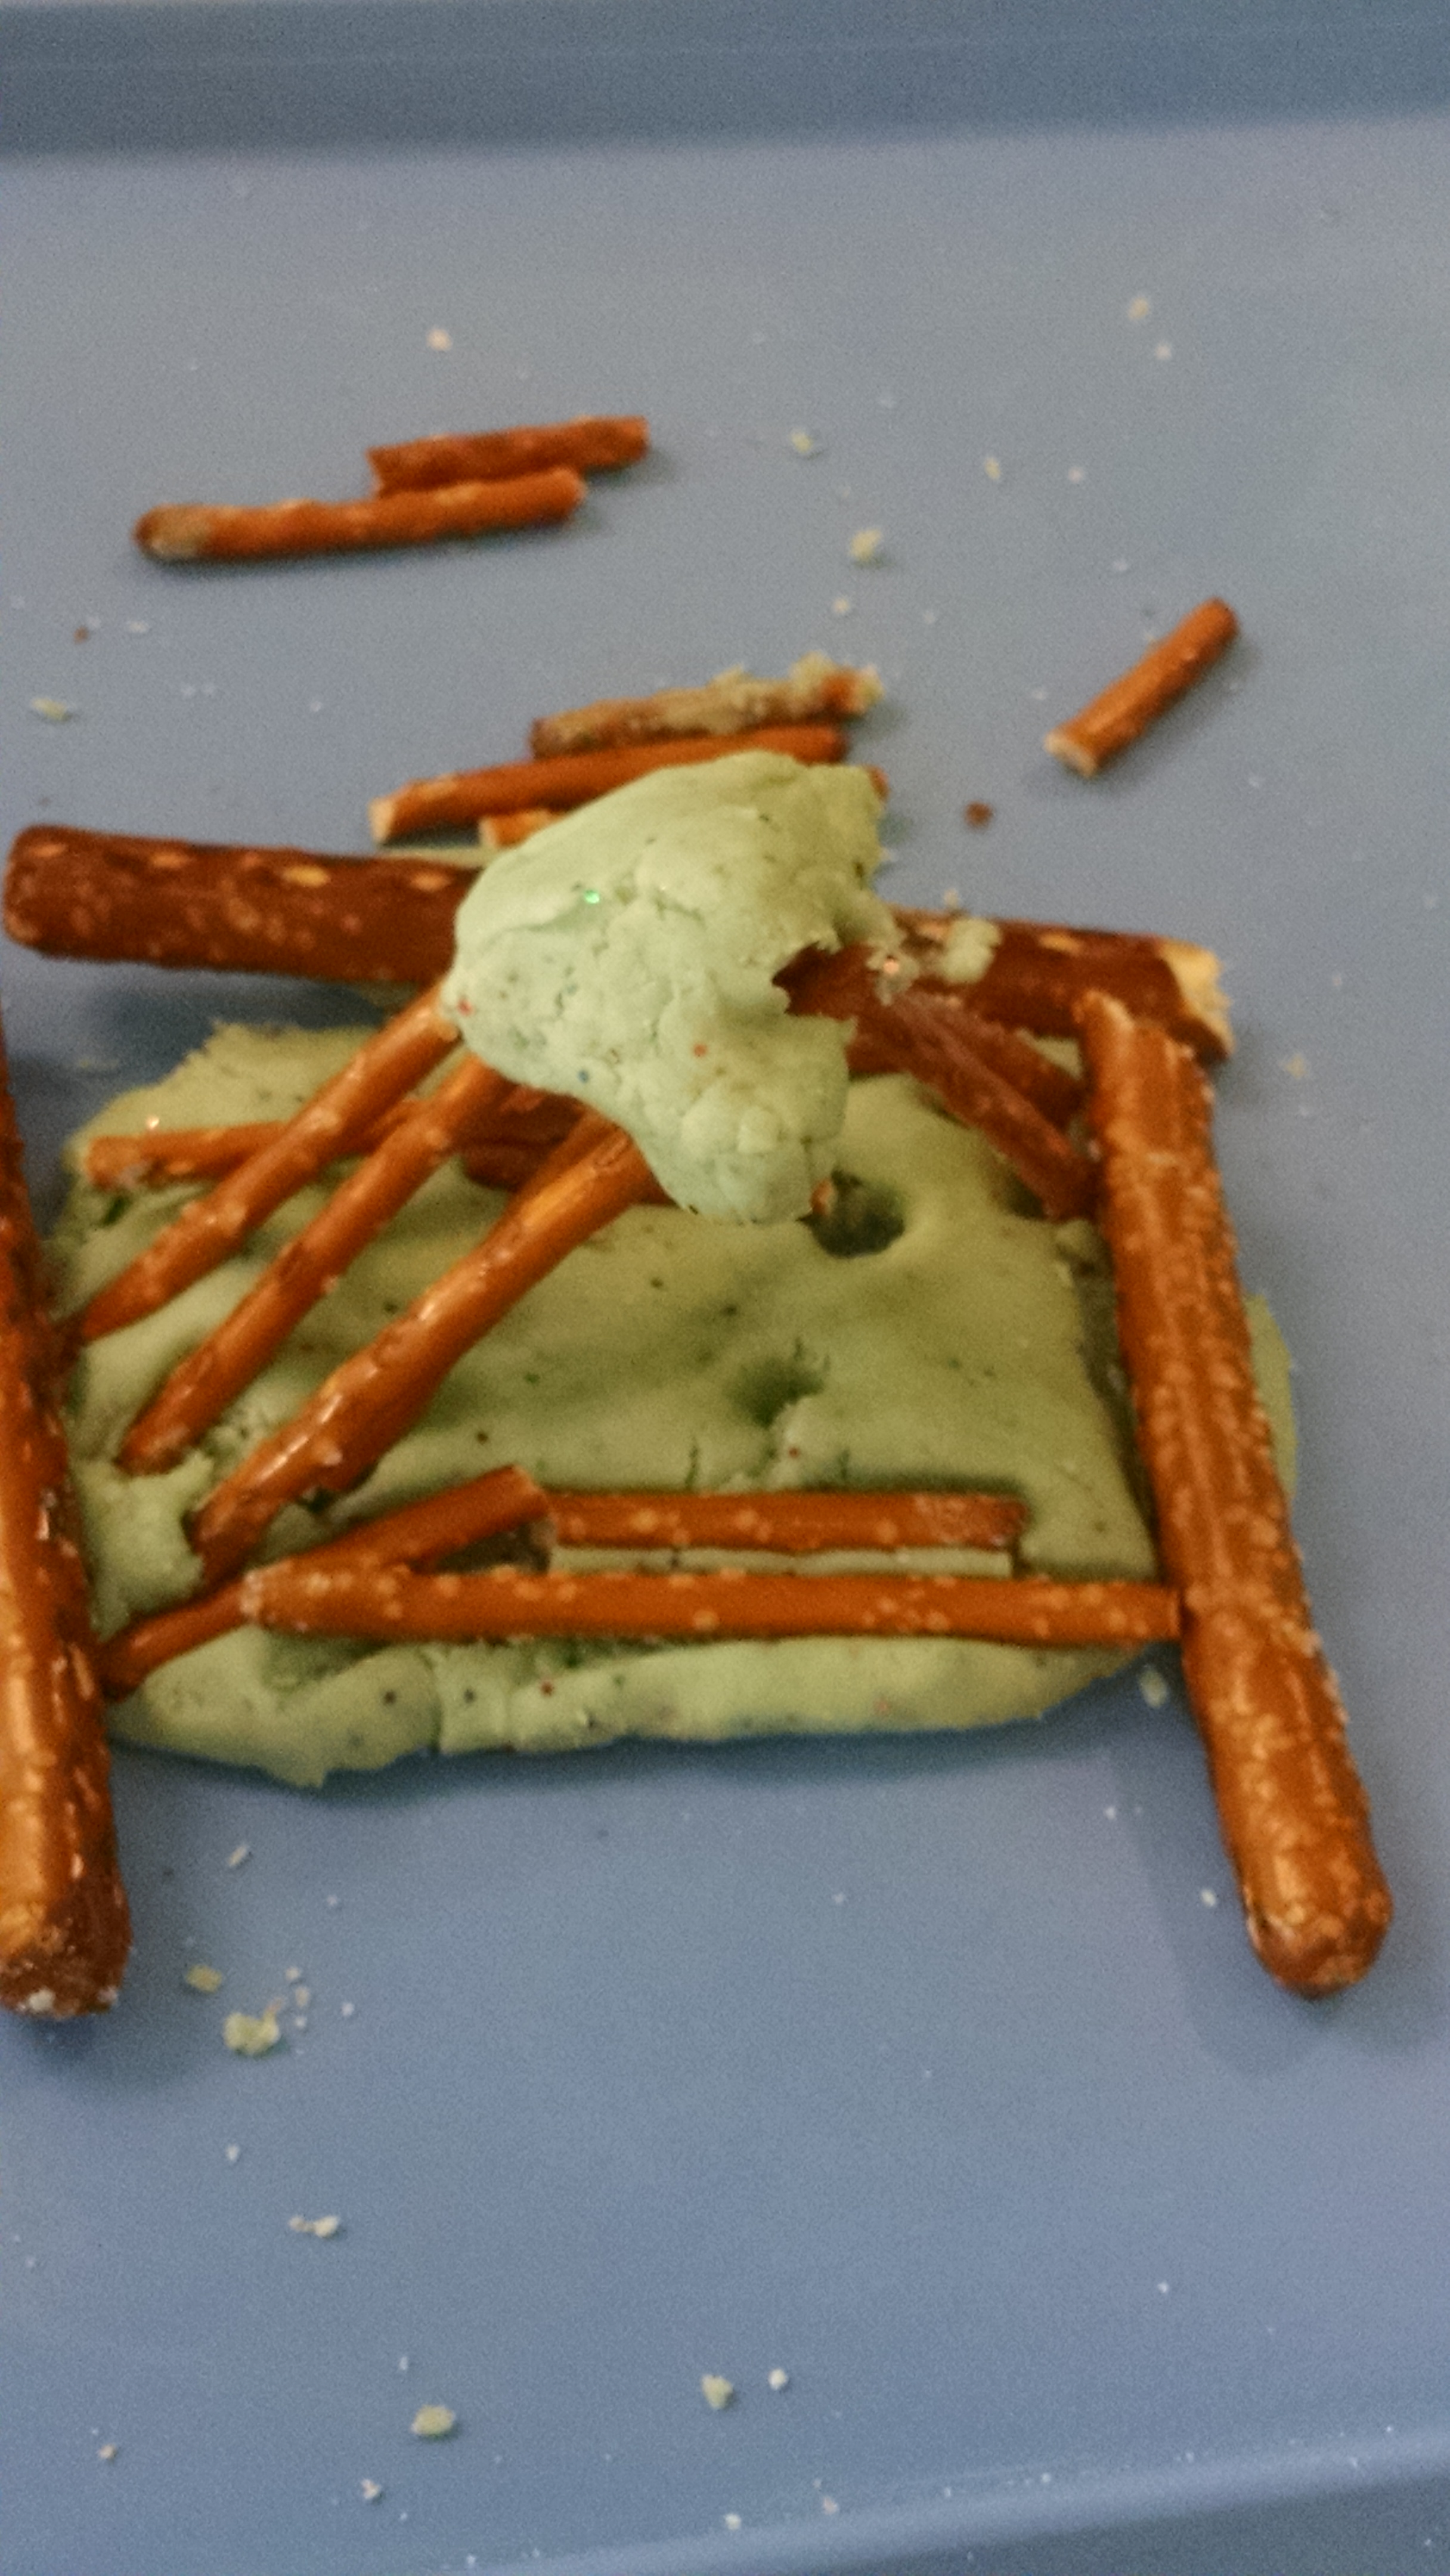
Build a beaver dam: One year, we put out paste (glue and flour mixed), spaghetti sticks, and “pebbles” (split peas and lentils) for kids to sculpt a beaver lodge or dam. This year, we used playdough, pretzel sticks, and pretzel rods. We had an illustration of a beaver dam nearby – again, the picture gives context and helps kids really understand the idea.

Building Forts
We give over one room to fort building for large motor, collaborative, imaginative play. We’ve done it with several different sets of supplies: newspaper trusses (learn how to make them), PVC pipes, giant tinker toys, and pop-up tunnels. Plus sheets and tablecloths, and some stuffed animal companions.


Circle Time
Bridges – Key concepts
Bridges are a challenging structure to build so we used them as a theme to focus our group times around.
We showed several pictures of different types of bridges, and then we asked why people build bridges. Reasons included: to go across water without having to swim or get wet, to go across a valley without having to go down the hill and up the hill (think railroad trestle), to go over a road (highway overpasses and pedestrian bridges). Different obstacles present different challenges. For example, the log across the stream works great, but what if the water you want to bridge is wider than any log you have? Building a bridge on pilings is great, but if the water is REALLY deep, that doesn’t work. (We have floating bridges in Seattle that all our kids are very familiar with.)
So we need to be able to build bridges with a variety of materials and a variety of methods. We asked them about their experience with building bridges with blocks and index cards – it’s all the same materials, but the construction methods / shapes make a big difference. We also talked about materials – asking if it would be better to build a bridge from paper or wood, or from plastic or metal.
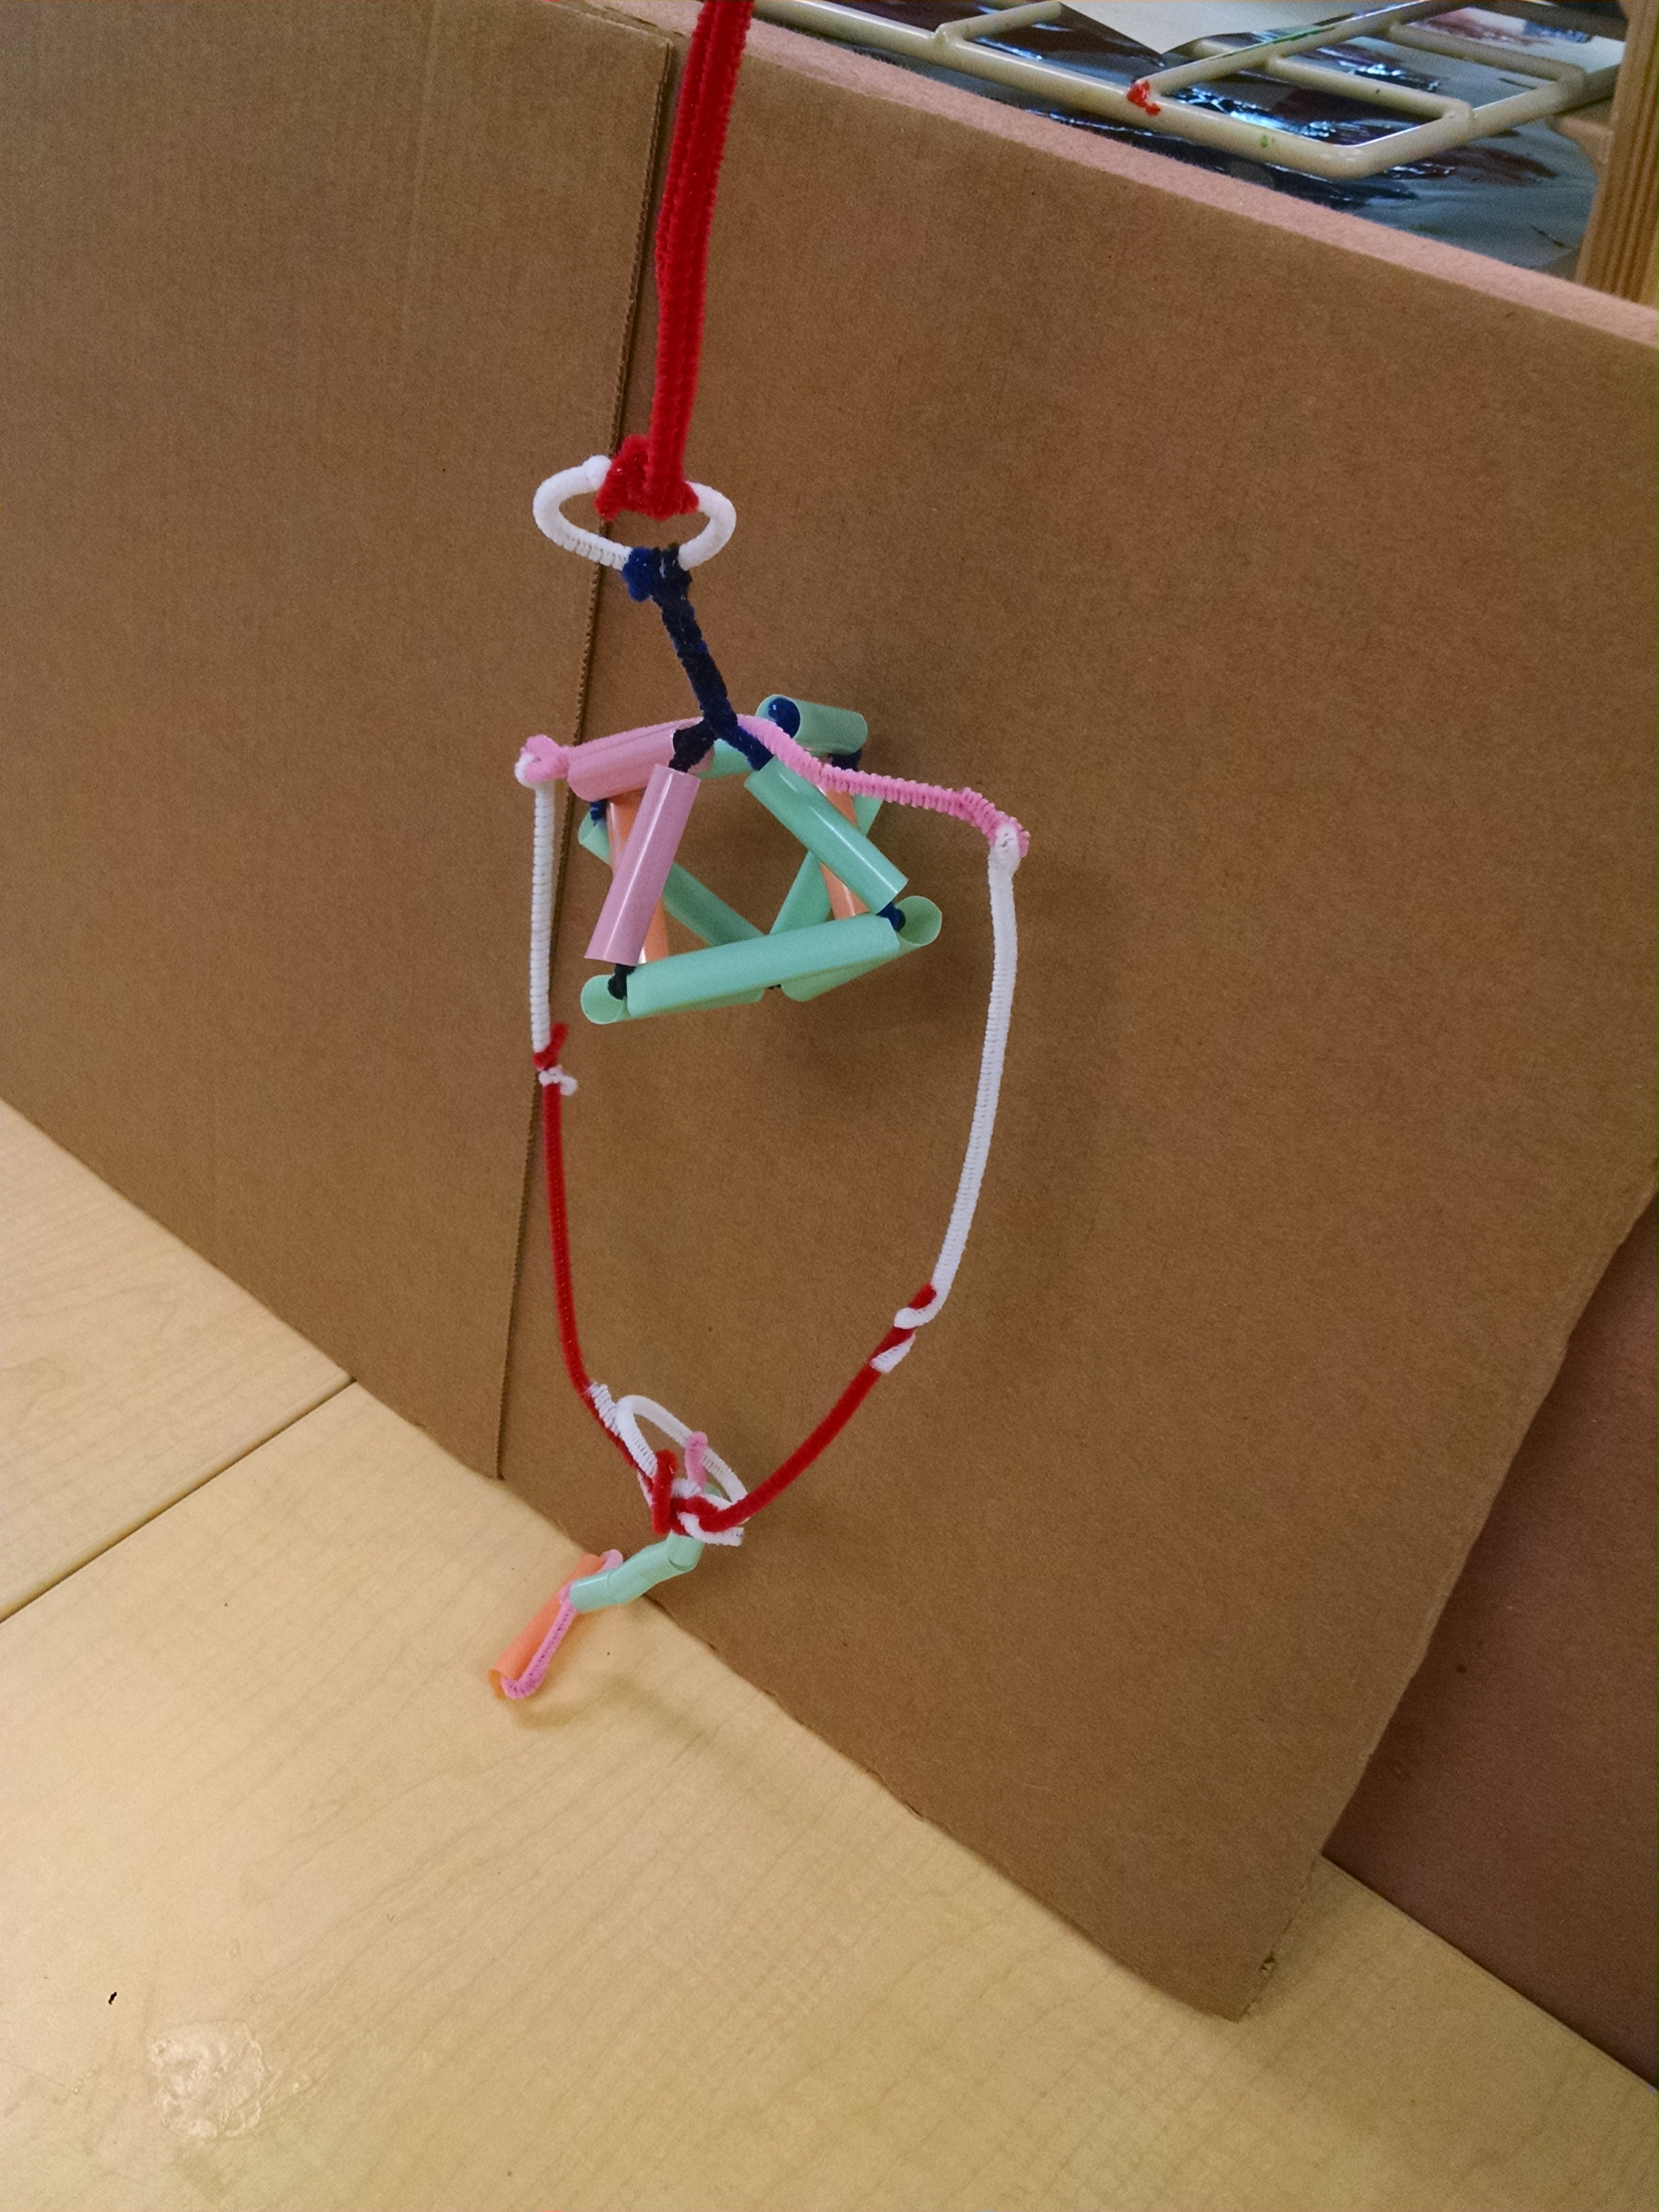
Suspension bridge: We demo’ed a simple suspension bridge, built with a cardboard deck, string, and paper clips. You can see the first version and the upgrade below.
If you’re working with 10 – 12 year olds, try this suspension bridge project.


Book – Build It
We read Build It!: Structures, Systems and You by Mason. (It’s also included in Motion, Magnets and More.) This series by Mason is a really great early science series which introduces key ideas from physical science at a level appropriate for 4 – 5 year olds. (I simplify / shorten the text of a few pages for my 3 year olds.) It introduces the ideas of different materials, different shapes, and different fasteners / construction techniques making things stronger.
Demo: What shape holds the most weight:
Take four pieces of paper or cardstock. Fold one in half to make a tent. Fold one into a triangle tower, one into a squat square, and one into a round column. (Option: you can add in fasteners – taping or stapling the shapes to make them stronger.) Ask your child which will hold the most weight, then test them. Watch this video from PBS’ Zoom to see this demo in action, except… they use a heavy book each time which crushes three out of four shapes. I would start with a thin lightweight book, which would crush the tent, but maybe not the triangle or the square. Then test the heavier book on that shape – it will crush it. Then test light book on round column, then heavy book. With one piece of cardstock folded in half and rolled into a column, we can routinely stack more than 40 books before it collapses!
Check out this video – it’s from an online class I taught and all the kids mics were muted, so you’ll only hear my co-teacher and I. But you can clearly see my folding methods. Then at the end, I include a brief clip from class so you can hear the energy that builds up with this activity!
Note: It’s important to do this as the final activity in group time because it gets everyone really riled up with excitement! You won’t be able to get them to settle down for a story after this.
One year our cardstock column held 50 books! (And we’re talking 200 page parenting books, not 50 kids’ paperbacks, all supported on one rolled up / taped piece of cardstock.) When the column finally collapsed, it was fascinating to see the result and how the paper collapsed in on itself in an accordion fold pattern!

Song – Build a Bridge
Teacher Cym wrote a song to the tune of “Johnny Comes Marching Home Again”
We’re going to build a bridge today, hurray! hurray!
We’re going to build a bridge today, hurray! hurray!
We’ll make it strong, we’ll make it straight,
We’ll see if it will hold the weight,
And we’ll all be learning together while we play.
Hurray!
We added more verses: …house… we’ll make it snug and safe and warm and so it can withstand a storm. … tunnel… we’ll dig the hole and add some light and make sure it is watertight… dam… we’ll design and build and know we’re on track if it can hold the water back.
Closing Circle
For the older kids (age 4 – 7), we read Iggy Peck, Architect, which is a delightful story of a boy who likes to build, who is discouraged by his teacher, until he saves the day by guiding his class in building a suspension bridge from shoelaces, fruit roll-ups and things. I’ve also created a matching game for Iggy Peck where children look at pictures of famous buildings and find the illustration in Iggy that relates to that building.
For the little kids (age 3), we read I Build with Blocks this year, but I prefer last year’s book, which was The Bridge Is Up, a nice cumulative read-along about all the vehicles who have to wait while the draw bridge is up. Then we taught them the rhyme Zoom Down the Freeway. (the lyrics on this page and the hand motions are the same we use, but I say it as a rhyme instead of singing it to the tune he uses.) Many of the parents and kids learned this rhyme in our toddler class, and recognized it from there.
Game: London Bridge is Falling Down
I like to bring in classic kids’ games where we can, and this was a nice opportunity. Two children make an arch, the rest of the kids line up and start going under the arch, then circling around to go under again. We sing the song, and whenever we get to “my fair lady”, the bridges drop their arms and capture someone, who then replaces one of the bridge supports and the game begins again.
More books
[look above for info on Build It!: Structures, Systems and You and Iggy Peck, Architect.
Nonfiction:
Dreaming Up: A Celebration of Building by Hale (Video read-aloud.) This is a great book! Each 2 page spread features a picture of a famous building and an illustration of a child building something like that building – using blocks or legos or toothpicks or such. Each page also has a poem about the building, using concrete poetry technique – the poems are in the shape of the building! (Here is an interview with the author where she talks more about the book.)

Look at That Building!: A First Book of Structures. A nice story that introduces fundamentals of buildings, like foundations, beams and frames. Too long to use in circle time, but worth a read.
Other books about buildings to consider: The World Is Not a Rectangle: A Portrait of Architect Zaha Hadid; 13 Buildings Children Should Know (this architecture series also has 13 skyscrapers… 13 Bridges, etc.); and Who Built That? Bridges: An Introduction to Ten Great Bridges and Their Designers (series also includes 10 Modern Buildings and 10 Skyscrapers.)
Cross a bridge, a nice age-appropriate, engaging non-fiction on bridges.
Bridges: Amazing Structures to Design, Build & Test is aimed at much older kids, but has some fun ideas for advanced bridge building projects.
Bridges Are to Cross. Very nice artwork depicting famous bridges around the world. Each page has a description of what bridges are for: “some carry llamas loaded with firewood across deep canyons, this bridge lets boats float under the road”. Has more details on each type of bridge in fine print. A fine book for the shelf.
Dig a Tunnel is a engaging preschool read about tunnels. Digging Tunnels
and Tunnels are also fine non-fiction choices, but Dig a Tunnel is my favorite of the 3.
Monsters Under Bridges. I wanted to love this book, a guidebook to the bridges of the Pacific Northwest. I only know one of these bridges well, but when I looked at those pages, they were not what I hoped for. In Seattle, under highway 99, we have a statue known as the Fremont troll. Where it appears in the book, it is mentioned as being one of many imaginary monsters here. I’d rather they just talked about the one Fremont troll and made it “real” instead of making up others that aren’t here.
London Bridge Is Falling Down which includes all the verses of the song, illustrated, plus music notation, plus (for adults or older kids) a section on the history of London Bridge. We read/sang it – it’s an old nursery rhyme, so the verses are a little odd in places… for example, they’ve put a guard on the bridge they need to keep awake, so the verse is “give him a pipe to smoke all night.”
Stories
The Little Red Fort by Maier, illus Sanchez. (Video preview.) Based on the classic Little Red Hen, Ruby is full of ideas for a fort – she asks her brothers to help – they say no over and over. In the end, when she’s built an amazing fort, they want to play. She says no until they have made their own great contributions to the project. I appreciate that it’s a Hispanic family that’s depicted (they are very under-represented in children’s literature in general and especially in the STEM field) and that her mother and abuela help her to build.
A Girl Can Build Anything by Charlton-Trujillo and Miller, illus Morris. I really like this book – “It starts with a vision. A sketch. A plan. You might find some wood. A hammer. A saw. With work, they could become…” and it walks through the process of women and girls building a community center and park. It’s great! But, I can’t use it in my classes which are mixed gender, and I don’t want to imply that boys can’t do all those things. But it could be a great source for parents of girls or Girl Scout leaders.
[affiliate links – learn about all these books on Amazon and buy if you choose, but remember most of these can be checked out from your library!]
Videos for Preview or Review
For 3 – 5 year olds, Peep and the Big Wide World: Bridge the Gap. For 4 – 6 year olds, What Make Bridges So Strong? by Sci Show Kids (3:44). For 6 and up: Bill Nye’s Structures episode – search YouTube for it.
Bridge Lesson Plans
PBS Building Big: http://www.pbs.org/wgbh/buildingbig/bridge/index.html
Links to more ideas: http://steminlibraries.com/2015/10/18/week-thirty-nine-beam-suspension-bridges/
Note: All the activities described in my posts are from Family Inventor’s Lab, a parent-child cooperative class in Bellevue, WA. We are a play-based, STEM focused class for preschool through early elementary (kids age 3 – 7). We do a wide variety of fun, hands-on activities to learn about Science, Tools, Engineering, Nature, and Art. We also sing songs and read stories. Most of our activities are cheap, easy, and use everyday materials that most families would have in their homes (or their recycle bins!), so that our activities are appropriate for classroom teachers, parents who homeschool, or after school programs.

[…] to eat it! and it smells good. See pictures on my other blog, Inventors of Tomorrow, here and here.) If you want to shape it more, use more […]
LikeLike
[…] Towers, Bridges & Tunnels, If I Built a House, Contraptions and Rube […]
LikeLike
[…] Theme: Bridges […]
LikeLike
[…] Theme: Bridges […]
LikeLike
[…] of our favorite books to read aloud at our Family Inventors’ Lab. We read it when we study Structures during our Engineering unit. It’s the right length for a read-aloud, great illustrations, […]
LikeLike
[…] materials, and some suggested ideas, and perhaps a goal, and can create anything they want. (index card bridges, the launch zone, the egg drop or engineering a boat that […]
LikeLike
[…] Engineering: Tunnels and bridges. Build structures with food: provide toothpicks and cheese cubes or grapes or cubes of French bread or melon balls or marshmallows, let children build their structures, then dismantle and eat. […]
LikeLike
[…] our bridges and tunnels week, we use cloud dough, round wooden blocks to build tunnels around, and plastic animals to live […]
LikeLike
[…] A bridge made of craft sticks – we use this in our class on Bridges and Tunnels […]
LikeLike
[…] Give kids toothpicks and something to stick them into (grapes? apple chunks? cheese squares? marshmallows? gum drops?) and let them build. […]
LikeLike
[…] 11 week engineering unit, we study Simple Machines, Electricity, Ways to Build Tall Structures and Strong Structures, Building Houses and Cars and Contraptions. We begin the unit by discussing the engineering […]
LikeLike
[…] what will fly in the wind, what is heavy, what is light, what is strong, what is fragile, how to build stronger structures, taller structures, something that is waterproof, something that will crash-proof an […]
LikeLike
[…] We also use lots of other things to build with – just get creative: plastic cups, straws, pipe cleaners, toilet paper tubes and cardboard, gum drops and toothpicks, raw spaghetti and marshmallows, sugar cubes, cereal boxes, PVC pipes, rolled up newspapers, and more. (Check out our lesson plans for towers and structures.) […]
LikeLike
[…] If you want more building ideas, check out my post on structures. […]
LikeLike
[…] robot, kids will use some of the engineering skills they learned when they built towers and strong structures. Sometimes an initial design requires refinement, like this robot who started with two triangular […]
LikeLike
[…] boxes, PVC pipes, rolled up newspapers, binder clips and craft sticks and more. (Check out our Building Structures lesson […]
LikeLike
[…] we study Towers and Structures, we build with LOTS of different materials. One of my favorites is plastic […]
LikeLike
[…] session, we work to build a structure that’s as strong as possible. You can read the full Structures Lesson Plan here. In this post, I’ll just share some samples of materials we use in our […]
LikeLike
[…] to build structures with – building toys (Lego, wooden blocks, K’nex, etc.), […]
LikeLike
[…] boxes, PVC pipes, rolled up newspapers, binder clips and craft sticks and more. (Check out our Building Structures lesson plan.) And, of course, classic wood […]
LikeLike
[…] another great book with Hispanic characters, check out The Little Red Fort, which I review in my structures […]
LikeLike
[…] are some fun building themed activities your child might enjoy and some great ideas for a construction themed birthday […]
LikeLike
[…] it smells like brownies, but without the sugar, it doesn’t taste like them!) See pictures in tunnels […]
LikeLike
[…] Structures – after we learned how to build tall, this week we work on building strong and stable. To […]
LikeLike